Whirlpool KDRP407HSS Use and Care Guide - Page 19
General Cleaning - oven not working
 |
View all Whirlpool KDRP407HSS manuals
Add to My Manuals
Save this manual to your list of manuals |
Page 19 highlights
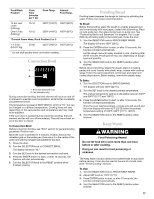
How the Cycle Works IMPORTANT: The heating and cooling of porcelain on steel in the oven may result in discoloring, loss of gloss, hairline cracks and popping sounds. The Self-Cleaning cycle uses very high temperatures, burning soil to a powdery ash. The oven is preset for a 3 hour 30 minute clean cycle. Once the oven has completely cooled, remove ash with a damp cloth. Do not wipe down any of the inside surfaces until the oven has completely cooled down. Applying a cool damp cloth to the inner door glass before it has cooled completely could result in the glass breaking. The oven light will not work during the Self-Cleaning cycle. To Self-Clean: Before self-cleaning, make sure the door is closed completely or it will not lock and the cycle will not begin. 1. Turn the SELECTOR knob to CLEAN. 2. Turn the SET knob to "On." 3. Press the ENTER button to start a preset non-adjustable 3 hour 30 minute cycle. To Delay Start Self-Clean: Before delay starting Self-Clean, make sure the clock is set to the correct time of day. See "Clock" section. Also, make sure the door is closed completely or it will not lock and the cycle will not begin. 1. Turn the SELECTOR knob to CLEAN. 2. Turn the SET knob to "On." 3. Press the ENTER button to start a preset non-adjustable 3 hour 30 minute cycle. 4. Press the ENTER button twice. The time the cycle will end is displayed and the STOP TIME LED will blink. 5. Turn the SET knob to STOP TIME. 6. Press the ENTER button. The DURATION and STOP TIME arrow will glow. To Stop Self-Clean any time: Turn the SELECTOR knob to the RESET position or press the CANCEL button. If the oven temperature is too high, the door will remain locked. It will not unlock until the oven cools. General Cleaning IMPORTANT: Before cleaning, make sure all controls are off and the oven and cooktop are cool. Always follow label instructions on cleaning products. Soap, water and a soft cloth or sponge are suggested first unless otherwise noted. EXTERIOR PORCELAIN ENAMEL SURFACES Food spills containing acids, such as vinegar and tomato, should be cleaned as soon as the entire appliance is cool. These spills may affect the finish. s Glass cleaner, mild liquid cleaner or nonabrasive scrubbing pad: Gently clean around the model and serial number plate because scrubbing may remove numbers. STAINLESS STEEL Do not use soap-filled scouring pads, abrasive cleaners, Cooktop Polishing Creme, steel-wool pads, gritty washcloths or some paper towels. Damage may occur. Rub in direction of grain to avoid damaging. s Stainless Steel Cleaner & Polish (not included): See "Assistance or Service" section to order. s Liquid detergent or all-purpose cleaner: Rinse with clean water and dry with soft, lint-free cloth. s Vinegar for hard water spots PORCELAIN-COATED GRATES AND CAPS Food spills containing acids, such as vinegar and tomato, should be cleaned as soon as the cooktop, grates and caps are cool. These spills may affect the finish. To avoid chipping, do not bang grates and caps against each other or hard surfaces such as cast iron cookware. Do not reassemble caps on burners while wet. Do not clean in the Self-Cleaning cycle. Do not clean in dishwasher. s Nonabrasive plastic scrubbing pad and mildly abrasive cleanser: Clean as soon as cooktop, grates and caps are cool. SURFACE BURNERS Sealed Burner models See "Sealed Surface Burners" section. COOKTOP CONTROLS Do not use steel wool, abrasive cleansers or oven cleaner. Do not soak knobs. When replacing knobs, make sure knobs are in the OFF position. On some models, do not remove seals under knobs. NOTE: When replacing knobs after cleaning either the surface burner controls or the grille module control, make sure the knobs are replaced to the correct location. For example, the knobs for the surface burner controls will read "LITE," while the knob for the grille will read "LITE/HI." s Soap and water or dishwasher: Pull knobs straight away from control panel to remove. CONTROL PANEL Do not use abrasive cleaners, steel-wool pads, gritty washcloths or some paper towels. Damage may occur. s Soap and water. Wash, rinse and dry with a soft cloth. s Glass cleaner and soft cloth or sponge: Apply glass cleaner to soft cloth or sponge, not directly on panel. 19
-
 1
1 -
2
-
3
-
4
-
5
-
6
-
7
-
8
-
9
-
10
-
11
-
12
-
13
-
 14
14 -
 15
15 -
 16
16 -
 17
17 -
 18
18 -
 19
19 -
 20
20 -
 21
21 -
 22
22 -
 23
23 -
 24
24 -
25
-
26
-
27
-
28
-
29
-
30
-
31
-
32
-
33
-
34
-
35
-
36
-
37
-
38
-
39
-
40
-
41
-
42
-
43
-
44
-
45
-
46
-
47
-
48
 |
 |