Yamaha C961 Owners Manual - Page 11
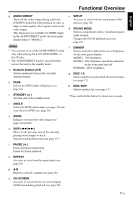
English, AUDIO DIRECT, Numeric buttons 0-9, STANDBY, ANGLE, PAUSE, REPEAT, ON SCREEN, SETUP
 |
UPC - 027108928432
View all Yamaha C961 manuals
Add to My Manuals
Save this manual to your list of manuals |
Page 11 highlights
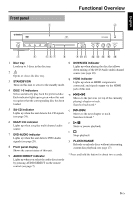
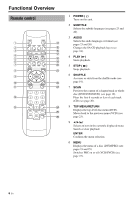
English Functional Overview q AUDIO DIRECT Turns off the video output during audio disc (CD/DVD-Audio/SA-CD) playback in order to improve audio quality. Press again to turn on the video output. This function is not available for HDMI output. In the AUDIO DIRECT mode, the front panel display dims to "MODE 2". Notes • You can turn on or off the AUDIO DIRECT mode only when playing back CD, DVD-AUDIO, or SA-CD disc. • The AUDIO DIRECT mode is canceled when you set this unit to the standby mode. w Numeric buttons (0-9) Selects numbered items in the currently displayed menu. e PAGE Selects the DVD-Audio still picture (see page 24). r STANDBY ( ) Sets this unit to the standby mode. t ANGLE Selects the DVD camera angle (see page 23) and scan effect for JPEG (see page 26). y ZOOM Enlarges or lessens the video image (see pages 22 and 26). u SKIP (l22 / 33l) Moves to the previous (top of the currently playing)/next chapter or track. Searches backward/forward (see page 17).* i PAUSE ( 8 ) Pauses playback temporarily. Frame-by-frame playback. o REPEAT Accesses or exits from the repeat mode (see page 18). p A-B Repeats a specific segment (see page 18). a ON SCREEN Accesses or exits from the on-screen display (OSD) menu during playback (see page 20). s SETUP Accesses or exits from the setup menu of this unit (see page 28). d SOUND MODE Selects a sound mode: stereo, virtual surround or multi-channel. Changes the SA-CD playback area (see page 24). f DIMMER Selects from three different levels of brightness for the front panel display: MODE 1: 70% brightness MODE 2: 40% brightness and all the indicators on the front panel turn off. NORMAL: 100% brightness g DISC 1-5 Selects and directly plays back the preferred disc (see page 17). h DISC SKIP Selects another disc (see page 17). * Press and hold the button for about two seconds. 7 En
-
 1
1 -
2
-
3
-
4
-
5
-
 6
6 -
 7
7 -
 8
8 -
 9
9 -
 10
10 -
 11
11 -
 12
12 -
 13
13 -
 14
14 -
 15
15 -
 16
16 -
17
-
18
-
19
-
20
-
21
-
22
-
23
-
24
-
25
-
26
-
27
-
28
-
29
-
30
-
31
-
32
-
33
-
34
-
35
-
36
-
37
-
38
-
39
-
40
-
41
-
42
-
43
-
44
-
45
-
46
-
47
-
48
-
49
-
50
-
51
 |
 |
