Yamaha CLP-120 Owner's Manual - Page 55
Connecting the computer, s USB port to the Clavinova viaUSB interface, such as, the UX256, UX96 - user manual
 |
View all Yamaha CLP-120 manuals
Add to My Manuals
Save this manual to your list of manuals |
Page 55 highlights
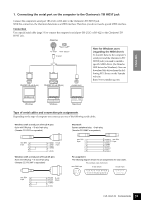
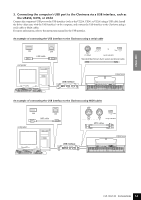
ENGLISH 3. Connecting the computer's USB port to the Clavinova via a USB interface, such as the UX256, UX96, or UX16 Connect the computer's USB port to the USB interface (such as the UX256, UX96, or UX16) using a USB cable. Install the driver (that came with the USB interface) on the computer, and connect the USB interface to the Clavinova using a serial cable or MIDI cables. For more information, refer to the instruction manual for the USB interface. An example of connecting the USB interface to the Clavinova using a serial cable computer USB cable PC-1 or Mac TO HOST HOST SELECT Standard Machintosh 8-pin system peripheral cable USB interface Clavinova MIN MAX MASTER VOLUME MELLOW BRIGHT BRILLIANCE START/ STOP TEMPO FUNCTION DEMO METRONOME TEMPO / FUNCTION TEMPO/ OTHER VALUE - / NO +/ YES PRESET USER 1 USER 2 USER 3 TRACK 1 TRACK 2 START/ STOP REC SONG GRAND PIANO 1 GRAND PIANO 2 E.PIANO 1 E.PIANO 2 HARPSICHORD E.CLAVICHORD VIBRAPHONE VARIATION CHURCH ORGAN JAZZ ORGAN STRINGS CHOIR GUITAR WOOD BASS E.BASS SPLIT VOICE ROOM CHORUS HALL 1 PHASER HARD HALL 2 TREMOLO MEDIUM STAGE DELAY SOFT ON REVERB EFFECT TOUCH TRANSPOSE POWER An example of connecting the USB interface to the Clavinova using MIDI cables computer USB cable MIDI MIDI HOST SELECT OUT IN MIDI cables USB interface Clavinova MIN MAX MASTER VOLUME MELLOW BRIGHT BRILLIANCE START/ STOP TEMPO FUNCTION DEMO METRONOME TEMPO / FUNCTION TEMPO/ OTHER VALUE - / NO +/ YES PRESET USER 1 USER 2 USER 3 TRACK 1 TRACK 2 START/ STOP REC SONG GRAND PIANO 1 GRAND PIANO 2 E.PIANO 1 E.PIANO 2 HARPSICHORD E.CLAVICHORD VIBRAPHONE VARIATION CHURCH ORGAN JAZZ ORGAN STRINGS CHOIR GUITAR WOOD BASS E.BASS SPLIT VOICE ROOM CHORUS HALL 1 PHASER HARD HALL 2 TREMOLO MEDIUM STAGE DELAY SOFT ON REVERB EFFECT TOUCH TRANSPOSE POWER CLP-130/120 Connections 55
-
 1
1 -
2
-
3
-
4
-
5
-
6
-
7
-
8
-
9
-
10
-
11
-
12
-
13
-
14
-
15
-
16
-
17
-
18
-
19
-
20
-
21
-
22
-
23
-
24
-
25
-
26
-
27
-
28
-
29
-
30
-
31
-
32
-
33
-
34
-
35
-
36
-
37
-
38
-
39
-
40
-
41
-
42
-
43
-
44
-
45
-
46
-
47
-
48
-
49
-
 50
50 -
 51
51 -
 52
52 -
 53
53 -
 54
54 -
 55
55 -
 56
56 -
 57
57 -
 58
58 -
 59
59 -
 60
60 -
61
-
62
-
63
-
64
-
65
-
66
-
67
-
68
-
69
-
70
-
71
-
72
-
73
-
74
-
75
-
76
-
77
-
78
-
79
-
80
 |
 |
