Yamaha DSP-A1 Owner's Manual - Page 32
DOLBY, If the function 1A. CENTER SP in the SET MENU mode - display fix
 |
View all Yamaha DSP-A1 manuals
Add to My Manuals
Save this manual to your list of manuals |
Page 32 highlights
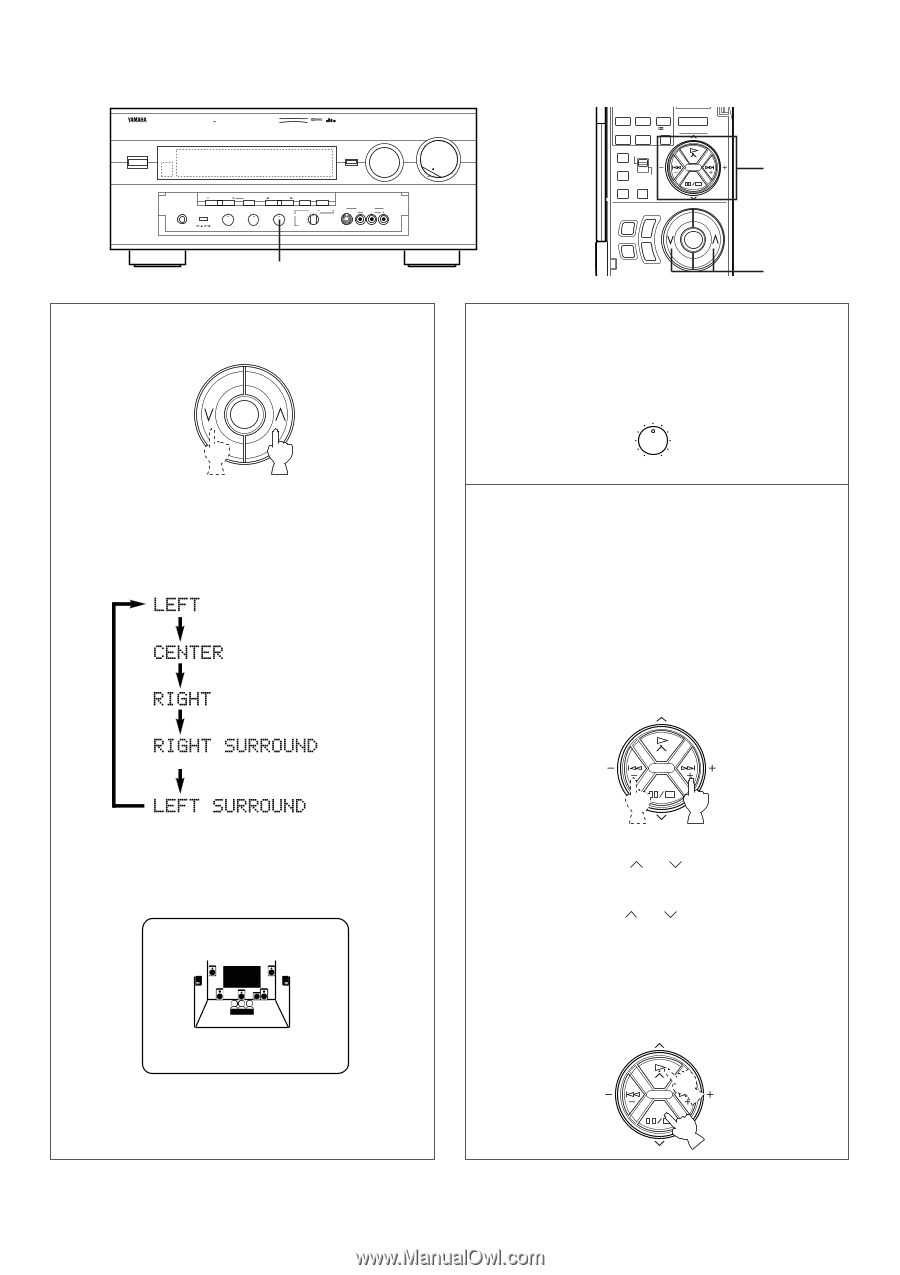
NATURAL SOUND AV AMPLIFIER DSP A1 STANDBY/ON DIGITAL PRO LOGIC DSP DIGITAL SOURCE AC 3 DTS PCM CINEMA DSP 7ch TV/DBS VCR 1 VCR 2 DVD/VCR 3 V-AUX SLEEP LD MD/TAPE 1 TUNER CD PHONO TAPE 2 MON INPUT SELECTOR TAPE 2 MON /EXT. DECODER SET MENU NEXT PROGRAM EFFECT INPUT MODE PHONES BASS EXTENSION BASS l 0l 2 2 3 3 4 5 4 5 TREBLE l 0l 2 2 3 3 4 5 4 5 BALANCE l 0l 2 2 3 3 4 L5 4 5R REC OUT SOURCE MD/TAPE 1 LD CD VCR 1 TV/DBS VCR 2 DVD/VCR 3 VIDEO AUX VIDEO AUX VOLUME l6 20 l2 28 8 40 4 60 2 0 -dB 8 CONCERT CONCERT TV VIDEO 1 VIDEO 2 THEATER 7 8 9 MOVIE MOVIE / DTS THEATER 1 THEATER 2 SURROUND 10 11 12 LEVEL PARAMETER TEST SET MENU SLEEP ON SCREEN EFFECT ON/OFF SYSTEM POWER ON TV MASTER VOLUME MUTE VCR STANDBY 9 7 7 Turn up the volume. Remote control MUTE 8 Adjust the BALANCE control so that the effect sound output level of the left main speaker and the right main speaker are the same. Front panel BALANCE l 0l 2 2 3 3 4 L5 4 5R You will hear a test tone (like pink noise) from the left main speaker, then the center speaker, then the right main speaker, then the right rear speaker, and then the left rear speaker, for about 2.5 seconds each. The display changes as shown below. Main (L) Center Main (R) 9 Adjust the sound output levels of the center speaker and the rear speakers so that they become almost as same as that of the main speakers. How to adjust: Pressing the + or - key adjusts the level to the speaker (except the main speakers) currently outputting the test tone. * Pressing the + key raises and the - key lowers the level. * While adjusting, the test tone is fixed on the selected speaker. Remote control Rear (R) Rear (L) * The state of test tone output is also shown on the monitor screen by an image of audio listening room. This is convenient for adjusting each speaker level. TEST DOLBY SUR. EFFECT LEVEL CENTER +2dB * If the function "1A. CENTER SP" in the SET MENU mode is set in the "NONE" position, you will hear the center channel test tone from the left and right main speakers. If desired, you can select a speaker to output the test tone by pressing the or key once or more so that "CENTER", "RIGHT SURROUND" or "LEFT SURROUND" appears on the display. * While holding the or key pressed, the test tone is fixed on the selected speaker. * "CENTER" shows the center speaker is selected, "RIGHT SURROUND" shows the right rear speaker, and "LEFT SURROUND" shows the left rear speaker. * The output level of the selected speaker can be adjusted by the + or - key. Remote control 30
-
 1
1 -
2
-
3
-
4
-
5
-
6
-
7
-
8
-
9
-
10
-
11
-
12
-
13
-
14
-
15
-
16
-
17
-
18
-
19
-
20
-
21
-
22
-
23
-
24
-
25
-
26
-
 27
27 -
 28
28 -
 29
29 -
 30
30 -
 31
31 -
 32
32 -
 33
33 -
 34
34 -
 35
35 -
 36
36 -
 37
37 -
38
-
39
-
40
-
41
-
42
-
43
-
44
-
45
-
46
-
47
-
48
-
49
-
50
-
51
-
52
-
53
-
54
-
55
-
56
-
57
-
58
-
59
-
60
-
61
-
62
-
63
-
64
-
65
-
66
-
67
-
68
-
69
-
70
-
71
-
72
-
73
-
74
-
75
-
76
-
77
-
78
-
79
-
80
 |
 |