Yamaha DX7 Product Manual - Page 44
Keyboard Rate Scaling, Keyboard Level Scaling
 |
View all Yamaha DX7 manuals
Add to My Manuals
Save this manual to your list of manuals |
Page 44 highlights
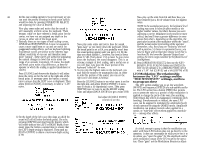
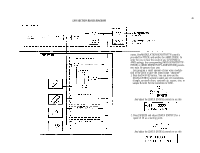
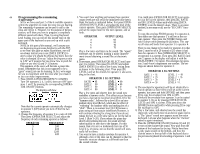
When you later try switching algorithms after adding FEEDBACK and activating the other 4 operators, you'll hear much more variation. 2. Pull down the [DATA ENTRY] slider and/or use the [-1] button until you've selected algorithm 1 again. Use either of these controls Alternately play very low and then very high notes and listen to the envelope attack and release rates. Then press the [KEYBOARD RATE SCALING] button, and, for the most noticeable effect, push the [DATA ENTRY] slider all the way up so you get a maximum rate scaling value of 7. Then play the same notes again and listen to the rates. The low notes will not change much, but the highest notes will have significantly shorter times. The scaling is not continuously changing with each note, but instead changes the rates for each group of 3 keys on the keyboard. When you've tried the maximum, reset the scaling to a value of 4. 39 KEYBOARD LEVEL SCALING To return to algorithm 1 And push up [DATA ENTRY]; leave it set like this *With a (-) linear curve set to a depth of 99, the attenuation is 22 dB per octave. 5. If necessary, reset the current operator to operator 1 by pressing (OPERATOR SELECT). 3. It you play the lowest note on the keyboard, then the highest, you can hear the same attack and release time. In a natural, acoustic instrument the times would tend to be faster as you move up the scale. This is because a vibrating reed or string, or a resonating column of air can be excited more quickly and will stop moving more rapidly when the string, pipe, etc. isshorter. You can achieve this effect by scaling the envelope rates across the keyboard to any of 8 values (from 0 to 7), as illustrated. KEYBOARD RATE SCALING In this case, the rate scaling for the modulator (operator 2) will have little effect, so you don't have to change it from the "initialized" value of zero. 4. Much like the envelope rates can be varied across the keyboard, so, too, can the operator output levels. By using the multiple functions of the 3 KEYBOARD LEVEL SCALING buttons, you can obtain 99 [DEPTH] settings on either side of a [BREAK POINT] that you select, and you can also choose any of 4 [CURVE] settings on each side of that break point. You can do this for each of the 6 operators. These selections are diagrammed at the upper right corner of the synthesizer. These 3 buttons provide access So all the level scaling parameters The DX7 is still in rate scaling mode from the previous step. 6. In order to show you an extreme setting, we will "split the keyboard" so that this woodwind-like voice component appears on the upper portion of the keyboard only (When we program operators 3 through 6, we'll scale them so they work primarily on the lower portion of the keyboard.) Press [BREAK POINT] and then move the [DATA ENTRY] controls as required to obtain a break point ofE4.
-
 1
1 -
2
-
3
-
4
-
5
-
6
-
7
-
8
-
9
-
10
-
11
-
12
-
13
-
14
-
15
-
16
-
17
-
18
-
19
-
20
-
21
-
22
-
23
-
24
-
25
-
26
-
27
-
28
-
29
-
30
-
31
-
32
-
33
-
34
-
35
-
36
-
37
-
38
-
 39
39 -
 40
40 -
 41
41 -
 42
42 -
 43
43 -
 44
44 -
 45
45 -
 46
46 -
 47
47 -
 48
48 -
 49
49 -
50
-
51
-
52
-
53
-
54
-
55
-
56
-
57
-
58
-
59
-
60
-
61
-
62
-
63
-
64
-
65
-
66
-
67
-
68
-
69
-
70
-
71
-
72
 |
 |
