Yamaha DX7 Product Manual - Page 50
Press [key Velocity Sensitivity]
 |
View all Yamaha DX7 manuals
Add to My Manuals
Save this manual to your list of manuals |
Page 50 highlights
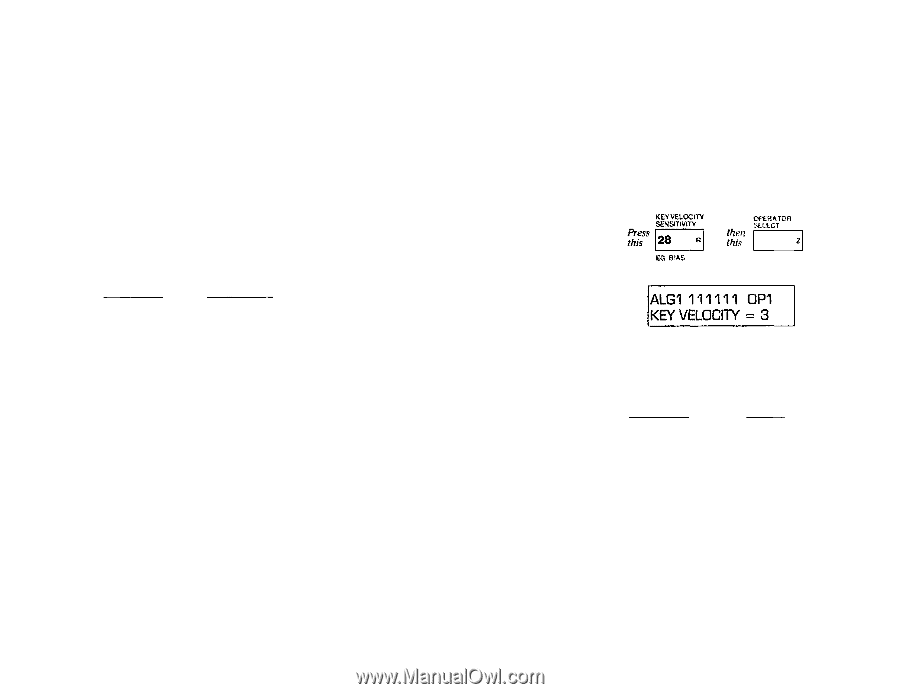
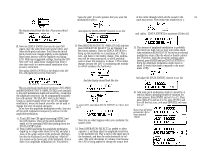
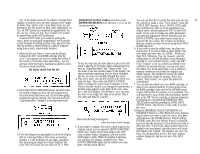
In this case, we do not want these two segments of and adjusting [DATA ENTRY] to suit your taste To illustrate this feature, lets program the piano-like 45 the voice (OP1-OP2 and OP3-OP6) to combine; we while playing the piano-like sound on the lower portion of the voice to get louder and more brilliant want a "split" keyboard instead. (With another voice, portion of the keyboard. We recommend starting when you press the keys faster. We'll do something you might want the two voice segments to play to- with a Detune value of + 3 for OP4. similar with the clarinet-like portion of the voice. (We'd gether, complementing one another.) Since we don't 15. The entire keyboard can be transposed if you like. say "play harder," which is what we mean, but we don't want the piano mixed with the clarinet, let's use the Press the [KEY TRANSPOSE] button and then want to confuse this parameter with the After Touch keyboard level scaling feature to "roll off" the piano press the key which you want middle C to become. modulation that depends on the pressure you apply alter (OP3-OP6). Now play and see what happens. If you want to the key "bottoms out.") 10. If necesary press [OPERATOR SELECT] to set transpose again, press [KEY TRANSPOSE] again 1.Press[KEYVELOCITYSENSITIVITY]andthen operator 3 as current. Then press [BREAK POINT] and press the new "middle C" key This transposes press [OPERATOR SELECT] as required to set oper- and use [DATA ENTRY] to set the break point as both portions of the voice. ator 1 as the current operator. shown below. Next press [OPERATOR SELECT] to set operator 4 as current, and set its break point as indicated in the chart. Operators 5 and 6 will not need any level scaling because their effects will be adequately contoured by operator 4 (through which bath must travel). Suppose, however, that you just want to transpose the piano portion of the voice. To do this, you do not use the transpose feature. Instead, you change the frequency ratios of the operators in that part of the voice (operators 3, 4, 5 & 6). 16. Press [OPERATOR SELECT] as many times as and use (DATA ENTRY] to set OP1 like this OPERATOR BREAKPOINT needed to set operator 3 as current. Then press 3 A2 4 C3 5 (Doesn't matter) 6 (Doesn't matter) 11. Now that the break points are set, you'll need to establish the curves for each of these operators. Press [CURVE] and use [DATA ENTRY] to set oper- ator 4 to a negative linear curve on the right side of [OSCILLATOR FREQUENCY COARSE] and you'll see the ratio is now set at 2.00. To transpose an octave, double this ratio to 4.00. At this point, the voice will seem to "change" because the modulator frequencies have not yet been transposed, so the modulation will, in fact, be producing a different effect. 17. To "correct" and completely transpose the piano-like sound, double the frequency ratio of each of opera- 2. Then press (OPERATOR SELECT] and use [DATA ENTRY] to set each of the other operators' for key velocity sensitivities as shown in the accompanying chart. KEY VELOCITY SENSITIVITY the break point. Remember you may have to press [CURVE] once or twice to see the "R CURVE = ?" display 12. Set operator 3 as the current operator, and then use [DATA ENTRY] to set it to a -LIN Right curve. 13. Now set the depth of the right curves for operator 3 by pressing [DEPTH] once, to see the "R DEPTH = tors 4, 5 and 6 by pressing [OPERATOR SELECT] and adjusting [DATA ENTRY]. Operator 4 increases from 2.00 to 4.00, operator 5 from 12.00 to 24.00, and operator 6 from 4.00 to 8.00. Now play across the keyboard and listen to what has happened... two lead voices! OPERATOR 1 2 3 4 5 VALUE 3 0 2 7 7 ?" display and adjusting [DATA ENTRY] to a value of 99 (maximum roll off). Press [OPERATOR SELECT] to set operator 4 as current, and set its depth to 99 also. You can now play the keyboard and observe how the sound changes from the piano-like voice on the bottom to the clarinet-like voice at the top. It's all one Programming velocity sensitivity The output level of each operator can be programmed to increase based on how rapidly a key is pressed down. This is accomplished with the [KEY VELOCITY SENSITIVITY] button. Since the maximum output level of any operator is always 99, if an operator is already set to 99, it might seem that no further output can be achieved 6 7 3. The resulting voice will change as you press keys faster. If you experiment with different velocity sensitivity values, you may find that no combination is "ideal." It may be necessary to go back and change the operator output level settings, voice, but the component "stacks" of carriers and modulators are uniquely programmed and scaled to produce two distinct sounds. 14. To obtain a slightly altered harmonic structure, you may want to shift the pitch just a little bit for operator 4, the primary modulator in the piano portion of the voice. You can do this by pressing [DETUNE] using the velocity sensitivity. To get around this problem, the DX7 is designed so that the nominal operator output level decreases as you program the operator for more key velocity sensitivity If an operator is programmed for maximum key velocity sensitivity (7), and you play a note very slowly, that operator will have a very low output level; play the same note quickly, and the output level will increase substantially Naming and storing the newly created voice 1. Now that you've created the voice, perhaps you'd like to give it a name all of your own. Press [VOICE NAME] and you'll see a blinking cursor (a box) appear at the starting position of the 10 available character spaces for the name. To actually enter a name,
-
 1
1 -
2
-
3
-
4
-
5
-
6
-
7
-
8
-
9
-
10
-
11
-
12
-
13
-
14
-
15
-
16
-
17
-
18
-
19
-
20
-
21
-
22
-
23
-
24
-
25
-
26
-
27
-
28
-
29
-
30
-
31
-
32
-
33
-
34
-
35
-
36
-
37
-
38
-
39
-
40
-
41
-
42
-
43
-
44
-
 45
45 -
 46
46 -
 47
47 -
 48
48 -
 49
49 -
 50
50 -
 51
51 -
 52
52 -
 53
53 -
 54
54 -
 55
55 -
56
-
57
-
58
-
59
-
60
-
61
-
62
-
63
-
64
-
65
-
66
-
67
-
68
-
69
-
70
-
71
-
72
 |
 |