Yamaha EMX66M Owner's Manual - Page 7

Introduction, Features, Contents, Thank you for purchasing the Yamaha EMX66M Powered Mixer. - 6 channel powered mixer

Page 7 highlights

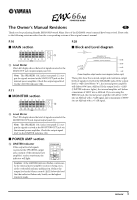
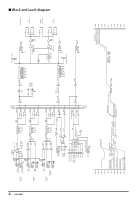
5 Introduction Thank you for purchasing the Yamaha EMX66M Powered Mixer. In order to take full advantage of the EMX66M and enjoy long and trouble-free performance, please read this owner's manual carefully, and keep it in a safe place for future reference. Features • The EMX66M provides six input channels compatible with mic/line signals, including highimpedance input suitable for an electric-acoustic guitar. The EMX66M has ample power, with a maximum output of 300 W+300 W (600 W with bridge connection), and is suitable for a wide range of applications from installed systems to small-scale PA systems. • A two-channel power amp is built-in. The input signals for the two channels can be selected as MAIN+MAIN, MAIN+MONITOR, or MAIN (bridge connection). • Independent 7-band graphic EQ is provided for both the MONITOR section and the MAIN section. This allows the volume and frequency response to be adjusted separately for the main speakers and monitor speakers. • The power amp section has a limiter circuit to prevent sound distortion and protect the speakers. • A digital effect with eight selectable effect types is built-in. A variety of effects can be applied to add reverberation or ambiance to vocals or instrumental sounds. • The EMX66M has implemented "EEEngine", Yamaha's epochal amp drive technology to create an unrivaled high-efficiency drive. The EEEngine's energy-saver/low-heat-generation design has reduced power consumption to 50% or less, and reduced heat generation to 35% or less (in field applications, compared to Yamaha's previous models), and has lead to a reduction in energy cost and to less-restrictive installation requirements related to heat generation. Contents Introduction 5 Features 5 EMX66M Quick Guide 6 Front and rear panel 9 Control panel 9 Input/output panel 13 Rear panel 15 Installation/Connection 16 Installation 16 Connection 16 Basic Operation 19 Connecting microphones and instruments ......... 19 Monitoring 19 Using the digital effect 19 Example setups 20 As a conference PA system/ installed sound system 20 As a band PA 21 Installing an optional rack mount kit 23 Troubleshooting 24 Specifications 25 General specifications 25 Input specifications 26 Output specifications 26 Dimensions 27 Block and Level diagram 28 EMX66M-Owner's Manual

  • 1
  • 2
  • 3
  • 4
  • 5
  • 6
  • 7
  • 8
  • 9
  • 10
  • 11
  • 12
  • 13
  • 14
  • 15
  • 16
  • 17
  • 18
  • 19
  • 20
  • 21
  • 22
  • 23
  • 24
  • 25
  • 26
  • 27
  • 28
  • 29
  • 30
  • 31

5
EMX66M—Owner’s Manual
Introduction
Thank you for purchasing the Yamaha EMX66M Powered Mixer.
In order to take full advantage of the EMX66M and enjoy long and trouble-free perfor-
mance, please read this owner’s manual carefully, and keep it in a safe place for future
reference.
Features
• The EMX66M provides six input channels com-
patible with mic/line signals, including high-
impedance input suitable for an electric-acoustic
guitar. The EMX66M has ample power, with a
maximum output of 300 W+300 W (600 W with
bridge connection), and is suitable for a wide
range of applications from installed systems to
small-scale PA systems.
• A two-channel power amp is built-in. The input
signals for the two channels can be selected as
MAIN+MAIN, MAIN+MONITOR, or MAIN
(bridge connection).
• Independent 7-band graphic EQ is provided for
both the MONITOR section and the MAIN sec-
tion. This allows the volume and frequency
response to be adjusted separately for the main
speakers and monitor speakers.
• The power amp section has a limiter circuit to
prevent sound distortion and protect the speak-
ers.
• A digital effect with eight selectable effect types is
built-in. A variety of effects can be applied to add
reverberation or ambiance to vocals or instru-
mental sounds.
• The EMX66M has implemented “EEEngine”,
Yamaha’s epochal amp drive technology to create
an unrivaled high-efficiency drive.
The EEEngine’s energy-saver/low-heat-genera-
tion design has reduced power consumption to
50% or less, and reduced heat generation to 35%
or less (in field applications, compared to
Yamaha’s previous models), and has lead to a
reduction in energy cost and to less-restrictive
installation requirements related to heat genera-
tion.
Contents
Introduction
............................................................
5
Features
................................................................
5
EMX66M Quick Guide
................................................
6
Front and rear panel
...................................................
9
Control panel
........................................................
9
Input/output panel
...............................................
13
Rear panel
..........................................................
15
Installation/Connection
.............................................
16
Installation
.........................................................
16
Connection
........................................................
16
Basic Operation
........................................................
19
Connecting microphones and instruments
.........
19
Monitoring
...........................................................
19
Using the digital effect
........................................
19
Example setups
........................................................
20
As a conference PA system/
installed sound system
......................................
20
As a band PA
......................................................
21
Installing an optional rack mount kit
.........................
23
Troubleshooting
.......................................................
24
Specifications
...........................................................
25
General specifications
........................................
25
Input specifications
.............................................
26
Output specifications
..........................................
26
Dimensions
.........................................................
27
Block and Level diagram
....................................
28