Yamaha EMX66M Owner's Manual - Page 8
EMX66M Quick Guide - 6 channels
 |
View all Yamaha EMX66M manuals
Add to My Manuals
Save this manual to your list of manuals |
Page 8 highlights
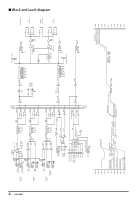
6 EMX66M Quick Guide EMX66M Quick Guide The following steps (1-5) explain the basic connection and operation of the EMX66M. Also, please read "Front and Rear Panel" and "Basic Operation" following this Quick Guide section to learn more about using the EMX66M. STEP 1 Connection Connecting speakers Using speaker cables, connect each speaker to the A 1 or 2 jack and to the B 1 or 2 jack in the SPEAKERS jack section on the rear panel of the EMX66M. SSPPEEAAKKEERRSS BB BBRRIIDDGGEE AA EEMMXX6666MM 22 11 22 11 • You may connect to either of the two jacks on the speakers. • Be sure to use a cable designed for speaker connection. Never connect the speakers in the manner shown below. Otherwise, the EMX66M's built-in power amplifier will be damaged. SPEAKERS B BRIDGE A EMX66M 2 1 2 1 Setting the power amplifier mode Set the power amp select switch (located on the right corner on the panel) to MAIN-MAIN. EMX66M MAIN MAIN MON MAIN MAIN BRIDGE Power amp select switch • This Quick Guide assumes that two main speakers are connected. Refer to pages 16-17 for other connections and power amp select switch settings. Connecting a microphone Make sure that the power is turned off to the EMX66M. Connect a microphone to the Low-Z jack of channel 1-4. EMX66M Hi-Z Hi-Z Hi-Z Hi-Z Lo-wZ Lo-wZ Lo-wZ Lo-wZ EMX66M SPEAKERS BRIDGE A 2 1 EMX66M-Owner's Manual Microphone Using a condenser microphone Turn on the PHANTOM switch (located in the upper right corner on the panel). EMX66M PHANTOM ON OFF PHANTOM switch • Do not connect or disconnect a condenser microphone while the power to the unit is on and the PHANTOM switch has been turned on.
-
 1
1 -
2
-
 3
3 -
 4
4 -
 5
5 -
 6
6 -
 7
7 -
 8
8 -
 9
9 -
 10
10 -
 11
11 -
 12
12 -
 13
13 -
14
-
15
-
16
-
17
-
18
-
19
-
20
-
21
-
22
-
23
-
24
-
25
-
26
-
27
-
28
-
29
-
30
-
31
 |
 |
