Yamaha MY16-mLAN Installation Guide - Page 19
Connecting a Computer to an mLAN device via mLAN, Connecting the i88X
 |
View all Yamaha MY16-mLAN manuals
Add to My Manuals
Save this manual to your list of manuals |
Page 19 highlights
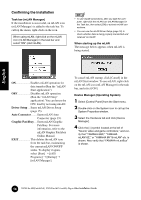
English Connecting a Computer to an mLAN device via mLAN This section describes the procedure for connecting a computer to a single mLAN device peer-to-peer in mLAN Auto Connector. In mLAN Auto Connector, you can easily connect an mLAN device by setting up the wordclock and the number of audio I/O channels. To connect multiple mLAN devices to a computer, use mLAN Graphic Patchbay. For more information on mLAN Graphic Patchbay, refer to the mLAN Graphic Patchbay Online Manual. Noise may be generated during the following operations. Before performing these operations, lower the output level of each device. • Turning the power to the computer and mLAN devices on or off • Connecting or disconnecting an IEEE1394 (mLAN) cable • Making an mLAN connection in mLAN Auto Connector • Changing the wordclock master and slave status in mLAN Auto Connector or mLAN Graphic Patchbay • Selecting On or Off in mLAN Manager (Windows) • Starting or quitting the OS • Installing/uninstalling mLAN software • If you use Auto Connector after you make connections in mLAN Graphic Patchbay, the connections made in mLAN Graphic Patchbay will be cancelled. • You can also use mLAN Graphic Patchbay to connect a computer to a single mLAN device peer-to-peer. • The mLAN Auto Connector windows may appear different when certain mLAN devices are connected. 1 Connect a computer to an mLAN device using an IEEE1394 cable. 2 Right-click the YAMAHA mLAN Manager icon in the Task bar, then select [Auto Connector]. 3 Set up the wordclock and specify the number of audio channels (see below), then click the [Connect] button. The computer and mLAN device are connected via mLAN. Connecting the i88X q e w r t y u i o !0 !1 !2 19 TOOLS for i88X/mLAN16E, TOOLS for MY16-mLAN, Plug-in Effect Installation Guide
-
 1
1 -
2
-
3
-
4
-
5
-
6
-
7
-
8
-
9
-
10
-
11
-
12
-
13
-
 14
14 -
 15
15 -
 16
16 -
 17
17 -
 18
18 -
 19
19 -
 20
20 -
 21
21 -
 22
22 -
 23
23 -
 24
24 -
25
-
26
-
27
-
28
-
29
-
30
-
31
-
32
-
33
-
34
-
35
-
36
-
37
-
38
-
39
-
40
-
41
-
42
-
43
-
44
-
45
-
46
-
47
-
48
-
49
-
50
 |
 |
