Yamaha PSR-A3 Owner's Manual - Page 27

Chorus, ≤Chorus1

Page 27 highlights

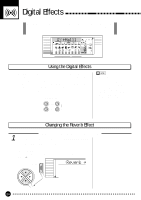
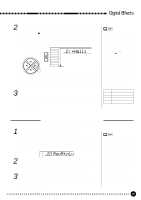
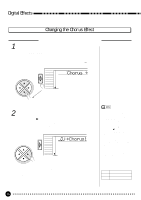
Digital Effects Changing the Chorus Effect Selecting the Chorus Effect Type 1 Select the Chorus Type Function Press the [FUNCTION] button to the left of the display as many times as necessary until the arrowhead in the display appears next to "DIGITAL EFFECT" in the function list to the left of the display, and use the cursor [v] and [w] buttons to select the Chorus Type function, "Chorus m". FUNCTION CURSOR VOICE STYLE SONG REGIST MEMORY MULTI PAD DUAL VOICE SPLIT VOICE HARM/ ECHO OVERALL DIGITAL EFFECT Chorus ≥ 2 Select the Chorus Type ...Use the cursor [>] button to enter the Chorus Type function and then select one of the 10 chorus types using the [-/NO] and [+/YES] buttons, the number buttons or the data dial. The name of the selected chorus type appears on the top line of the display. FUNCTION CURSOR VOICE STYLE SONG REGIST MEMORY MULTI PAD DUAL VOICE SPLIT VOICE HARM/ ECHO OVERALL DIGITAL EFFECT 101 ≤Chorus1 • See page 83 for a complete listing of the chorus types. • The chorus type will change automatically whenever a different style is selected. • You can return to the previous display, "Chorusm", by pressing the cursor [

  • 1
  • 2
  • 3
  • 4
  • 5
  • 6
  • 7
  • 8
  • 9
  • 10
  • 11
  • 12
  • 13
  • 14
  • 15
  • 16
  • 17
  • 18
  • 19
  • 20
  • 21
  • 22
  • 23
  • 24
  • 25
  • 26
  • 27
  • 28
  • 29
  • 30
  • 31
  • 32
  • 33
  • 34
  • 35
  • 36
  • 37
  • 38
  • 39
  • 40
  • 41
  • 42
  • 43
  • 44
  • 45
  • 46
  • 47
  • 48
  • 49
  • 50
  • 51
  • 52
  • 53
  • 54
  • 55
  • 56
  • 57
  • 58
  • 59
  • 60
  • 61
  • 62
  • 63
  • 64
  • 65
  • 66
  • 67
  • 68
  • 69
  • 70
  • 71
  • 72
  • 73
  • 74
  • 75
  • 76
  • 77
  • 78
  • 79
  • 80
  • 81
  • 82
  • 83
  • 84
  • 85
  • 86
  • 87
  • 88
  • 89
  • 90
  • 91
  • 92
  • 93
  • 94
  • 95
  • 96
  • 97
  • 98
  • 99
  • 100
  • 101
  • 102
  • 103

26
Digital Effects
Changing the Chorus Effect
1
Select the Chorus Type Function
...............................................................................
Press the
[FUNCTION]
button to the left of the display as many times
as necessary until the arrowhead in the display appears next to “DIGITAL
EFFECT” in the function list to the left of the display, and use the cursor
[
] and [
] buttons to select the Chorus Type function, “Chorus
m
”.
Selecting the Chorus Effect Type
2
Select the Chorus Type
..................................................................................................................
Use the cursor [
>
] button to enter the Chorus Type function and then
select one of the 10 chorus types using the
[–/NO]
and
[+/YES]
buttons, the
number buttons or the data dial. The name of the selected chorus type ap-
pears on the top line of the display.
FUNCTION
Chorus
°
VOICE
STYLE
SONG
REGIST MEMORY
MULTI PAD
DUAL VOICE
SPLIT VOICE
HARM
/
ECHO
OVERALL
DIGITAL EFFECT
CURSOR
FUNCTION
≤Chorus1
1
01
VOICE
STYLE
SONG
REGIST MEMORY
MULTI PAD
DUAL VOICE
SPLIT VOICE
HARM
/
ECHO
OVERALL
DIGITAL EFFECT
CURSOR
You can also enter the Chorus Type function by pressing and holding the
[CHORUS]
button until the arrow jumps to the “DIGITAL EFFECT” posi-
tion and the current chorus type name appears in the display.
See page 83 for a complete
listing of the chorus types.
The chorus type will change
automatically whenever a differ-
ent style is selected.
You can return to the previous
display, “Chorus
m
”, by pressing
the cursor [
<
] button, and
choose the REVERB or DSP
effect.
The chorus type can be reset to
its default by simultaneously
pressing the [–/NO] and [+/YES]
buttons.
If you want to disable the chorus
effect for all the data excepting
VOICE function voice, select
OFF in the Type selection.
The Chorus Types
01~05
Chorus 1~5
06~09
Flanger 1~4
10
OFF