Yamaha PSR-EW300 PSR-E363 PSR-EW300 YPT-360 Owners Manual - Page 41
Recording Your Performance, Track Structure of a Song, Quick Recording
 |
View all Yamaha PSR-EW300 manuals
Add to My Manuals
Save this manual to your list of manuals |
Page 41 highlights
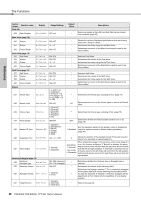
Recording Your Performance Reference You can record up to 5 of your performances as User Songs (User 1-5: Song numbers 155-159). The recorded User Songs can be played back on the instrument. The recorded User Song can be played back in the same way as the preset Songs. Track Structure of a Song You can record your performance to the following two tracks of a User Song individually or simultaneously. Track 1: Your melody performance is recorded to this track. Track 2: Your melody performance, or Style playback (Chord changes and Section changes), is recorded to this track. Recording Data Capacity: A total of approximately 10,000 notes or 5,500 chord changes can be recorded to the five User Songs. Quick Recording The operation is convenient for recording a new Song without having to specify a track. 1 Make the desired settings such as Voice and Style settings. If you want to record only the melody performance, turn ACMP off (page 22). If you want to record Style playback or Rhythm playback as well as melody performance, turn ACMP on (page 22). 2 Press the [REC] button to enter the Record Ready mode. This operation selects the lowest-numbered unrecorded User Song ("User 1"-"User 5") as the recording target, if a User Song has not been specified in advance or if Record Ready mode has been entered from the Style mode. If you want to select another Song, use the [+] and [-] buttons. To exit from the Record mode, press the [REC] button again to stop flashing on the display. NOTICE • If all User Songs contain recorded data, "User 1 (Song Number 155)" will automatically be selected. In this case, since you will record over and erase any previous data in "User 1," we recommend that you save your important data to a computer (see page 48). NOTE • ACMP cannot be turned on or off in this status while you can select another Style in this status by using the [STYLE] and Number buttons. 3 Play the keyboard to start recording. If ACMP is turned on, you can independently record just the rhythm sound of Style playback by pressing the [START/STOP] button then changing the Section (page 24). Split Point ... default setting: 054 (F#2) 36 48 60 72 Auto Accompaniment range 4 Press the [START/STOP] button to stop recording. When using a Style, you can stop recording also by pressing the [INTRO/ENDING/rit.] button then waiting until playback ends. NOTICE • After Recording stops, a "Writing!" message is shown on the display for a while. Never attempt to turn the power off while this is shown in the display. Doing so can damage the internal memory and result in a loss of data. 5 To play back the recorded Song, press the [START/STOP] button. User Song Number EC User 1 001 Flashes Limitations while Recording • You cannot record the Reverb Level, metronome click, or the Transpose and Tuning settings. • The following settings and buttons are not available, or if operated, the new settings cannot be recorded: ACMP ON/OFF, Split Point, Reverb Type, Chorus Type, Harmony/Arpeggio Type, [FUNCTION] button, [PORTABLE GRAND] button. PSR-E363, PSR-EW300, YPT-360 Owner's Manual 41
-
 1
1 -
2
-
3
-
4
-
5
-
6
-
7
-
8
-
9
-
10
-
11
-
12
-
13
-
14
-
15
-
16
-
17
-
18
-
19
-
20
-
21
-
22
-
23
-
24
-
25
-
26
-
27
-
28
-
29
-
30
-
31
-
32
-
33
-
34
-
35
-
 36
36 -
 37
37 -
 38
38 -
 39
39 -
 40
40 -
 41
41 -
 42
42 -
 43
43 -
 44
44 -
 45
45 -
 46
46 -
47
-
48
-
49
-
50
-
51
-
52
-
53
-
54
-
55
-
56
-
57
-
58
-
59
-
60
-
61
-
62
-
63
-
64
-
65
-
66
-
67
-
68
-
69
-
70
-
71
-
72
-
73
-
74
-
75
-
76
-
77
-
78
-
79
-
80
-
81
-
82
-
83
-
84
 |
 |
