Yamaha PSR-EW300 PSR-E363 PSR-EW300 YPT-360 Owners Manual - Page 42
Recording to a Specified Track, Clearing a User Song, ClrUser1, Sure?
 |
View all Yamaha PSR-EW300 manuals
Add to My Manuals
Save this manual to your list of manuals |
Page 42 highlights
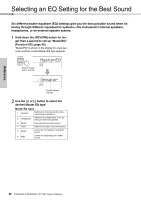
Reference Recording Your Performance Recording to a Specified Track 1 Make the desired settings, such as those of Voice or Style. If you want to record the melody performance, turn ACMP off (page 22). If you want to record Style playback, turn ACMP on (page 22). 2 While holding down the [REC] button, press the desired Track button 1 or 2 to engage the Record mode. If you want to record Style playback, make sure to select the Track 2. If you want to record melody performance, select either Track 1 or Track 2 as desired. The illustration below is the example when selecting Track 2. The User Song appears on the display. User Song EC User 1 001 If Track 2 is selected as Recording target for example and Track 1 contains already recorded data, L flashes and R lights in the display. Turning on or off R via the [TRACK 1] button will determine whether you listen to a previously recorded Track or not while recording a new Track. 3 Press the [+], [-] buttons to select the User Song you want to record. 4 Same as in Steps 3 to 5 (page 41) in "Quick Recording." Clearing a User Song 1 Press the [SONG] button then select the desired User Song by using the Number buttons. 2 Press and hold the [REC] button for longer than a second. A confirmation message appears. YES ClrUser1 Hold for longer than a second. To cancel the operation, press the [-/NO] button. 3 Press the [+/YES] button. A confirmation message appears again. YES Sure? To cancel the operation, press the [-/NO] button. 4 Press the [+/YES] button to clear the Song. A "Writing!" message appears while the track is being cleared. 42 PSR-E363, PSR-EW300, YPT-360 Owner's Manual
-
 1
1 -
2
-
3
-
4
-
5
-
6
-
7
-
8
-
9
-
10
-
11
-
12
-
13
-
14
-
15
-
16
-
17
-
18
-
19
-
20
-
21
-
22
-
23
-
24
-
25
-
26
-
27
-
28
-
29
-
30
-
31
-
32
-
33
-
34
-
35
-
36
-
 37
37 -
 38
38 -
 39
39 -
 40
40 -
 41
41 -
 42
42 -
 43
43 -
 44
44 -
 45
45 -
 46
46 -
 47
47 -
48
-
49
-
50
-
51
-
52
-
53
-
54
-
55
-
56
-
57
-
58
-
59
-
60
-
61
-
62
-
63
-
64
-
65
-
66
-
67
-
68
-
69
-
70
-
71
-
72
-
73
-
74
-
75
-
76
-
77
-
78
-
79
-
80
-
81
-
82
-
83
-
84
 |
 |
