Yamaha PSR-EW400 PSR-E453_PSR-EW400 Owners Manual - Page 32
Recording Your Performance, Track Structure of a Song, Quick Recording
 |
View all Yamaha PSR-EW400 manuals
Add to My Manuals
Save this manual to your list of manuals |
Page 32 highlights
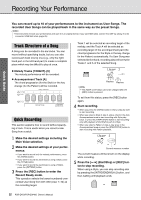
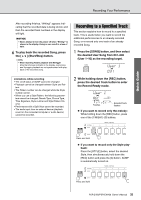
Recording Your Performance Quick Guide You can record up to 10 of your performances to the instrument as User Songs. The recorded User Songs can be played back in the same way as the preset Songs. NOTE • This instrument records your performance and save it in an original format. If you want MIDI data, convert it to SMF by saving it to the connected USB flash drive (page 65). Track Structure of a Song A Song can be recorded to the six tracks. You can record without specifying tracks, but you can also record each track one by one (e.g., only the righthand part or the left-hand part) to create a complete piece which may be difficult to play at once. Melody Tracks [1/RIGHT]-[5] The melody performance will be recorded. Accompaniment Track [A] The chord progression (for the Style) or the key change (for the Pattern) will be recorded. Melody Tracks Accompaniment Track Quick Recording This section explains how to record without specifying a track. This is useful when you record a new Song from scratch. 1 Make the desired settings including the Main Voice selection. 2 Make the desired settings of your performance. • If you want to record only the melody performance, press the [SONG] button. • If you want to record the performance using a Style, press the [STYLE] button. • If you want to record the performance using a Pattern, press the [PATTERN] button. 3 Press the [REC] button to enter the Record Ready mode. This operation selects the lowest-numbered unrecorded User Song from 031-040 (User 1-10) as the recording target. Track 1 will be selected as recording target of the melody, and the Track A will be selected as recording target of the accompaniment part (the chord progression for the Style or the key change for the Pattern) automatically. If a User Song was selected beforehand, recording data will overwrite Tracks 1 and A of the selected Song. User 1 pEC 001 Flashes Flashes NOTE • The ACMP on/off status cannot be changed after the [REC] button is pressed. To exit from this status, press the [REC] button again. 4 Start recording. • When you press the [SONG] button in step 2, play any note to start recording. • When you select a Style in step 2, play a chord in the Auto Accompaniment area to start recording with Style playback, or press the [START/STOP] button to start recording only with playback of the Rhythm part of a Style. • When you select a Pattern in step 2, play a key in the Accompaniment area or press the [START/STOP] button to start recording with Pattern playback. User 1 pEC 003 Current measure number The current measure will be shown on the display while recording. 5 Press the [ ] (Start/Stop) or [REC] button to stop recording. When using a Style, you can stop recording also by pressing the [INTRO/ENDING/rit.] button, and then waiting until playback ends. or 32 PSR-E453/PSR-EW400 Owner's Manual
-
 1
1 -
2
-
3
-
4
-
5
-
6
-
7
-
8
-
9
-
10
-
11
-
12
-
13
-
14
-
15
-
16
-
17
-
18
-
19
-
20
-
21
-
22
-
23
-
24
-
25
-
26
-
 27
27 -
 28
28 -
 29
29 -
 30
30 -
 31
31 -
 32
32 -
 33
33 -
 34
34 -
 35
35 -
 36
36 -
 37
37 -
38
-
39
-
40
-
41
-
42
-
43
-
44
-
45
-
46
-
47
-
48
-
49
-
50
-
51
-
52
-
53
-
54
-
55
-
56
-
57
-
58
-
59
-
60
-
61
-
62
-
63
-
64
-
65
-
66
-
67
-
68
-
69
-
70
-
71
-
72
-
73
-
74
-
75
-
76
-
77
-
78
-
79
-
80
 |
 |
