Yamaha PSR-S650 Owner's Manual - Page 41
Multi-track Recording Procedure, Press the [USER] button, then use the dial to select the desired
 |
View all Yamaha PSR-S650 manuals
Add to My Manuals
Save this manual to your list of manuals |
Page 41 highlights
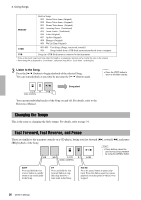
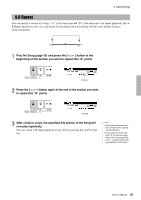
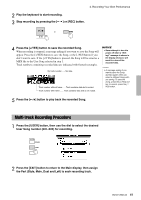
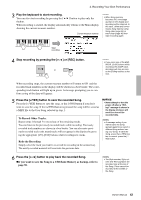
4. Recording Your Own Performance 2 Play the keyboard to start recording. 3 Stop recording by pressing the [ ] or [REC] button. or 4 Press the [+/YES] button to save the recorded Song. When recording is stopped, a message asking if you want to save the Song will appear. Press the [+/YES] button to save the Song, or the [-/NO] button if you don't want to save. If the [+/YES] button is pressed, the Song will be saved as a MIDI file to the User Song selected in step 1. Track numbers containing recorded data are indicated with framed rectangles. No track number ..... No data. Track number without frame ..... Track contains data but is muted. Track number with frame ...... Track contains data and is not muted. NOTICE • Never attempt to turn the power off when a "Writing!" message is shown in the display. Doing so will result in a loss of the recorded data. NOTE • A message asking if you want to save the Song appears again when you select a different Song without saving. To save the Song, press the [+/YES] button; to cancel, press the [-/ NO] button. 5 Press the [ ] button to play back the recorded Song. Multi-track Recording Procedure 1 Press the [USER] button, then use the dial to select the desired User Song number (001-005) for recording. 2 Press the [EXIT] button to return to the Main display, then assign the Part (Style, Main, Dual and Left) to each recording track. Owner's Manual 41
-
 1
1 -
2
-
3
-
4
-
5
-
6
-
7
-
8
-
9
-
10
-
11
-
12
-
13
-
14
-
15
-
16
-
17
-
18
-
19
-
20
-
21
-
22
-
23
-
24
-
25
-
26
-
27
-
28
-
29
-
30
-
31
-
32
-
33
-
34
-
35
-
 36
36 -
 37
37 -
 38
38 -
 39
39 -
 40
40 -
 41
41 -
 42
42 -
 43
43 -
 44
44 -
 45
45 -
 46
46 -
47
-
48
-
49
-
50
-
51
-
52
-
53
-
54
-
55
-
56
-
57
-
58
-
59
-
60
-
61
-
62
-
63
-
64
-
65
-
66
-
67
-
68
-
69
-
70
-
71
-
72
-
73
-
74
-
75
 |
 |
