Yamaha PocketrakCX Reference Manual - Page 40
Applying the fade out effect, Inserting and deleting index marks, Inserting index marks
 |
UPC - 086792893440
View all Yamaha PocketrakCX manuals
Add to My Manuals
Save this manual to your list of manuals |
Page 40 highlights
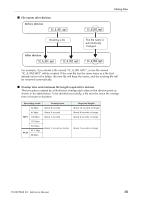
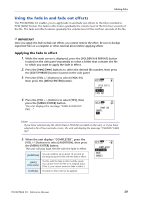
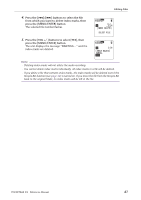
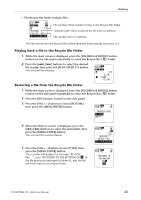
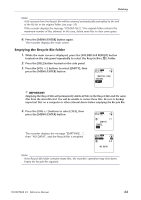
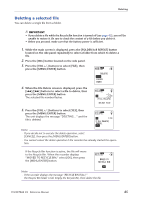
Editing Files 6. If you are satisfied with the file after auditioning and wish to save it, press the [VOL +/-] buttons to select [SAVE], then press the [MENU/ENTER] button. The file with the fade in effect will overwrite the original file. If you do not wish to overwrite the original file, select [CANCEL], then press the [MENU/ENTER] button. Note: · If the microSD card does not have sufficient free space, you will be unable to apply the fade in and out effects to the file. Applying the fade out effect The basic procedure is the same as that for the fade in effect. Please refer to the "Applying the fade in effect" section on page 39. Please note that you must select [FADE OUT] instead of [FADE IN] in step 3 to apply the fade out effect. Inserting and deleting index marks Inserting index marks in a file enables you to locate the playback point immediately during the fast forward, fast reverse, or playback operation. You can insert index marks only in the files in the VOICE (A-D) folders. Inserting index marks 1. During recording or playback, press the [LIST/INDEX] button (located on the side panel) at the point where you want to insert an index mark. The unit displays the message "INDEX SETTING..." and the index mark is inserted. Note: · Recording or playback continues after you insert an index mark. Repeat the same steps to continue inserting more index marks in the file, if necessary. · You can insert up to 36 index marks in each file. If you try to insert more than 36 index marks, the unit displays "INDEX FULL!" and no more index marks will be recorded. · If you divide a file that contains index marks, the index marks will be deleted. Deleting index marks 1. While the main screen is displayed, press the [FOLDER/A-B REPEAT] button located on the side panel repeatedly to select a folder that contains a file from which you want to delete index marks. 2. Press the [DEL] button located on the side panel. 3. Press the [VOL +/-] buttons to select [INDEX], then press the [MENU/ENTER] button. POCKETRAK CX Reference Manual 40
-
 1
1 -
2
-
3
-
4
-
5
-
6
-
7
-
8
-
9
-
10
-
11
-
12
-
13
-
14
-
15
-
16
-
17
-
18
-
19
-
20
-
21
-
22
-
23
-
24
-
25
-
26
-
27
-
28
-
29
-
30
-
31
-
32
-
33
-
34
-
 35
35 -
 36
36 -
 37
37 -
 38
38 -
 39
39 -
 40
40 -
 41
41 -
 42
42 -
 43
43 -
 44
44 -
 45
45 -
46
-
47
-
48
-
49
-
50
-
51
-
52
-
53
-
54
-
55
-
56
-
57
-
58
-
59
-
60
-
61
-
62
-
63
-
64
-
65
-
66
-
67
-
68
-
69
-
70
-
71
-
72
-
73
-
74
-
75
-
76
-
77
-
78
-
79
-
80
-
81
-
82
-
83
 |
 |
