Yamaha QL5 Owner's Manual - Page 14
USER DEFINED KEYS FADER BANK Master SEL] key, CUE] key, ON] key
 |
View all Yamaha QL5 manuals
Add to My Manuals
Save this manual to your list of manuals |
Page 14 highlights
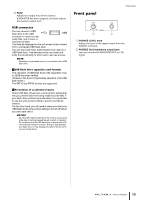
Controls and functions USER DEFINED KEYS section USER DEFINED keys [1]-[12] Execute functions as assigned by the user (scene changes, switching the talkback or internal oscillator on/off, etc.). Make these assignments in the USER SETUP screen. Master section This section is similar to the Channel Strip section, and enables you to control the principal parameters of the assigned channels. When the unit is in the default state, STEREO/MONO channels are assigned. 1 2 FADER BANK section 3 4 5 1 1 Bank Select keys [1-32]/[33-64]/ [STIN/DCA]/[MIX/MATRIX] These keys switch the channel faders controlled in the Channel Strip section. 6 Press the [1-32] key and [MIX/MATRIX] key simultaneously to switch between fader bank A and custom fader bank B. For details on the custom fader banks, refer to page 22. 14 Owner's Manual 1 [SEL] key Selects the channel you wish to control. Pressing this key will cause the channel LED to light up, and you will be able to control the channel in both the Selected Channel section and on the touch screen. If the STEREO bus has been assigned, the selected object of control will alternate between the L and R channels each time you press the [SEL] key. 2 [CUE] key Selects the channel to be cue-monitored. If cue is on, the LED will light. 3 [ON] key Switches the channel on or off. If a channel is on, the key LED will light. If MONITOR has been assigned, this key switches the monitor output on or off. 4 Channel name display 5 Channel color indicator Same as that in the Channel Strip section.
-
 1
1 -
2
-
3
-
4
-
5
-
6
-
7
-
8
-
 9
9 -
 10
10 -
 11
11 -
 12
12 -
 13
13 -
 14
14 -
 15
15 -
 16
16 -
 17
17 -
 18
18 -
 19
19 -
20
-
21
-
22
-
23
-
24
-
25
-
26
-
27
-
28
-
29
-
30
-
31
-
32
-
33
-
34
-
35
-
36
-
37
-
38
-
39
-
40
-
41
-
42
-
43
-
44
-
45
-
46
-
47
-
48
-
49
-
50
-
51
-
52
-
53
-
54
-
55
-
56
-
57
-
58
 |
 |
