Yamaha QL5 Owner's Manual - Page 27
Storing settings in a library, When you've assigned a title to the settings
 |
View all Yamaha QL5 manuals
Add to My Manuals
Save this manual to your list of manuals |
Page 27 highlights
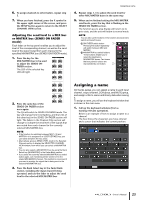
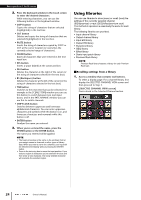
Storing settings in a library 1. Access a window that contains tool buttons. 2. Select the channel (EQ/dynamics) or rack (GEQ/effect/Premium Rack) whose settings you want to store. NOTE You can select only one channel or rack as the source for storing. If multiple channels are selected in the dynamics or EQ window, you will not be able to perform the Store operation. 3. Press the LIBRARY button. The screen for the selected library appears. Using libraries • Be aware that if you store settings to a location that already contains data, the existing data will be overwritten. (Read-only data cannot be overwritten.) Erasing settings from a library 1. Access a window that contains tool buttons. 2. Press the LIBRARY button. The screen for the selected library appears. 4. Turn the [TOUCH AND TURN] knob to select the store-destination library number. NOTE You cannot store to a library number that contains read-only data (indicated by an R symbol). 5. When you've selected the store-destination, press the STORE button. The LIBRARY STORE window will appear, allowing you to assign a name to the data. For details on entering text, refer to "Assigning a name" (see page 23). 6. When you've assigned a title to the settings, press the STORE button in the keyboard window. A dialog box will ask you to confirm the Store operation. 7. Press the OK button to execute the Store operation. The current settings will be stored to the library number you selected in step 4. If you decide to cancel the Store operation, press the CANCEL button instead of the OK button. NOTE • Even after you have stored the settings, you can edit the title of the settings by pressing the data title in the list to access the LIBRARY TITLE EDIT window. However, you can't edit the title of a read-only library item (indicated by an R symbol). 3. Turn the [TOUCH AND TURN] knob to select the library number that you want to clear. NOTE You can't clear read-only data (data indicated by an "R" symbol). 4. Press the CLEAR button. A dialog box will ask you to confirm the Clear operation. 5. Press the OK button to execute the Clear operation. The data you selected in step 3 will be cleared. If you decide to cancel the Clear operation, press the CANCEL button instead of the OK button. Owner's Manual 27
-
 1
1 -
2
-
3
-
4
-
5
-
6
-
7
-
8
-
9
-
10
-
11
-
12
-
13
-
14
-
15
-
16
-
17
-
18
-
19
-
20
-
21
-
 22
22 -
 23
23 -
 24
24 -
 25
25 -
 26
26 -
 27
27 -
 28
28 -
 29
29 -
 30
30 -
 31
31 -
 32
32 -
33
-
34
-
35
-
36
-
37
-
38
-
39
-
40
-
41
-
42
-
43
-
44
-
45
-
46
-
47
-
48
-
49
-
50
-
51
-
52
-
53
-
54
-
55
-
56
-
57
-
58
 |
 |
