Zenith C34W23 Operating Guide
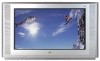
Zenith C34W23 - 34" Widescreen Integrated HDTV Manual
 |
UPC - 044642003326
View all Zenith C34W23 manuals
Add to My Manuals
Save this manual to your list of manuals |
Zenith C34W23 manual content summary:
- Zenith C34W23 | Operating Guide - Page 1
Operating Guide | Warranty Model Numbers | C32V23, C36V23, C34W23 | Digital TVs © Copyright 2002, Zenith Electronics Corporation - Zenith C34W23 | Operating Guide - Page 2
of the TV cabinet. For your future convenience, we suggest that you record these numbers here: Model No Serial No WARNING RISK OF ELECTRIC SHOCK DO NOT OPEN WA R N I N G : TO REDUCE THE RISK OF ELECTRIC SHOCK DO NOT REMOVE COVER (OR BACK). NO USER SERVICEABLE PARTS INSIDE. REFER SERVICING TO - Zenith C34W23 | Operating Guide - Page 3
future reference. Observing the simple precautions discussed in this operating guide can help you get many years of enjoyment and safe operation a bookcase or rack unless proper ventilation is provided or the manufacturer's instructions have been adhered to. 11. Power Sources This product should be - Zenith C34W23 | Operating Guide - Page 4
mast and supporting structure, instructions. Adjust only those controls that are covered by the operating instructions part. Unauthorized substitutions may result in fire, electric shock, or other hazards. 22. Safety Check Upon completion of any service or repairs to this product, ask the service - Zenith C34W23 | Operating Guide - Page 5
Brand Codes 46 - 47 Remote Modes Key Functions 48 Maintenance 49 Troubleshooting 50 - 51 - 52 Glossary 53 Notes 54 - 55 Zenith Warranty Back Cover Video Menu 30 EZ Picture: (Custom, Normal, Digital Preset, Night Time, Movie, Note: Design and specifications are subject to change without - Zenith C34W23 | Operating Guide - Page 6
and audio equipment see pages 7, 15, 16. 4. Install batteries in remote control. See any page 8 through 14. 5. Plug TV and source equipment into power outlets. See pages 8 through 14. 6. Turn TV on. See pages 17 (Front Panel) and 19 (Remote Control). 7. Choose on screen menu language. See page 37 - Zenith C34W23 | Operating Guide - Page 7
and ana- log hookup options. ANTENNA/ CABLE 1 ANTENNA 2 CALIBRATION HD IN (1080i) Y DVD IN (480i) Y VIDEO 1 equipment here. -EDTV Set top Box, 1080i -HDTV Set top Box, 1080i See page 14. DVD use both digital and analog equipment to receive your TV channels, use both Antenna/Cable 1 and Antenna 2 - Zenith C34W23 | Operating Guide - Page 8
of the remote and put in two "AAA" batteries. Antenna Back of Remote Flat Wire (300 ohm) 4 Plug in your TV. Your TV is service provider. Each end looks like a hex shaped nut with a wire sticking through the middle, and it screws onto the threaded antenna/cable jack on the back of your TV - Zenith C34W23 | Operating Guide - Page 9
back of the TV. 2 Connect the cable service wire that runs from the wall or cable box directly to this jack, according to one of the diagrams to the right. 3 Remove the back of the remote and put in two "AAA" batteries. Back of Remote 4 Plug in your TV. Your TV is designed to operate - Zenith C34W23 | Operating Guide - Page 10
back of the remote and put in two "AAA" Flat Wire (300 ohm) batteries. Back of Remote 300/75 ohm Adapter 4 Plug in your TV. Your TV is designed 3 4 Out Audio Video TV Back 120 V AC 60 Hz No adapters or A/V cables are included with the TV. See your Zenith dealer to purchase any adapters or - Zenith C34W23 | Operating Guide - Page 11
the dia- grams to the right. Make any other connec- tions necessary for your setup. 3 Remove the back of the remote and put in two "AAA" batteries. Cable service with or without a cable box Typical Cable TV Wall Jack VCR Back VCR Back AV Panel In output switch 3 4 Out Audio Video Back of - Zenith C34W23 | Operating Guide - Page 12
From Antenna or Cable Service With or Without a Cable Box 1 Hook up your S-VHS VCR to your Zenith TV according to the diagram shown at the right. Flat Wire (300 ohm) 2 Remove the back of the remote and put in two "AAA" batteries. Back of Remote 3 Plug in your TV. Your TV is designed to - Zenith C34W23 | Operating Guide - Page 13
as indicated. (Appearance of components may vary from those in the illus- trations.) 2 Remove the back of the remote and put in two "AAA" batteries. Back of Remote 3 Plug in your TV. Your TV is designed to operate on standard household current, 120-volt 60 Hertz AC. Do not plug it into an - Zenith C34W23 | Operating Guide - Page 14
Interlaced only) Connect high-definition component video equipment here. HDTV Set top Box, 1080i 1 Make the HD connections R AUDIO L R AUDIO L 120 V AC 60 Hz 4 Press POWER to turn TV on. 5 On the remote, press SOURCE repeatedly until "HD-In" is displayed. Or use the Source menu to choose - Zenith C34W23 | Operating Guide - Page 15
(Refer to the Audio Menu on page 31 for instructions on how to turn the TV's internal speakers off and on.) 3 Select Audio/Video or the source connected to the HD-IN or DVD-IN jacks, MONITOR OUTPUT is not available. TV Back HD IN Y Pr RGB Pb DVD IN Y VIDEO 1 VIDEO 2 MONITOR IN IN OUTPUT - Zenith C34W23 | Operating Guide - Page 16
the audio equipment. 3 See the external audio equipment instruction manual for operation. Caution: Do not look into the optical output port. Looking at the laser beam may damage your vision. TV Back ANTENNA/ CABLE 1 ANTENNA/ CABLE 2 CALIBRATION HD IN Y DVD IN Y VIDEO 1 VIDEO 2 MONITOR IN - Zenith C34W23 | Operating Guide - Page 17
Used for stereo sound from external equipment. C34W23 Side Control Panel menu channel TV Operation 1 Press POWER to turn TV on and off. 2 Use the CHANNEL equipment like a Camcorder to the Front Video input jacks. 2 On the remote control, use Source to choose Front Video, or use the Source menu - Zenith C34W23 | Operating Guide - Page 18
TV/DTV Ant only 2. CATV only 3. TV/DTV+CATV Menu Prev. Option 3 1 Press MENU, (if not selected, use the Up/Down arrow to choose Setup Menu,) then press ENTER or the right arrow button. 2 Using the Up or Down arrow on the remote cable service provider. PRG POWER CABLE VCR AUX TV SURF - Zenith C34W23 | Operating Guide - Page 19
VIDEO CC QUIT RECORD PAUSE TIMER SOURCE REWIND PLAY STOP F FWD remote control part number MBR4286 (P124-00240) POWER Turns TV On or Off. LED INDICATOR LIGHT Lights when keys are pressed. CABLE/VCR/AUX/TV Selects remote operating mode. MUTE Turns sound Off/On while the picture remains.Press - Zenith C34W23 | Operating Guide - Page 20
press the Right arrow. You can select other menu options like COLOR TEMP using the UP or DOWN directional arrows. 32 3 Once the to remove the menus from the TV screen. Additional instructions are usually included on the bottom of the menu indicating which remote keys to use to move to the - Zenith C34W23 | Operating Guide - Page 21
Choose the connected source you want to see and hear on your TV ANTENNA/ CABLE 1 ANTENNA 2 CALIBRATION HD IN (1080i) Y DVD IN (480i) Y VIDEO Analog: Antenna/Cable1 -2 on TV back near Jackpack, Over-the-Air Antenna or Cable service signal source. Video 1 In: on TV back Jackpack, Set of - Zenith C34W23 | Operating Guide - Page 22
the other keys indicated on the remote, the user can access the menus and displays TV/DTV Ant 1 X Ant 2 Select antenna input, press ENTER 1. TV/DTV Ant only 2. CATV only 3. TV/DTV+CATV Menu Prev. SETUP VIDEO AUDIO TIME SPECIAL LOCK EZ Picture Contrast Brightness Color Tint Sharpness Color - Zenith C34W23 | Operating Guide - Page 23
34 Sets the TVs internal clock and TV turn on/off functions. Clock page 32 Sets the current time on the TV. Off Timer page 33 Sets the time the TV will turn off automatically each day. On Timer page 33 Sets the time the TV Sleep Timer TIME SPECIAL LOCK Type Manual Year 2002 Date 10 / 23 - Zenith C34W23 | Operating Guide - Page 24
again to restore the sound. Mute B Volume Display Press the VOLUME +/- key on the remote control to see the sound level status display. 8 C Channel/Time Display TV 7-0 Press ENTER on the remote control to STEREO view the Channel/Time/incoming audio signal, and channel label display. XYZ - Zenith C34W23 | Operating Guide - Page 25
it isn't gone for good. Just select it using the NUMBER keypad on the remote, or add it later. 1/5 Mini glossary ADD Include a new channel to the scroll the normal channels list. 206-3767 PRG POWER CABLE VCR AUX TV SURF FLASHBK MUTE CHANNEL VOLUME VOLUME CHANNEL 123 4 56 7 89 - Zenith C34W23 | Operating Guide - Page 26
Signal option is only accessible on the Setup menu if the source is DTV. Press SIGNAL on the remote control to show signal strength. 2/3 1 PRG POWER CABLE VCR AUX TV SURF FLASHBK MUTE CHANNEL VOLUME VOLUME CHANNEL 123 4 56 7 89 0 - MENU ENTER RATIO SIGNAL AUDIO VIDEO CC QUIT - Zenith C34W23 | Operating Guide - Page 27
Press QUIT to remove menus and return to TV viewing. The tilt angle you set will be retained in the TV's memory. When the TV is turned on, the tilt angle last set will be used. 2/3/4 1 PRG POWER CABLE VCR AUX TV SURF FLASHBK MUTE CHANNEL VOLUME VOLUME CHANNEL 123 4 56 7 89 0 - Zenith C34W23 | Operating Guide - Page 28
appears above the channel picture on the menu. 5 Tune to another channel to continue labeling or press QUIT to remove menu and to return to TV viewing. TV 7-0 STEREO XYZ When you press ENTER, the label you have chosen will appear in the channel/time display. When you scroll through the channels - Zenith C34W23 | Operating Guide - Page 29
have selected a viewing source, press QUIT to remove the menu and return to TV viewing. 2/3/4 If S-Video sources are connected, they will appear on the Source different picture proportions for the main screen. CABLE VCR AUX TV SURF FLASHBK MUTE CHANNEL VOLUME VOLUME CHANNEL 123 4 56 - Zenith C34W23 | Operating Guide - Page 30
Color Temp Z-View LOCK LOCK 1 Press MENU, use the Up/Down arrow to select the Video menu, then press ENTER or the Right arrow. 2 Using the Up/Down arrow on the remote , the softer the image will appear. • Color Temp: Adjusts levels of all colors in the TV picture; Cool or Warm. • Z-View: - Zenith C34W23 | Operating Guide - Page 31
or the Right arrow button. 2 Using the Up/Down arrow on the remote control, highlight the audio option you want to adjust, then press the Right to your preference. PRG POWER CABLE VCR AUX TV SURF FLASHBK MUTE 4 Press QUIT, to return to TV viewing, or press MENU and repeat from CHANNEL - Zenith C34W23 | Operating Guide - Page 32
Down arrows to set the clock as indicated on the menu. Clock Menu Options Manual Mode User sets the Clock options. • Year: Set the current year. • Date: • Daylight Savings: Turn Off or On. 1/2 3 Press QUIT to return to TV viewing, or press MENU to return to the previous menu. 1/3 The On/Off - Zenith C34W23 | Operating Guide - Page 33
SPECIAL LOCK SETUP VIDEO AUDIO Clock Off Timer On Timer Sleep Timer TIME SPECIAL LOCK Menu Prev. Off On Time 11 : 00 PM Setting the TV Turn Off Time 1 With the Time menu selected, use the Up/Down arrows to choose the Off Timer option, then press ENTER or the Right - Zenith C34W23 | Operating Guide - Page 34
TV off preset time from 10 minutes to 4 hours for the TV to automatically turn itself off. Using the Sleep Timer Menu to select a preset TV turn-off time from the preset options listed, press ENTER the menu and return to TV viewing. 1/2 1 PRG POWER CABLE VCR AUX TV SURF FLASHBK MUTE CHANNEL VOLUME - Zenith C34W23 | Operating Guide - Page 35
the picture source is correct and no other options are available. For Model No. C34W23, Aspect Ratio will be Normal, Wide, or Zoom. As a result, Set by Program, 16:9, and 4:3 are not available. PRG POWER CABLE VCR AUX TV SURF FLASHBK MUTE CHANNEL VOLUME VOLUME CHANNEL 123 4 56 7 89 - Zenith C34W23 | Operating Guide - Page 36
Text 2 Text 3 Text 4 Analog Caption (Caption/Text) allows your TV to receive various closed caption and text options if provided by broadcasters. usually messages provided by the broadcaster. PRG POWER CABLE VCR AUX TV SURF FLASHBK MUTE CHANNEL VOLUME VOLUME CHANNEL 123 4 56 7 89 - Zenith C34W23 | Operating Guide - Page 37
of the following options: English, Spanish, or French, then press ENTER. 4 Press QUIT to remove menu and to return to TV viewing. 1/2/3 1 PRG POWER CABLE VCR AUX TV SURF FLASHBK MUTE CHANNEL VOLUME VOLUME CHANNEL 123 4 56 7 89 0 - MENU ENTER RATIO SIGNAL AUDIO VIDEO CC QUIT - Zenith C34W23 | Operating Guide - Page 38
and learn what features are available to you as EZ Demo cycles through the on-screen menus. 1/2 1 PRG POWER CABLE VCR AUX TV SURF FLASHBK MUTE CHANNEL VOLUME VOLUME CHANNEL 123 4 56 7 89 0 - MENU ENTER RATIO SIGNAL AUDIO VIDEO CC QUIT RECORD PAUSE TIMER SOURCE REWIND PLAY - Zenith C34W23 | Operating Guide - Page 39
TV. Note: Lock, is also known and referred to in the text as Parental Control. To block specific on or off by the user who specifies the secret 4-number code, TV Rating-Children option: Fantasy Violence. • Select a secret password; in the Set Password option. Use the number keys on the remote - Zenith C34W23 | Operating Guide - Page 40
instructions AUDIO Movie Rating TIME TV Rating-Children TV Rating-General SPECIAL Aux Down arrow to highlight an option like TV Rating-General, then press ENTER or the For "Language" for example, use the "TV-PG" setting. (See the Mini Glossary, Note: Zenith Electronics Corporation is not liable for any - Zenith C34W23 | Operating Guide - Page 41
Tilt Ch. Label Input Source SPECIAL LOCK SETUP VIDEO AUDIO TIME SPECIAL Lock System Set Password Select Country Block Ch. Movie Rating TV Rating-Children TV Rating-General Aux. Block LOCK Menu Prev. On Off New **** Confirm **** USA Canada Age Fantasy Violence Age Dialog Language Sex Violence - Zenith C34W23 | Operating Guide - Page 42
. IF they do not operate, try another code. Or, see page 45. Not all devices will operate with your Zenith remote control. Mode / Product Compatibility TV VCR CATV AUX TVs VCRs Cable Boxes, All products on pp 46 - 47 DVDs Satellite Receivers Mini glossary PROGRAMMING PRG DEVICE Procedure to - Zenith C34W23 | Operating Guide - Page 43
want to hear. If not, see the remote programming page. 1 With a small blunt object, press and hold PRG until the LED 1 indicator light turns on (about 3 seconds), then release PRG. 2 Press the mode button of the device you want to hear: CABLE, VCR, AUX, TV. Indicator Light 3 Press the Vol - Zenith C34W23 | Operating Guide - Page 44
are programmed. Not all devices will work with your Zenith remote control. Mode / Product Compatibility TV VCR CATV TVs VCRs Cable Boxes, DVDs Satellite Receivers AUX All products on pp 46 - 47 PRG POWER CABLE VCR AUX TV 2 SURF FLASHBK MUTE CHANNEL VOLUME VOLUME CHANNEL 123 4 56 - Zenith C34W23 | Operating Guide - Page 45
Search by pressing PRG or not pressing any button for 20 seconds. The Zenith remote may not be able to operate the device. If so, use the device's original remote control. PRG POWER CABLE VCR AUX TV SURF FLASHBK MUTE CHANNEL VOLUME VOLUME CHANNEL 123 4 56 7 89 0 - MENU ENTER RATIO - Zenith C34W23 | Operating Guide - Page 46
Codes Other Manufacturers Brand Names and Programming Codes TVS A MARK 112 143 ADMIRAL 072 081 161 TELEFUNKEN TELERENT TERA TMK TOSHIBA TOTEVISION UNIVERSAL VIDEO CONCEPTS VIDIKRON VIDTECH WARDS YAMAHA YORK YUPITERU ZENITH ZONDA 029 081 143 170 175 088 072 041 070 079 085 126 139 147 185 - Zenith C34W23 | Operating Guide - Page 47
129 212 PRIMESTAR 140 220 221 PROSAT 182 RCA 176 216 REALISTIC 153 184 SAMSUNG 233 SATELLITE SERVICE CO 138 145 157 167 SCIENTIFIC ATLANTA SONY STARCAST SUPER GUIDE TEECOM TOSHIBA UNIDEN UNIDEN VIEWSTAR WINEGARD ZENITH 195 142 248 213 151 130 234 235 133 136 185 197 198 200 217 240 247 - Zenith C34W23 | Operating Guide - Page 48
list for your remote control KEY NAME POWER CABLE VCR AUX TV SURF FLASHBK MUTE Guide VCR Rewind VCR Play VCR Stop VCR Fast Forward AUX Mode (DVD) Zenith Code 960 AUX TV/DISC Selects Cable Selects VCR Selects AUX Selects TV AUX Audio AUX Return TV Mute AUX Skip >> AUX Skip - Zenith C34W23 | Operating Guide - Page 49
Careful and regular cleaning can extend the the useful service life of the TV. Be sure to turn the power off and pull Make sure the excess water is off the screen, and then let it air-dry before turning the TV on. Cabinet Cleaning 1. Use a soft cloth with a mild soap solution to wipe the cabinet. - Zenith C34W23 | Operating Guide - Page 50
. • Broadcast problem. -Press MUTE or VOL (Volume) + key to increase sound level. 19 -Tune to a different channel. 17/19 TV turns On. • On-Timer turned TV On. -Cancel On-Timer and/or turn TV off. 33 TV turns Off. • Sleep Timer turned TV Off. -Turn TV back on. 34 • Off-Timer turned TV off - Zenith C34W23 | Operating Guide - Page 51
Troubleshooting Some quick and easy tips to resolving problems Symptoms Using Remote Control Remote does not work. Remote does not operate accessory product. Possible Cause(s) • Wrong mode selected. • Not aimed at remote sensor. • Remote too far from TV or too much light in room. • IR path to TV - Zenith C34W23 | Operating Guide - Page 52
Troubleshooting (Continued) Symptoms Possible Cause(s) Possible Solution(s) Page(s) Sound/Audio Problems Normal picture but no sound. • Check volume levels No SAP signal. -Make sure the TV sound is not muted. -The problem may be the broadcast, not your TV. -Install the Audio cables correctly. - Zenith C34W23 | Operating Guide - Page 53
some of the words found in this guide 75 OHM RF CABLE The wire that comes from an off-air antenna or cable service provider. The end looks like a hex from the channel scan list that you'll scroll through. DTV Digital TV. Digital channels are usually identified with dash "-" numbers: 9-1, 9-2, etc - Zenith C34W23 | Operating Guide - Page 54
Notes PAGE 54 206-3767 - Zenith C34W23 | Operating Guide - Page 55
Notes 206-3767 PAGE 55 - Zenith C34W23 | Operating Guide - Page 56
Zenith TV Models: C32V23•C36V23•C34W23 Warranty Zenith will repair or replace your product, at Zenith's option, if it proves to be defective in material or workmanship under normal use, during the warranty period listed below from the date of original
-
 1
1 -
 2
2 -
 3
3 -
 4
4 -
 5
5 -
 6
6 -
 7
7 -
8
-
9
-
10
-
11
-
12
-
13
-
14
-
15
-
16
-
17
-
18
-
19
-
20
-
21
-
22
-
23
-
24
-
25
-
26
-
27
-
28
-
29
-
30
-
31
-
32
-
33
-
34
-
35
-
36
-
37
-
38
-
39
-
40
-
41
-
42
-
43
-
44
-
45
-
46
-
47
-
48
-
49
-
50
-
51
-
52
-
53
-
54
-
55
-
56
 |
 |

© Copyright 2002, Zenith Electronics Corporation
Operating Guide | Warranty
Model Numbers
|
C32V23, C36V23, C34W23
| Digital TVs