Zenith C34W23 Operating Guide - Page 13
Hook Up Component Video Equipment
 |
UPC - 044642003326
View all Zenith C34W23 manuals
Add to My Manuals
Save this manual to your list of manuals |
Page 13 highlights
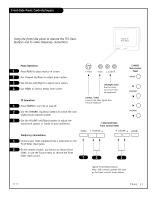
Hook Up Component Video Equipment The DVD IN Input jacks will only accept an interlaced signal. Switch your DVD player or set-top box to interlaced. Connecting component video DVD equipment DVD IN (480 Interlaced only) Connect standard component video equipment or a DVD player here. DVD Player, 480i SDTV Set top Box, 480i 1 Make the connections as indicated. (Appearance of components may vary from those in the illus- trations.) 2 Remove the back of the remote and put in two "AAA" batteries. Back of Remote 3 Plug in your TV. Your TV is designed to operate on standard household current, 120-volt 60 Hertz AC. Do not plug it into an outlet controlled by a switch. Do not attempt to operate it on DC power. TV Back HD IN Y Pr RGB Pb DVD IN (480i) Y VIDEO 1 IN VIDEO 2 MONITOR IN OUTPUT S-VIDEO 1 S-VIDEO 2 Pr VIDEO VIDEO VIDEO Pb R AUDIO L R AUDIO L R AUDIO L R AUDIO L R AUDIO L 120 V AC 60 Hz 4 Press POWER to turn TV on. 5 On the remote, press SOURCE repeatedly until "DVD IN" is displayed. Or use the Source menu to choose DVD IN. Component video jacks are sometimes labeled with CR, CB, or PB, PR. In this case, connect B to B and the R to R. The "Y" jack is usually labeled "Y", connect Y to Y. DVD IN input does not accept progressive (480p/720p) or interlaced (1080i) video formats. Y Pr Pb R L COMPONENT VIDEO OUT S-VIDEO OUT VIDEO R-AUDIO L-/MONO DVD Player with Component Video 206-3767 PAGE 13
-
 1
1 -
2
-
3
-
4
-
5
-
6
-
7
-
 8
8 -
 9
9 -
 10
10 -
 11
11 -
 12
12 -
 13
13 -
 14
14 -
 15
15 -
 16
16 -
 17
17 -
 18
18 -
19
-
20
-
21
-
22
-
23
-
24
-
25
-
26
-
27
-
28
-
29
-
30
-
31
-
32
-
33
-
34
-
35
-
36
-
37
-
38
-
39
-
40
-
41
-
42
-
43
-
44
-
45
-
46
-
47
-
48
-
49
-
50
-
51
-
52
-
53
-
54
-
55
-
56
 |
 |
