ZyXEL G-302 v3 User Guide - Page 45
WPA-PSK/WPA2-PSK - g 302 v2
 |
View all ZyXEL G-302 v3 manuals
Add to My Manuals
Save this manual to your list of manuals |
Page 45 highlights
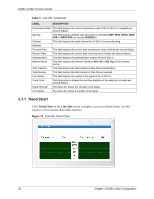
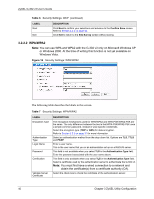
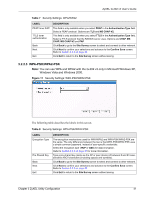
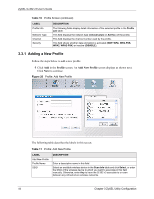
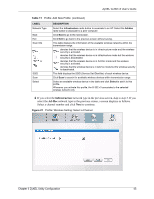
ZyXEL G-302 v3 User's Guide Table 7 Security Settings: WPA/WPA2 LABEL PEAP Inner EAP TTLS Inner authentication Back Next Exit DESCRIPTION This field is only available when you select PEAP in the Authentication Type field. Select a PEAP protocol. Options are TLS and MS CHAP-V2. This field is only available when you select TTLS in the Authentication Type field. Select a TTLS protocol that the RADIUS server uses. Options are CHAP, MS CHAP, MS CHAP-V2 and PAP. Click Back to go to the Site Survey screen to select and connect to other network. Click Next to confirm your selections and advance to the Confirm Save screen. Refer to Section 3.2.3 on page 42. Click Exit to return to the Site Survey screen without saving. 3.2.2.3 WPA-PSK/WPA2-PSK Note: You can use WPA and WPA2 with the G-302 v3 only in Microsoft Windows XP, Windows Vista and Windows 2000. Figure 17 Security Settings: WPA-PSK/WPA2-PSK The following table describes the labels in this screen. Table 8 Security Settings: WPA-PSK/WPA2-PSK LABEL Encryption Type Pre-Shared Key Back Next Exit DESCRIPTION The encryption mechanisms used for WPA/WPA2 and WPA-PSK/WPA2-PSK are the same. The only difference between the two is that WPA-PSK/WPA2-PSK uses a simple common password, instead of user-specific credentials. Select the encryption type (TKIP or AES) for data encryption. Refer to Section 2.2.3 on page 31 for more information. Type a pre-shared key (same as the AP or peer device) of between 8 and 63 casesensitive ASCII characters (including spaces and symbols). Click Back to go to the Site Survey screen to select and connect to other network. Click Next to confirm your selections and advance to the Confirm Save screen. Refer to Section 3.2.3 on page 42. Click Exit to return to the Site Survey screen without saving. Chapter 3 ZyXEL Utility Configuration 41
-
 1
1 -
2
-
3
-
4
-
5
-
6
-
7
-
8
-
9
-
10
-
11
-
12
-
13
-
14
-
15
-
16
-
17
-
18
-
19
-
20
-
21
-
22
-
23
-
24
-
25
-
26
-
27
-
28
-
29
-
30
-
31
-
32
-
33
-
34
-
35
-
36
-
37
-
38
-
39
-
 40
40 -
 41
41 -
 42
42 -
 43
43 -
 44
44 -
 45
45 -
 46
46 -
 47
47 -
 48
48 -
 49
49 -
 50
50 -
51
-
52
-
53
-
54
-
55
-
56
-
57
-
58
-
59
-
60
-
61
-
62
-
63
-
64
-
65
-
66
-
67
-
68
-
69
-
70
-
71
-
72
-
73
-
74
-
75
-
76
-
77
-
78
-
79
-
80
-
81
 |
 |