ZyXEL NPS-520 User Guide - Page 37
Title Bar, 3.3.2 Navigation Panel, 3.3.3 Main Window, 3.4 The Status Screen, Title Bar
 |
View all ZyXEL NPS-520 manuals
Add to My Manuals
Save this manual to your list of manuals |
Page 37 highlights
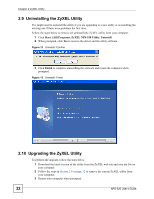
Chapter 3 Web Configurator • D - status bar 3.3.1 Title Bar The title bar provides some icons in the upper right corner. The icons provide the following functions. Table 9 Title Bar: Web Configurator Icons ICON DESCRIPTION Help: Click this icon to open the help page for the current screen. About: Click this icon to open the about screen where you can view driver and utility version numbers of the NPS-520. Logout: Click this icon to exit the web configurator. 3.3.2 Navigation Panel After you enter the password, use the menus on the navigation panel to configure NPS-520 features. The following table describes the menus. Table 10 Screens Summary LINK SUB-MENU FUNCTION Status This screen shows the NPS-520's general device, printer status and TCP/IP information. System Use this screen to change your administrative information and system password. Setup TCP/IP Use this screen to configure TCP/IP and DHCP settings. Utilities Firmware Upgrade Use this screen to upload firmware to your NPS-520 Load Defaults Use this screen to reset the factory defaults (the password is 1234 and the IP address is 192.168.1.6). Restart Server This screen allows you to reboot the NPS-520 without turning the power off. 3.3.3 Main Window The main window shows the screen you select in the navigation panel. It is discussed in more detail in the rest of this document. Right after you log in, the Status screen is displayed. 3.4 The Status Screen This screen displays general status information about the NPS-520. NPS-520 User's Guide 37
-
 1
1 -
2
-
3
-
4
-
5
-
6
-
7
-
8
-
9
-
10
-
11
-
12
-
13
-
14
-
15
-
16
-
17
-
18
-
19
-
20
-
21
-
22
-
23
-
24
-
25
-
26
-
27
-
28
-
29
-
30
-
31
-
 32
32 -
 33
33 -
 34
34 -
 35
35 -
 36
36 -
 37
37 -
 38
38 -
 39
39 -
 40
40 -
 41
41 -
 42
42 -
43
-
44
-
45
-
46
-
47
-
48
-
49
-
50
-
51
-
52
-
53
-
54
-
55
-
56
-
57
-
58
-
59
-
60
-
61
-
62
-
63
-
64
-
65
-
66
-
67
-
68
-
69
-
70
-
71
-
72
-
73
-
74
-
75
-
76
-
77
-
78
-
79
-
80
-
81
-
82
-
83
-
84
-
85
-
86
-
87
-
88
-
89
-
90
-
91
-
92
-
93
-
94
-
95
-
96
-
97
-
98
-
99
-
100
-
101
-
102
-
103
-
104
-
105
-
106
-
107
-
108
-
109
-
110
-
111
-
112
 |
 |
