1997 Pontiac Bonneville Owner's Manual - Page 158
1997 Pontiac Bonneville Manual

Page 158 highlights
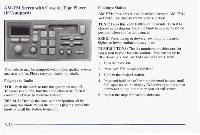
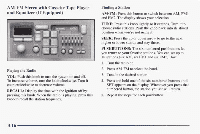
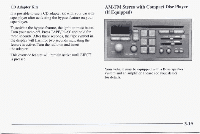
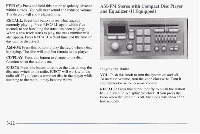
Setting the Tone EQUALIZER: A seven band equalizer is part of your audio system. Slide the levers up to boost or down to reduce frequency range. Adjusting the Speakers cassette are playing. The tape player automatically begins playing the other side when it reaches the end of the tape. If E and a number appear on the radio display, thetape won't playbecause of an error. a E10: The tape is tight and the player can't turn the tape hubs. Remove the tape. Hold the tape with the open end down and try to turn the right hub counterclockwise with a pencil. Turn the tape over and repeat. If the hubs do not turn easily, yourtape may be damaged and should not be usedin the player. Try a new tape to make sure your player is working properly. a E l l : The tape is broken. Try a new tape. BAL: Press thisknob lightly so it extends. Turn it to move the sound to the left or right speakers. The middle position balances the sound between the speakers. FADE: Press this knob lightly so it extends. Turn it to move the sound to the front or rear speakers. The middle position balances the sound between the speakers. Push these knobs back into their stored positions when you're not using them. Playing a Cassette Tape Your tape player is built to work best with tapes that are 30 to 45 minutes long on each side. Tapes longer than that are so thin they may not work well in this player. While the tape is playing, use the VOL, FADE and BAL controls just as you do forthe radio. The display will show an arrow to show which side of the tape is playing. When the down indicator arrow is lit, selections listed on the bottom side of the cassette are playing. When the up arrow is lit, selections listed on the top side of the I : amy error occurs repeatedly or if an error can't be f corrected, please contact your dealer. If your radio displays an error number, write it down and provide it to your dealer when reporting the problem. PREV (1): Press this button or the SEEK down arrow to search for the previous selection on the tape. Your tape must have at least three seconds of silence between each selection for PREV or SEEK to work. The tape direction arrow blinks during PREV or SEEK operation. Press PREV or the SEEK down arrow to stop searching. The sound will mute during PREV or SEEK operation. 3-17
-
 1
1 -
2
-
3
-
4
-
5
-
6
-
7
-
8
-
9
-
10
-
11
-
12
-
13
-
14
-
15
-
16
-
17
-
18
-
19
-
20
-
21
-
22
-
23
-
24
-
25
-
26
-
27
-
28
-
29
-
30
-
31
-
32
-
33
-
34
-
35
-
36
-
37
-
38
-
39
-
40
-
41
-
42
-
43
-
44
-
45
-
46
-
47
-
48
-
49
-
50
-
51
-
52
-
53
-
54
-
55
-
56
-
57
-
58
-
59
-
60
-
61
-
62
-
63
-
64
-
65
-
66
-
67
-
68
-
69
-
70
-
71
-
72
-
73
-
74
-
75
-
76
-
77
-
78
-
79
-
80
-
81
-
82
-
83
-
84
-
85
-
86
-
87
-
88
-
89
-
90
-
91
-
92
-
93
-
94
-
95
-
96
-
97
-
98
-
99
-
100
-
101
-
102
-
103
-
104
-
105
-
106
-
107
-
108
-
109
-
110
-
111
-
112
-
113
-
114
-
115
-
116
-
117
-
118
-
119
-
120
-
121
-
122
-
123
-
124
-
125
-
126
-
127
-
128
-
129
-
130
-
131
-
132
-
133
-
134
-
135
-
136
-
137
-
138
-
139
-
140
-
141
-
142
-
143
-
144
-
145
-
146
-
147
-
148
-
149
-
150
-
151
-
152
-
 153
153 -
 154
154 -
 155
155 -
 156
156 -
 157
157 -
 158
158 -
 159
159 -
 160
160 -
 161
161 -
 162
162 -
 163
163 -
164
-
165
-
166
-
167
-
168
-
169
-
170
-
171
-
172
-
173
-
174
-
175
-
176
-
177
-
178
-
179
-
180
-
181
-
182
-
183
-
184
-
185
-
186
-
187
-
188
-
189
-
190
-
191
-
192
-
193
-
194
-
195
-
196
-
197
-
198
-
199
-
200
-
201
-
202
-
203
-
204
-
205
-
206
-
207
-
208
-
209
-
210
-
211
-
212
-
213
-
214
-
215
-
216
-
217
-
218
-
219
-
220
-
221
-
222
-
223
-
224
-
225
-
226
-
227
-
228
-
229
-
230
-
231
-
232
-
233
-
234
-
235
-
236
-
237
-
238
-
239
-
240
-
241
-
242
-
243
-
244
-
245
-
246
-
247
-
248
-
249
-
250
-
251
-
252
-
253
-
254
-
255
-
256
-
257
-
258
-
259
-
260
-
261
-
262
-
263
-
264
-
265
-
266
-
267
-
268
-
269
-
270
-
271
-
272
-
273
-
274
-
275
-
276
-
277
-
278
-
279
-
280
-
281
-
282
-
283
-
284
-
285
-
286
-
287
-
288
-
289
-
290
-
291
-
292
-
293
-
294
-
295
-
296
-
297
-
298
-
299
-
300
-
301
-
302
-
303
-
304
-
305
-
306
-
307
-
308
-
309
-
310
-
311
-
312
-
313
-
314
-
315
-
316
-
317
-
318
-
319
-
320
-
321
-
322
-
323
-
324
-
325
-
326
-
327
-
328
-
329
-
330
-
331
-
332
-
333
-
334
-
335
-
336
-
337
-
338
-
339
-
340
-
341
-
342
-
343
-
344
-
345
-
346
-
347
-
348
-
349
-
350
-
351
-
352
-
353
-
354
-
355
-
356
-
357
-
358
-
359
-
360
-
361
-
362
-
363
-
364
-
365
-
366
-
367
-
368
-
369
-
370
-
371
-
372
-
373
-
374
-
375
-
376
-
377
-
378
-
379
-
380
-
381
-
382
-
383
-
384
-
385
-
386
-
387
-
388
-
389
-
390
-
391
-
392
-
393
-
394
-
395
-
396
-
397
-
398
-
399
-
400
-
401
-
402
-
403
-
404
-
405
 |
 |