2000 Saab 9-3 Owner's Manual - Page 197
2000 Saab 9-3 Manual
Page 197 highlights
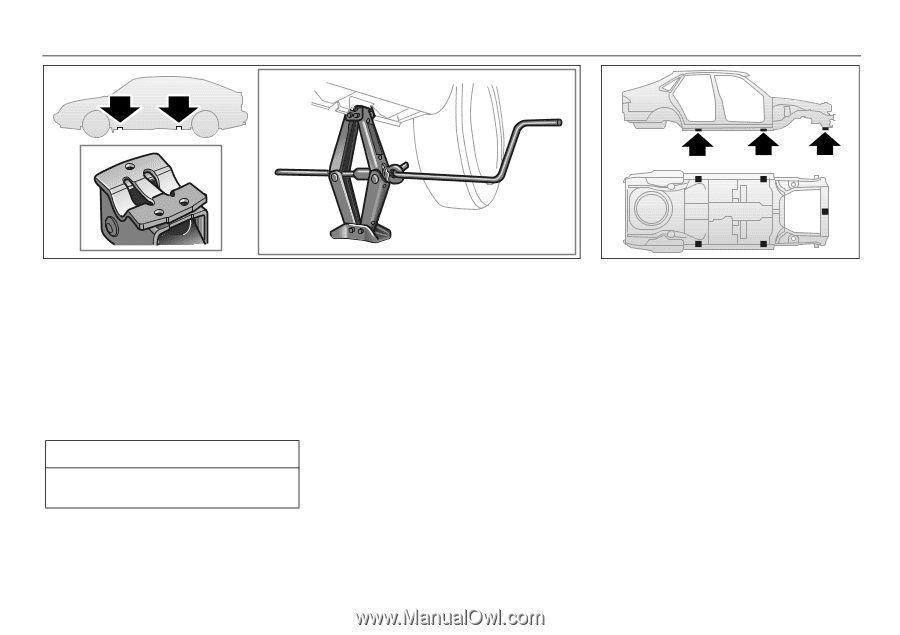
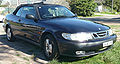
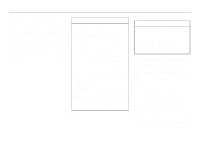
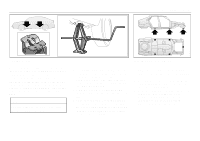
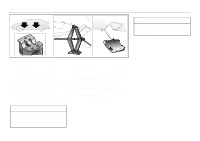
Car care 197 Position for jack When it is time to raise the car, apply the jack to one of the four jacking points (front or rear) located beneath the sills. If a floor jack is used it can be applied to the standard jacking points used by the dealer or centrally under the front of the engine subframe. If the car is equipped with a trailer hitch, the jack can also be placed under the hitch. 1 Put the car in 1st gear (automatic transmission: move selector to the P position) and apply the parking brake. Saab 9-3 Viggen: The front and rear jacking points are located behind covers that must be removed. 2 Wind the jack up to a suitable height before placing it under the recess in the sill. 3 Make sure that the jack fully engages the recess in the sill and that the base of the jack is steady and flat on the ground. 4 Turn the jack handle clockwise until it just begins to lift the car. Jacking points for a floor jack. 5 Remove the wheel cover (where applicable). Loosen the wheel bolts by half a turn. 6 Turn the jack handle to raise the wheel clear of the ground. Remove the wheel bolts and lift off the wheel. 7 Fit the wheel and screw in the bolts in the sequence shown (opposite pairs). Tighten the studs enough for the studs and wheel to be seated correctly. See page 199 for sequence. NOTE Do not position the jack under the rear axle or under the rear floor. IB1311 IB924
-
 1
1 -
2
-
3
-
4
-
5
-
6
-
7
-
8
-
9
-
10
-
11
-
12
-
13
-
14
-
15
-
16
-
17
-
18
-
19
-
20
-
21
-
22
-
23
-
24
-
25
-
26
-
27
-
28
-
29
-
30
-
31
-
32
-
33
-
34
-
35
-
36
-
37
-
38
-
39
-
40
-
41
-
42
-
43
-
44
-
45
-
46
-
47
-
48
-
49
-
50
-
51
-
52
-
53
-
54
-
55
-
56
-
57
-
58
-
59
-
60
-
61
-
62
-
63
-
64
-
65
-
66
-
67
-
68
-
69
-
70
-
71
-
72
-
73
-
74
-
75
-
76
-
77
-
78
-
79
-
80
-
81
-
82
-
83
-
84
-
85
-
86
-
87
-
88
-
89
-
90
-
91
-
92
-
93
-
94
-
95
-
96
-
97
-
98
-
99
-
100
-
101
-
102
-
103
-
104
-
105
-
106
-
107
-
108
-
109
-
110
-
111
-
112
-
113
-
114
-
115
-
116
-
117
-
118
-
119
-
120
-
121
-
122
-
123
-
124
-
125
-
126
-
127
-
128
-
129
-
130
-
131
-
132
-
133
-
134
-
135
-
136
-
137
-
138
-
139
-
140
-
141
-
142
-
143
-
144
-
145
-
146
-
147
-
148
-
149
-
150
-
151
-
152
-
153
-
154
-
155
-
156
-
157
-
158
-
159
-
160
-
161
-
162
-
163
-
164
-
165
-
166
-
167
-
168
-
169
-
170
-
171
-
172
-
173
-
174
-
175
-
176
-
177
-
178
-
179
-
180
-
181
-
182
-
183
-
184
-
185
-
186
-
187
-
188
-
189
-
190
-
191
-
 192
192 -
 193
193 -
 194
194 -
 195
195 -
 196
196 -
 197
197 -
 198
198 -
 199
199 -
 200
200 -
 201
201 -
 202
202 -
203
-
204
-
205
-
206
-
207
-
208
-
209
-
210
-
211
-
212
-
213
-
214
-
215
-
216
-
217
-
218
-
219
-
220
-
221
-
222
-
223
-
224
-
225
-
226
-
227
-
228
-
229
-
230
-
231
-
232
-
233
-
234
-
235
-
236
 |
 |