Acer Veriton X275 Acer Veriton 3900/5900/6900/7900 User's Guide EN - Page 74
Replacing the Veriton 3900Pro's hard disk, To recon your computer
 |
View all Acer Veriton X275 manuals
Add to My Manuals
Save this manual to your list of manuals |
Page 74 highlights
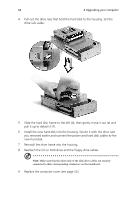
62 4 Upgrading your computer into the socket, turn the DDR2 DIMM around and try to insert it again. To reconfigure your computer Your computer automatically detects the amount of memory installed. Run the BIOS utility to view the new value for total system memory and make a note of it. Replacing the Veriton 3900Pro's hard disk Follow these steps to replace your computer's hard disk: 1 Remove the computer cover (see page 55). 2 Detach all cables connected to the CD or DVD drive, the 3.5-inch floppy drive and hard disk.
-
 1
1 -
2
-
3
-
4
-
5
-
6
-
7
-
8
-
9
-
10
-
11
-
12
-
13
-
14
-
15
-
16
-
17
-
18
-
19
-
20
-
21
-
22
-
23
-
24
-
25
-
26
-
27
-
28
-
29
-
30
-
31
-
32
-
33
-
34
-
35
-
36
-
37
-
38
-
39
-
40
-
41
-
42
-
43
-
44
-
45
-
46
-
47
-
48
-
49
-
50
-
51
-
52
-
53
-
54
-
55
-
56
-
57
-
58
-
59
-
60
-
61
-
62
-
63
-
64
-
65
-
66
-
67
-
68
-
 69
69 -
 70
70 -
 71
71 -
 72
72 -
 73
73 -
 74
74 -
 75
75 -
 76
76 -
 77
77 -
 78
78 -
 79
79 -
80
-
81
-
82
-
83
-
84
-
85
-
86
-
87
-
88
-
89
-
90
-
91
-
92
-
93
-
94
-
95
-
96
-
97
-
98
-
99
-
100
-
101
-
102
-
103
-
104
-
105
-
106
-
107
-
108
-
109
-
110
-
111
-
112
 |
 |

4 Upgrading your computer
62
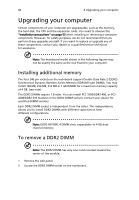
into the socket, turn the DDR2 DIMM around and try to insert
it again.
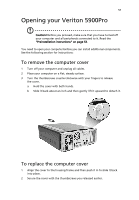
To reconfigure your computer
Your computer automatically detects the amount of memory installed. Run the
BIOS utility to view the new value for total system memory and make a note
of it.
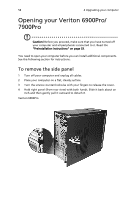
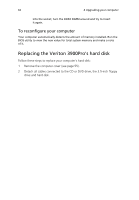
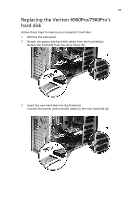
Replacing the Veriton 3900Pro's hard disk
Follow these steps to replace your computer’s hard disk:
1
Remove the computer cover (see page 55).
2
Detach all cables connected to the CD or DVD drive, the 3.5-inch floppy
drive and hard disk.