Alpine CDE-W235BT Owner's Manual (english) - Page 8

Getting Started - iphone

Page 8 highlights

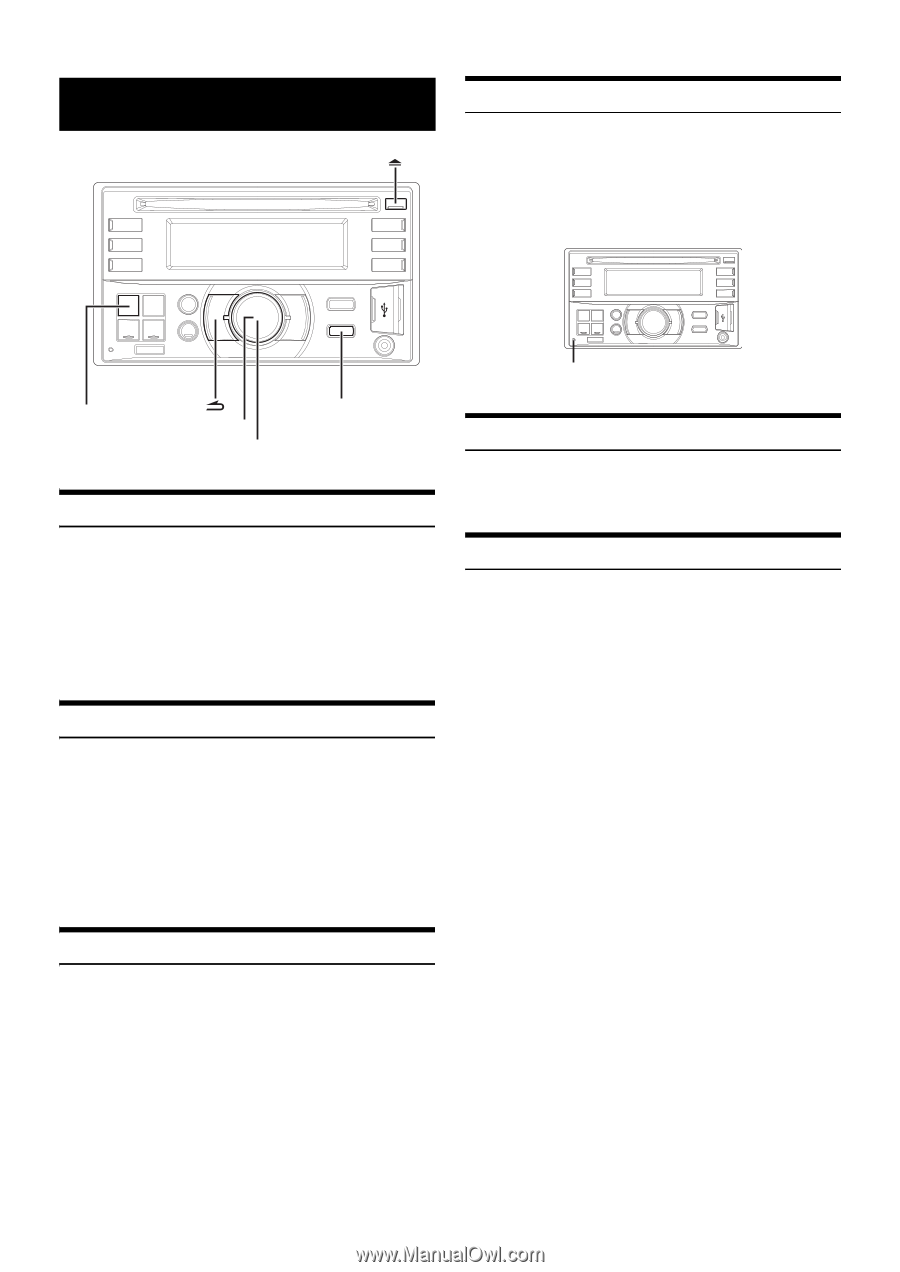
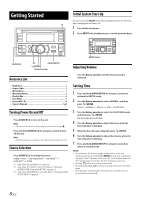
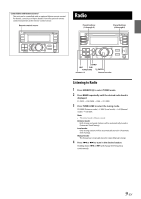
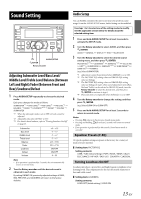
Getting Started Initial System Start-Up Be sure to press the RESET button when using the unit for the first time, after changing the car battery, etc. 1 Turn off the unit power. 2 Press RESET with a ballpoint pen or similar pointed object. SOURCE/ AUDIO/SETUP /ENTER Rotary encoder Accessory List • Head Unit 1 • Power Cable 1 • Microphone 1 • Mounting Sleeve 1 • Bracket Key 2 • Face Plate 1 • Screw (M5 × 8 4 • Owner's Manual 1 set Turning Power On and Off Press SOURCE to turn on the unit. Note • The unit can be turned on by pressing any other button except . Press and hold SOURCE for at least 2 seconds to turn off the unit. Note • The first time power is turned on, the volume will start from level 12. Source Selection Press SOURCE to change the source. TUNER  DISC  USB AUDIO/IPOD*1  BT AUDIO*2  AUXILIARY*3  TUNER *1 Only when the iPod/iPhone is connected. *2 Only when BT AUDIO is set to ON. Refer to "Setting the BLUETOOTH Connection (BT IN)" on page 21. *3 Only when AUX SETUP is set to ON. Refer to "Setting the AUX SETUP Mode" on page 18. RESET button Adjusting Volume Turn the Rotary encoder until the desired sound is obtained. Setting Time 1 Press and hold AUDIO/SETUP for at least 2 seconds to activate the SETUP mode. 2 Turn the Rotary encoder to select GENERAL, and then press ENTER. AUDIO  GENERAL  DISPLAY  IPOD  BLUETOOTH 3 Turn the Rotary encoder to select the CLOCK ADJ mode, and then press ENTER. The time indication will blink. 4 Turn the Rotary encoder to adjust the hours while the time indication is blinking. 5 When the hour has been adjusted, press ENTER. 6 Turn the Rotary encoder to adjust the minutes while the time indication is blinking. 7 Press and hold AUDIO/SETUP for at least 2 seconds to return to normal mode. Notes • To synchronize the clock to another clock/watch or radio time announcement, press and hold ENTER for at least 2 seconds after setting the "hour". Minutes will reset to "00". If the display shows over "30" minutes when you do this, the time will advance one hour. • Pressing  will return to the previous mode. • Pressing and holding  for at least 2 seconds will return to normal mode. • If no operation is performed for 60 seconds, the unit will return to normal mode automatically. 8-EN

  • 1
  • 2
  • 3
  • 4
  • 5
  • 6
  • 7
  • 8
  • 9
  • 10
  • 11
  • 12
  • 13
  • 14
  • 15
  • 16
  • 17
  • 18
  • 19
  • 20
  • 21
  • 22
  • 23
  • 24
  • 25
  • 26
  • 27
  • 28
  • 29
  • 30
  • 31
  • 32
  • 33
  • 34
  • 35
  • 36
  • 37
  • 38
  • 39
  • 40

8
-EN
Accessory List
Head Unit
..................................................................................
1
Power Cable
..............................................................................
1
Microphone
..............................................................................
1
Mounting Sleeve
......................................................................
1
Bracket Key
...............................................................................
2
Face Plate
..................................................................................
1
Screw (M5 × 8)
..........................................................................
4
Owner’s Manual
..................................................................
1 set
Turning Power On and Off
Press
SOURCE

to turn on the unit.
Note
The unit can be turned on by pressing any other button except
.
Press and hold
SOURCE

for at least 2 seconds to turn
off the unit.
Note
The first time power is turned on, the volume will start from level 12.
Source Selection
Press
SOURCE

to change the source.
TUNER
DISC
USB AUDIO/IPOD
*1
BT AUDIO
*2
AUXILIARY
*3
TUNER
*1
Only when the iPod/iPhone is connected.
*2
Only when BT AUDIO is set to ON. Refer to “Setting the
BLUETOOTH Connection (BT IN)” on page 21.
*3
Only when AUX SETUP is set to ON. Refer to “Setting the AUX
SETUP Mode” on page 18.
Initial System Start-Up
Be sure to press the
RESET
button when using the unit for the first time,
after changing the car battery, etc.
1
Turn off the unit power.
2
Press
RESET
with a ballpoint pen or similar pointed object.
Adjusting Volume
Turn the
Rotary encoder
until the desired sound is
obtained.
Setting Time
1
Press and hold
AUDIO/SETUP
for at least 2 seconds to
activate the SETUP mode.
2
Turn the
Rotary encoder
to select GENERAL, and then
press

ENTER
.
AUDIO
GENERAL
DISPLAY
IPOD
BLUETOOTH
3
Turn the
Rotary encoder
to select the CLOCK ADJ mode,
and then press

ENTER
.
The time indication will blink.
4
Turn the
Rotary encoder
to adjust the hours while the
time indication is blinking.
5
When the hour has been adjusted, press

ENTER
.
6
Turn the
Rotary encoder
to adjust the minutes while the
time indication is blinking.
7
Press and hold
AUDIO/SETUP
for at least 2 seconds to
return to normal mode.
Notes
To synchronize the clock to another clock/watch or radio time
announcement, press and hold

ENTER
for at least 2 seconds after
setting the “hour”. Minutes will reset to “00”. If the display shows over
“30” minutes when you do this, the time will advance one hour.
Pressing
will return to the previous mode.
Pressing and holding
for at least 2 seconds will return to normal
mode.
If no operation is performed for 60 seconds, the unit will return to
normal mode automatically.
Getting Started
SOURCE/
/ENTER
AUDIO/SETUP
Rotary encoder
RESET button