Alpine PXE-H660 Owners Manual - Page 10
Wiring/connections - software
 |
UPC - 793276310286
View all Alpine PXE-H660 manuals
Add to My Manuals
Save this manual to your list of manuals |
Page 10 highlights
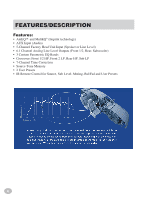
Wiring/Connections Front Panel Chassis 1 USB Port - USB cable required for PC setup (PC software on included Imprint Setup CD) 2 MULTEQ LED - Output for included LED; EQ Status indicator during setup 3 RESET - Press & Release button for: Factory Reset, or Redo MultEQ™ setup (see page 20) Rear Panel Chassis 4 POWER SUPPLY Harness (6-Pin) • Ground (BLK) Connect this lead to a good chassis ground on the vehicle. Make sure the connection is made to bare metal and is securely fastened using a sheet metal screw. • Battery (YEL) This is a constant +12V for the main unit. It will remain powered even when the Ignition key position is OFF. It draws minimal current to maintain processor memory. • Remote OUT (BLU/WHT) This output can turn on external amplifiers. The signal supplies 12 volts PXE-H660 is on. • Remote ON (BLU/WHT) If the OEM head unit is not turning on the EQ using the AUTO RANGING INPUT, use this wire. Connect this wire to the 'Auto Turn On' lead of the Factory head unit or a switched 12 VDC source (Ignition). • Remote Control (WHT/BRN) This input provides a means by which an external source, connected to AUX, is controlled. 5 REMOTE IR INPUT (2.5mm mini-jack) - Input for external remote eye (included) 6 WIRED REMOTE INPUT (3.5mm mini-jack) - Input for steering wheel control (factory op- tion); Note: Using this input disables the factory head unit steering wheel controls. 7 AUX PRIMARY SOURCE - Turn this switch ON, if a factory radio source is not being used. This accomodates an aftermarket radio using the AUX INPUT. 8 CLIP - This LED is ON whenever the AUX source is over the input limit. During MultEQ Calibration, this LED indicates MIC Input clipping. 9 AUX INPUT LEVEL - Use this trimmer control to adjust the AUX INPUT below clipping. 10 AUX INPUT - Use this input for an auxiliary source or an aftermarket head unit with line outputs. 11 MIC - 3.5mm jack for included microphone. 12 AUTO RANGING INPUT - Use this input for the factory head unit. This input is 'auto rang- ing' to handle a wide range of factory head unit outputs. It will accept speaker or line level outputs. It has 5 input pairs for Front, Rear, and Subwoofer. 13 RCA OUTPUT - 2 Front L/R Pairs, 1 Rear L/R Pair, 1 Subwoofer Mono Front L1/R1 For Factory High-pass Output Front L2/R2 For Factory Low-pass Output (or Fullrange Output) Rear L/R For Factory Rear, Full Range Output Subwoofer For Factory Subwoofer Output Note: OUTPUT: For full-range only, use outputs FRONT L2/R2 INPUT: If there is a L/R pair of full range outputs available from the factory system (FRONT or REAR) these should be used first and connected to inputs L2/R2 on the PXE-H660. If the factory 2-way output must be used, connect Tweeter Left to L1, Woofer Left to L2, Tweeter Right to R1, and Woofer Right to R2. 10
-
 1
1 -
2
-
3
-
4
-
 5
5 -
 6
6 -
 7
7 -
 8
8 -
 9
9 -
 10
10 -
 11
11 -
 12
12 -
 13
13 -
 14
14 -
 15
15 -
16
-
17
-
18
-
19
-
20
-
21
-
22
-
23
-
24
-
25
-
26
-
27
-
28
-
29
-
30
-
31
-
32
-
33
-
34
-
35
-
36
-
37
-
38
-
39
-
40
-
41
-
42
-
43
-
44
-
45
-
46
-
47
-
48
-
49
-
50
-
51
-
52
-
53
-
54
-
55
 |
 |
