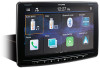
Alpine iLX-F409 Owners Manual - Page 20
Graphic Equalizer Curve Settings Graphic EQ, Time Correction Settings
 |
View all Alpine iLX-F409 manuals
Add to My Manuals
Save this manual to your list of manuals |
Page 20 highlights
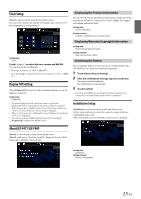
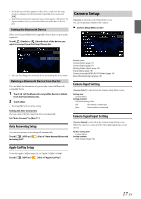
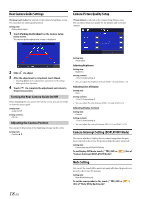
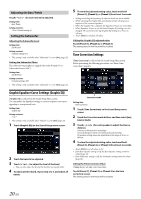
Adjusting the Bass/Treble Touch [ ] or [ ] for each item to be adjusted. Setting item: Bass, Treble Setting contents: -10 to 10 (Initial setting: 0) Setting the Subwoofer Adjusting the Subwoofer Level Setting item: Sub W.Level Setting contents: 0 (Initial setting) to 15 • This setting is only available when "Subwoofer" is set to [On] (page 22). Setting the Subwoofer Phase The subwoofer output phase is toggled Subwoofer Normal (0°) or Subwoofer Reverse (180°). Setting item: Sub W.Phase Setting contents: 0° (Initial setting), 180° • This setting is only available when "Subwoofer" is set to [On] (page 22). 5 To store the adjusted setting value, touch and hold [Preset 1], [Preset 2], or [Preset 3] for at least 2 seconds. • Settings exceeding the frequency of adjacent bands are not available. • While adjusting the Graphic EQ, you should consider the frequency response of the connected speakers. • When the Graphic EQ is adjusted, the Equalizer Presets are overridden. • When Equalizer Presets is set, the linked Graphic EQ settings are also changed. We recommend storing Graphic EQ settings in a Preset in advance. • Touch [Flat] to initialize all values. Calling the Graphic EQ adjusted value Touch [Preset 1], [Preset 2], or [Preset 3]. The setting stored in the Preset will be recalled. Time Correction Settings [Time Correction] is selected on the Sound Setup Menu screen. Before performing the following procedures, see "About Time Correction" (page 23). Graphic Equalizer Curve Settings (Graphic EQ) [Graphic EQ] is selected on the Sound Setup Menu screen. You can modify the Equalizer settings to create a response curve more appealing to your personal taste. Setting item: Graphic EQ Setting contents: -7 to 7 • This setting is only available when "Defeat" is set to [On] (page 22). 1 Touch [Graphic EQ] on the Sound Setup menu screen. 2 Touch the band to be adjusted. 3 Touch [ ] or [ ] to adjust the level of the band. • You can also adjust the level of the band by moving the slider. 4 To adjust another band, repeat step 2 to 3, and adjust all bands. Correction mode Setting item: Time Correction 1 Touch [Time Correction] on the Sound Setup menu screen. 2 Touch the Correction mode button, and then select [ms], [cm] or [inch]. 3 Touch [ ] or [ ] for each speaker to adjust the time or distance. 0.0 msec to 9.9 msec (0.1 msec/step) 0.0 cm (0.0 inch) to 336.6 cm (132.56 inch) (3.4 cm/step) All speaker setting values are adjustable in the range of 20 ms or 680 cm. 4 To store the adjusted setting value, touch and hold [Preset 1], [Preset 2], or [Preset 3] for at least 2 seconds. • Touch [Flat] to set all values to 0.0. • If the Rear Speaker setting is Off, the Rear Speaker setting cannot be edited (page 22). • If the Subwoofer setting is Off, the Subwoofer setting cannot be edited (page 22). Calling the Time Correction Value Calling the pre-set time correction value. Touch [Preset 1], [Preset 2], or [Preset 3] on the time correction screen. The setting stored in the Preset will be recalled. 20-EN
-
 1
1 -
2
-
3
-
4
-
5
-
6
-
7
-
8
-
9
-
10
-
11
-
12
-
13
-
14
-
 15
15 -
 16
16 -
 17
17 -
 18
18 -
 19
19 -
 20
20 -
 21
21 -
 22
22 -
 23
23 -
 24
24 -
 25
25 -
26
-
27
-
28
-
29
-
30
-
31
-
32
-
33
-
34
-
35
-
36
-
37
-
38
-
39
-
40
-
41
-
42
-
43
-
44
-
45
-
46
-
47
-
48
 |
 |
