Amana AGP200VDW Installation Instruction
Amana AGP200VDW Manual
 |
UPC - 883049214153
View all Amana AGP200VDW manuals
Add to My Manuals
Save this manual to your list of manuals |
Amana AGP200VDW manual content summary:
- Amana AGP200VDW | Installation Instruction - Page 1
GAS DE 20" (50,8 CM) con horno de limpieza estándar Table of Contents/Índice 2 To the installer: Please leave this instruction book with the unit. To the consumer: Please read and keep this book for future reference. W10173324B Para el instalador: favor de dejar este manual - Amana AGP200VDW | Installation Instruction - Page 2
INSTALLATION REQUIREMENTS 4 Tools and Parts 4 Location Requirements 4 Gas Supply Requirements 6 INSTALLATION INSTRUCTIONS 7 Unpack Range 7 Install Anti LA ESTUFA 18 REQUISITOS DE INSTALACIÓN 20 Herramientas y piezas 20 Requisitos de ubicación 20 Requisitos del suministro de gas 22 - Amana AGP200VDW | Installation Instruction - Page 3
your gas supplier. If a gas leak is detected, follow the "What to do if you smell gas" instructions. In the State of Massachusetts, the following installation instructions apply: ■ Installations and repairs must be performed by a qualified or licensed contractor, plumber, or gasfitter qualified or - Amana AGP200VDW | Installation Instruction - Page 4
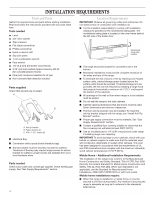
REQUIREMENTS Tools and Parts Gather the required tools and parts before starting installation. Read and follow the instructions provided with any tools subfloor. Longer screws are available from your local hardware store. Parts needed Check local codes and consult gas supplier. Check existing - Amana AGP200VDW | Installation Instruction - Page 5
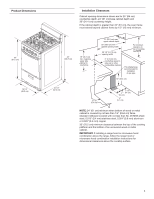
upper side cabinet to countertop 13" (33.0 cm) max. upper cabinet depth 20" (50.8 cm) min. cabinet opening width 20 1/8" (51.12 cm) opening width For minimum clearance to top of cooktop, see hood combination installation instructions for dimensional clearances above the cooktop surface. 5 - Amana AGP200VDW | Installation Instruction - Page 6
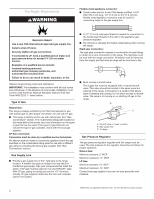
Conversion must be done by a qualified service technician. No attempt shall be made to convert the appliance from the gas specified on the model ■ Must include a shutoff valve: The supply line must be equipped with a manual shutoff valve. This valve should be located in the same room but external to - Amana AGP200VDW | Installation Instruction - Page 7
must be isolated from the gas supply piping system by closing its individual manual shutoff valve during any pressure testing of that system at test pressures equal to or less than 1/2 psi (3.5 kPa). INSTALLATION INSTRUCTIONS Unpack Range Install Anti-Tip Bracket WARNING 1. Do not use oven door - Amana AGP200VDW | Installation Instruction - Page 8
range is adequate as long as it conforms to the standards in the "Location Requirements" section. 13. Continue installing your range using the following installation instructions. 8 - Amana AGP200VDW | Installation Instruction - Page 9
person include: licensed heating personnel, authorized gas company personnel, and authorized service personnel. Failure to do so can result in death, explosion, or D. Flexible connector E. Adapter F. Use pipe joint compound G. Manual shutoff valve H. ¹⁄₂" to ³⁄₄" gas pipe Complete Connection 1. - Amana AGP200VDW | Installation Instruction - Page 10
Check Operation To Light Standing Pilot Lights: Before using the range, the standing pilots must be lit. They will stay lit after turning off the burners. 1. Make sure all controls are off and the oven and cooktop are cool. 2. Remove surface grates from the cooktop. 3. Lift the cooktop by both front - Amana AGP200VDW | Installation Instruction - Page 11
bulb. The oven burner should light in 20-40 seconds; this delay is normal. to be sure all parts are now installed. If there is an extra part, go back through Guide. 7. Turn on surface burners and oven. If range does not operate, check the following: ■ See "Troubleshooting" in your Use and Care Guide - Amana AGP200VDW | Installation Instruction - Page 12
person include: licensed heating personnel, authorized gas company personnel, and authorized service personnel. Failure to do so can result in death, explosion, or if the range is moved. Failure to follow these instructions can result in death or serious burns to children and adults. A A. - Amana AGP200VDW | Installation Instruction - Page 13
from the valve using a 3/8" (9.5 mm) combination wrench. 8. Install LP gas orifice spuds in the valves. 9. Place the natural gas orifice spuds in the parts bag for future use and keep with bag containing literature. 10. Slowly lower the cooktop until it snaps into position. 11. Replace grates. B 58 - Amana AGP200VDW | Installation Instruction - Page 14
clockwise. Complete Conversion 1. Refer to the "Make Gas Connection" section for proper connection of the range to the gas supply. 2. Turn the manual shutoff valve in the gas supply line to the open position. 3. Refer to the "Check Operation" section for proper burner ignition, operation, and - Amana AGP200VDW | Installation Instruction - Page 15
include: licensed heating personnel, authorized gas company personnel, and authorized service personnel. Failure to do so can result in death, explosion anti-tip bracket, if the range is moved. Failure to follow these instructions can result in death or serious burns to children and adults. A. Brass - Amana AGP200VDW | Installation Instruction - Page 16
Valves 51 A. Natural gas oven orifice spud stamped with "51" IMPORTANT: Do not over tighten. 6. Place LP gas oven burner spud in plastic parts bag along with LP gas cooktop burner spuds for future use and keep with bag containing literature. 7. Reinstall oven burner. 8. Reinstall oven racks, oven - Amana AGP200VDW | Installation Instruction - Page 17
the oven door. Complete Conversion 1. Refer to the "Make Gas Connection" section for properly connecting the range to the gas supply. 2. Turn the manual shutoff valve in the gas supply line to the open position. 3. Refer to the "Check Operation" section for proper burner ignition, operation, and - Amana AGP200VDW | Installation Instruction - Page 18
SEGURIDAD DE LA ESTUFA No trate de encender ningún aparato electrodoméstico. No toque ningún interruptor eléctrico. 18 - Amana AGP200VDW | Installation Instruction - Page 19
ADVERTENCIA: Las pérdidas de gas no siempre se pueden detectar por el olfato. Los proveedores de gas recomiendan que usted use un detector de gas aprobado por UL (Laboratorio de normalización) o CSA (Asociación canadiense de seguridad). Para obtener más información, póngase en contacto con su - Amana AGP200VDW | Installation Instruction - Page 20
Cinta para medir ■ Destornillador de hoja plana ■ Destornillador Phillips ■ Taladro manual o eléctrico ■ Pinzas ajustables ■ Llave de combinación de 7 empotradas deberán proveer un recinto cerrado de los lados y la parte posterior de la estufa. ■ Para eliminar el riesgo de quemaduras (194°F). 20 - Amana AGP200VDW | Installation Instruction - Page 21
armario al mostrador ancho mín. de la abertura del armario 20" (50,8 cm) ancho de la abertura 20-1/8" (51,12 cm) Para el espacio mínimo a la cobre de 0,020" (0,5 mm). 30" (76,2 cm) de espacio mínimo entre la parte superior de la plataforma de la superficie de cocción y la base de un armario de - Amana AGP200VDW | Installation Instruction - Page 22
gas. Vea la sección "Conversiones de gas". ■ Debe tener una válvula de cierre: La línea de suministro deberá equiparse con una válvula de cierre manual. Esta válvula deberá estar ubicada en la misma habitación pero fuera de la estufa. Deberá estar en una ubicación que permita un fácil acceso para - Amana AGP200VDW | Installation Instruction - Page 23
étrica (14" WCP) La estufa y su válvula de cierre individual manual deberán ser desconectadas del sistema de tubería del suministro de gas durante coloque sobre su parte posterior. Con la ayuda de 2 o más personas, agarre la estufa con firmeza y colóquela suavemente sobre su parte posterior, en los - Amana AGP200VDW | Installation Instruction - Page 24
Póngase en contacto con un instalador competente de revestimiento de pisos para ver cuál es el mejor procedimiento para perforar orificios de montaje a través del tipo de revestimiento de pisos que usted tenga. Antes de mover la estufa, deslícela sobre la base de transporte, cartón o madera. 1. - Amana AGP200VDW | Installation Instruction - Page 25
de presión B. Use compuesto para juntas de tubería C. Adaptador D. Conector flexible E. Adaptador F. Use compuesto para juntas de tubería G. Válvula de cierre manual H. Tubería de gas de 1/2" to 3/4" Complete la conexión 1. Ubique el regulador de la presión de gas en el asador. A Conexión típica - Amana AGP200VDW | Installation Instruction - Page 26
á encenderse en menos de 4 segundos. 9. Si no se encienden los quemadores de superficie, repita los pasos 3 a 6. OFF 3. Abra la válvula de cierre manual de la línea de suministro de gas. La válvula está "abierta" cuando la manija está paralela al tubo de gas. A B A. Válvula cerrada B. Válvula - Amana AGP200VDW | Installation Instruction - Page 27
un pequeño bulbo metálico. El quemador del horno deberá encenderse en 20-40 segundos; este retraso es normal. La válvula del horno requiere un tiempo material protector de embalaje. Seque meticulosamente con un paño suave. 6. Lea el Manual de uso y cuidado de la estufa para el uso y la limpieza de la - Amana AGP200VDW | Installation Instruction - Page 28
gas LP A. Tapa 5. Vuelva a colocar la tapa. A A. Tapa Cómo convertir el regulador de la presión del gas 1. Asegúrese de que la válvula de cierre manual esté en la posición cerrada. 28 - Amana AGP200VDW | Installation Instruction - Page 29
Cómo convertir los quemadores de superficie 1. Quite las parrillas de la superficie de cocción. 2. Levante la superficie de cocción por ambas esquinas frontales y sosténgala por el borde delantero central. 3. Quite los tornillos que sujetan cada quemador dual. Cómo convertir el quemador del horno - Amana AGP200VDW | Installation Instruction - Page 30
sentido de las manecillas del reloj. A B A. Tornillo piloto B. Tornillo de desvío 10. Ubique el tornillo piloto de gas LP en la bolsa que contiene el manual incluido en la estufa. Un tornillo piloto de gas LP está marcado con "15". 11. Quite el tornillo piloto de gas natural con un destornillador - Amana AGP200VDW | Installation Instruction - Page 31
2. Abra la puerta del asador y saque la charola para asar. El regulador de la presión de gas está ubicado en la esquina posterior derecha del compartimiento del asador. A quemadores superiores, que están en la bolsa con material impreso incluida con la estufa. Cuatro tornillos de gas natural están - Amana AGP200VDW | Installation Instruction - Page 32
frontal a un lado y ubique el termostato del horno. A A. Termostato del horno 7. Ubique el tornillo de desvío de gas natural en la bolsa que contiene el manual incluido en la estufa. Un tornillo de desvío de gas natural marcado con "76". 8. Quite el tornillo de desvío de gas LP con un destornillador
-
 1
1 -
 2
2 -
 3
3 -
 4
4 -
 5
5 -
 6
6 -
 7
7 -
8
-
9
-
10
-
11
-
12
-
13
-
14
-
15
-
16
-
17
-
18
-
19
-
20
-
21
-
22
-
23
-
24
-
25
-
26
-
27
-
28
-
29
-
30
-
31
-
32
 |
 |
To the installer: Please leave this instruction book with the unit.
To the consumer: Please read and keep this book for future
reference.
Para el instalador: favor de dejar este manual de instrucciones
con la unidad.
Para el consumidor: favor de leer y guardar este manual para
futura referencia.
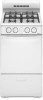
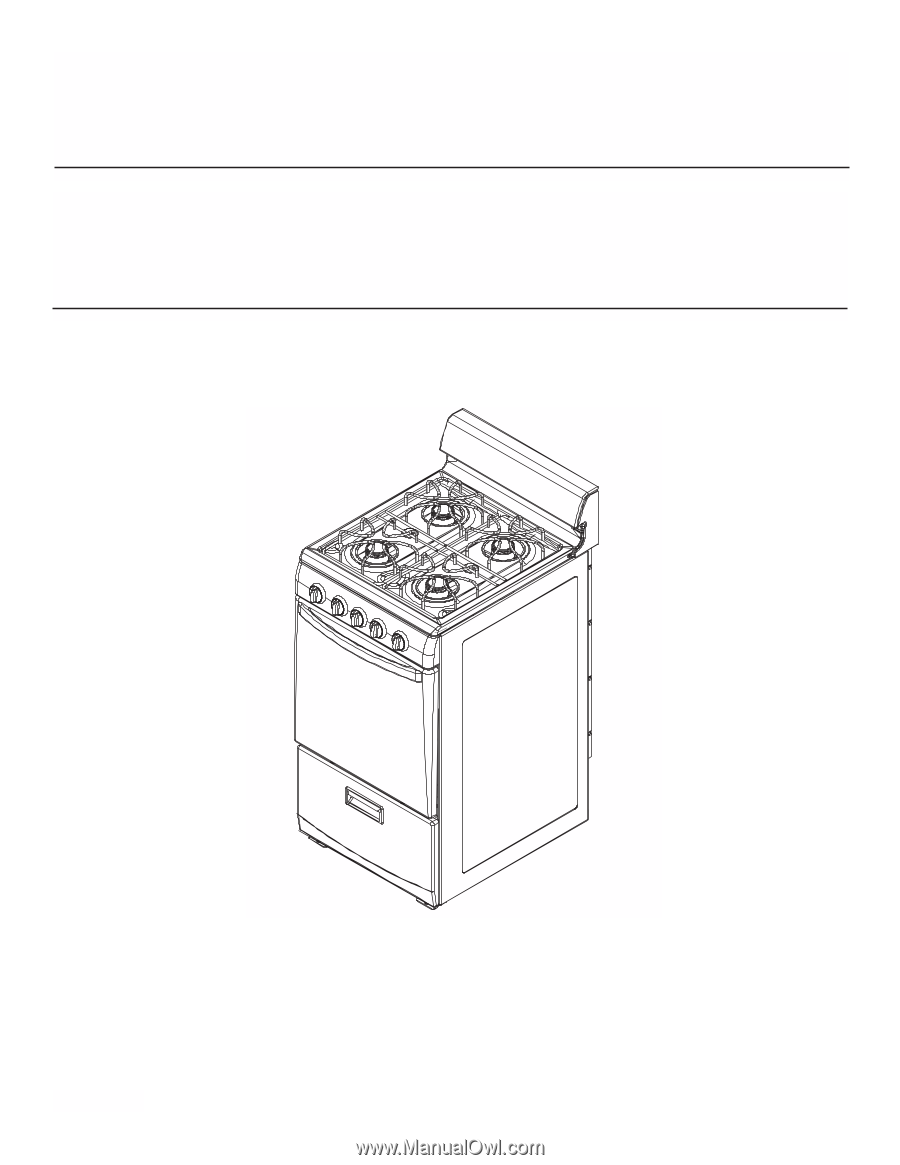
INSTALLATION INSTRUCTIONS
20" (50.8 CM) FREESTANDING GAS RANGE
with standard clean oven
INSTRUCCIONES DE INSTALACIÓN
ESTUFA AUTÓNOMA A GAS DE 20" (50,8 CM)
con horno de limpieza estándar
W10173324B
Table of Contents
/Índice
..................................................
2