Amana AGP200VDW Installation Instruction - Page 10
Check Operation
 |
UPC - 883049214153
View all Amana AGP200VDW manuals
Add to My Manuals
Save this manual to your list of manuals |
Page 10 highlights
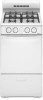
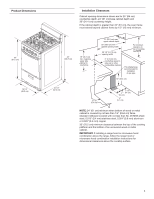
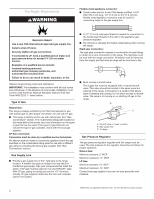
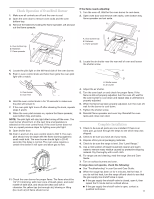
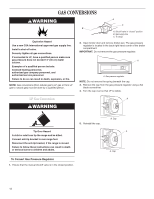
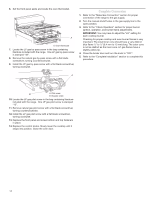
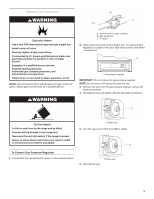
Check Operation To Light Standing Pilot Lights: Before using the range, the standing pilots must be lit. They will stay lit after turning off the burners. 1. Make sure all controls are off and the oven and cooktop are cool. 2. Remove surface grates from the cooktop. 3. Lift the cooktop by both front corners and hold it by the front center edge. 4. Using a match, light both burner pilot lights. 5. The surface pilot flames should be 0.4" - 0.6" (10 - 15 mm) high. A If the low flame needs adjusting: 1. Turn control knob to the "LO" setting and remove control knob. 2. Insert a small flat-blade screwdriver into the valve stem. Turn the valve adjusting screw to obtain the smallest flame that will not go out when the control of a cold burner is quickly turned from "HI" to "LO". Turn right to decrease flame height. Turn left to increase flame height. Repeat for other cooktop burners as needed. A A. Valve stem A. 0.4" - 0.6" (10 - 15 mm) 6. If the pilot flame needs adjustment, use a flat blade screwdriver and turn the adjusting screw until the flame is of the desired height. A 3. Replace control knob A. Adjusting screw 7. Slowly lower the cooktop until it snaps into position. 8. Push in and turn each surface burner control knob to the "HI" position. The flame should light within 4 seconds. 9. If surface burners do not ignite, repeat steps 3 to 6. OOFFFF HHI I PPuushshtotoTtuurrnn MMEEDD 10. Check each cooktop burner for proper flame. The small inner cone should have a very distinct blue flame 1/4" to 1/2" (6.4 mm to 13 mm) long. The outer cone is not as distinct as the inner cone. outer cone inner cone 11. Turn the control knob quickly to the "LO" position after the burner lights. If the flame goes out, turn the knob to the "OFF" position. 12. Check each cooktop burner for proper low flame. The low flame should be a mimimum, steady blue flame. The flame size should be 1/4" to 3/8" (6.4 mm to 9.5 mm) high. 13. Replace cooktop grates. 10
-
 1
1 -
2
-
3
-
4
-
 5
5 -
 6
6 -
 7
7 -
 8
8 -
 9
9 -
 10
10 -
 11
11 -
 12
12 -
 13
13 -
 14
14 -
 15
15 -
16
-
17
-
18
-
19
-
20
-
21
-
22
-
23
-
24
-
25
-
26
-
27
-
28
-
29
-
30
-
31
-
32
 |
 |
