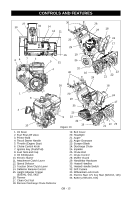
Ariens Pro Track 28 Owners Manual - Page 17
FILLING FUEL TANK, GASOLINE, PRE-START, Fuel Stabilizer, Fuel Shut-Off Valve, To add fuel to fuel tank
 |
View all Ariens Pro Track 28 manuals
Add to My Manuals
Save this manual to your list of manuals |
Page 17 highlights
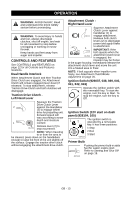
FILLING FUEL TANK WARNING: AVOID INJURY. Read and understand the entire Safety section before proceeding. GASOLINE IMPORTANT: ALWAYS use gasoline that meets the following guidelines: • Clean, fresh gasoline. • A minimum of 87 octane/87 AKI (91 RON). High altitude use may require a different octane. Consult your engine manual. • Gasoline with up to 10% ethanol (gasohol) or up to 10% MTBE (methyl tertiary butyl ether) is acceptable. • Use of any gasoline other than those approved above will void the engine warranty. If the pumps are not marked for the content of alcohol or ethers, check ethanol and MTBE levels with the fuel supplier. • Do not modify the fuel system to use different fuels. • Never mix oil and gasoline. NOTE: All gasoline is not the same. If the engine experiences starting or performance problems after using a new gasoline, switch to a different fuel provider or fuel brand. IMPORTANT: Excessively oxygenated or reformulated fuels (fuels blended with alcohols or ethers) can damage the fuel system or cause performance problems. If any undesirable operating problems occur, use a gasoline with a lower percentage of alcohol or ether. Fuel Stabilizer Gasoline left in the fuel system for extended periods without a stabilizer will deteriorate, resulting in gum deposits in the system. These deposits can damage the carburetor and the fuel hoses, filter and tank. Prevent deposits from forming in the fuel system during storage by adding a quality fuel stabilizer to the fuel. Follow the recommended mix ratio found on the fuel stabilizer container. Fuel Shut-Off Valve 1 2 IMPORTANT: The fuel shut-off valve MUST be in the closed position prior to transporting the unit. The fuel shut-off valve has two positions: Open (1): Use this position to run the unit. Closed (2): Use this position to service, transport, or store the unit. To add fuel to fuel tank: 1. ALWAYS place unit in open or wellventilated area. 2. Stop engine and allow to cool. 3. Clean Fuel Cap and surrounding area to prevent dirt from entering Fuel Tank. 4. Remove Cap. IMPORTANT: Refer to Engine Manual for proper fuel type and tank capacity. 5. Replace Fuel Cap and tighten. 6. ALWAYS clean up any spilled fuel. PRE-START 1. Frozen Impeller IMPORTANT: Before starting engine, check impeller to be sure it is not frozen. To check impeller: 1. With ignition key switch in "Stop" position, squeeze Attachment Clutch Lever to Engaged position. 2. Pull Recoil Starter Handle. 3. If Impeller is frozen, (cannot pull Starter Handle) move unit to a heated area and thaw to prevent possible damage. 2. Check Function of Clutches If clutches do not engage or disengage properly, adjust or repair before operation. See Attachment Clutch/Brake Adjustment on page 26 and Traction Drive Clutch Adjustment on page 29. 3. Check Dual Handle Interlock Without the engine running, press down (engage) both clutch levers. Release attachment clutch lever. Attachment clutch should remain engaged until traction clutch lever is released, then both clutches must disengage. If clutches do not engage or disengage properly, adjust or repair before operation (see Attachment Clutch/Brake Adjustment on page 26 and Traction Drive Clutch Adjustment on page 29). GB - 17
-
 1
1 -
2
-
3
-
4
-
5
-
6
-
7
-
8
-
9
-
10
-
11
-
 12
12 -
 13
13 -
 14
14 -
 15
15 -
 16
16 -
 17
17 -
 18
18 -
 19
19 -
 20
20 -
 21
21 -
 22
22 -
23
-
24
-
25
-
26
-
27
-
28
-
29
-
30
-
31
-
32
-
33
-
34
-
35
-
36
-
37
-
38
-
39
-
40
 |
 |
