Ariens Pro Track 28 Owners Manual - Page 29
Traction Drive Clutch, Adjustment
 |
View all Ariens Pro Track 28 manuals
Add to My Manuals
Save this manual to your list of manuals |
Page 29 highlights
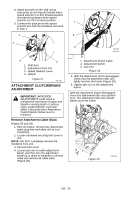
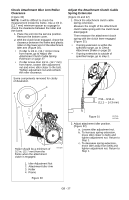
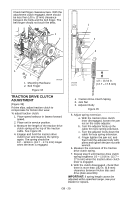
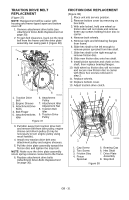
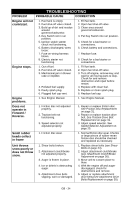
Check belt finger clearance here. With the attachment clutch engaged, there should be less than 1/8 in. (3 mm) clearance between the belts and the belt finger. The belt finger should not touch the belts. 1 2 1 2 3 1 1. Mounting Hardware 2. Belt Finger Figure 34 OS7196 OS7205 OS7210 1/2 - 11/16 in. (12.7 - 17.5 mm) TRACTION DRIVE CLUTCH ADJUSTMENT (Figure 35) If drive slips, adjust traction clutch to compensate for friction disc wear. To adjust traction clutch: 1. Place speed selector in fastest forward speed. 2. Place unit in service position. 3. Measure the length of the traction drive clutch spring at the top of the traction cable. See Figure 35. 4. Engage and hold the traction drive clutch lever and measure the spring again. The spring should be 1/2 - 11/16 in. (12.7 - 17.5 mm) longer when the lever is engaged. 1. Traction Drive Clutch Spring 2. Jam Nut 3. Adjuster Body Figure 35 5. Adjust spring extension. a. With the traction drive clutch lever disengaged, loosen the jam nut on the cable adjuster. b. Turn the adjuster body up the cable for more spring extension. c. Turn the adjuster body down the cable for less spring extension. d. Finger tighten the jam nut, and then hold the adjuster body with pliers and tighten the jam nut with wrench. 6. Measure the extension of the traction drive clutch spring. 7. Repeat step 5 until traction drive clutch spring lengthens 1/2 - 11/16 in. (12.7 - 17.5 mm) when the traction drive clutch lever is engaged. 8. With the clutch disengaged, check that there is more than 1/32 in. (0.8 mm) clearance between friction disc and drive plate assembly IMPORTANT: If spring length cannot be adjusted within specified range, see your Dealer for repairs. GB - 29
-
 1
1 -
2
-
3
-
4
-
5
-
6
-
7
-
8
-
9
-
10
-
11
-
12
-
13
-
14
-
15
-
16
-
17
-
18
-
19
-
20
-
21
-
22
-
23
-
 24
24 -
 25
25 -
 26
26 -
 27
27 -
 28
28 -
 29
29 -
 30
30 -
 31
31 -
 32
32 -
 33
33 -
 34
34 -
35
-
36
-
37
-
38
-
39
-
40
 |
 |
