Asko WCAM1812 User manual ASKO WCAM1812 UCG - Page 8
Getting Started - washing machines
 |
View all Asko WCAM1812 manuals
Add to My Manuals
Save this manual to your list of manuals |
Page 8 highlights
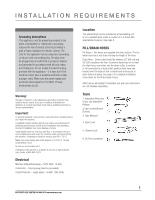
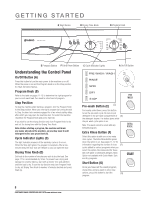
GETTING STARTED G Start Button D Drying Time Knob B Program Knob E Prewash Button F Extra Rinse Button C Cycle Indicator Lights A On/Off Button Understanding the Control Panel On/Off Button (A) Press this button to turn the main power to the machine on or off. When the power is on and the Program Knob is on the Stop position, the Start (G) button flashes. Program Knob (B) Refer to the table on pages 11-12 to determine the right program for your current wash load. Turn knob to select correct program. Stop Position To stop the machine after starting a program, turn the Program Knob to the Stop position. When you interrupt a program by turning the dial to Stop, the door lock remains engaged for a two-minute safety delay, after which you may open the machine door. To restart the machine, reposition the Program Knob and press Start (G). If you wish to use the drying function only, turn Program Knob to dry and set the drying time with the Drying Time Knob. Note: Before starting a program, the machine will drain any water already in the machine, so you may need to add detergent before you press Start (G). Cycle Indicator Lights (C) The light indicates progress of the wash/dry cycle as it occurs. When the Stop light glows, the program is complete. After a twominute delay, the door lock will release so you can open the door. Drying Time Knob (D) Set knob to the number of minutes you wish to dry the load. See page 11 for recommended dry times. To prevent over-drying and damage to sensitive fabrics, start with a shorter time and add time until the load is dry. To use the dry function only, turn Program Knob to dry, set Drying Time Knob to number of minutes desired and press Start (G). PRE-WASH / WASH RINSE SPIN (A) DRY STOP Pre-wash Button (E) (C) For heavily soiled items, press this button to run the pre-wash cycle. Be sure to put detergent in the pre-wash compartment of (E) the detergent drawer. The button glows while the pre-wash cycle option is on. Note: Pre-wash cannot be used with any Delicate program. Extra Rinse Button (F) Select this option to add one or two extra rinse cycles. The Extra Rinse Button glows when the option is on. See pages 11-12 for information regarding the number of rinse (F) cycles added to various programs when you select this option. Recommended for those with soft water or detergent allergies. Note: Option not available with Quick Wash, Spin, and Dry programs. Start Button (G) Once you have set the wash program, drying time, and pre-wash or extra rinse options, press this button to start the (G) program. 8 CUSTOMER CARE CENTER 800.898.1879 www.askousa.com
-
 1
1 -
2
-
 3
3 -
 4
4 -
 5
5 -
 6
6 -
 7
7 -
 8
8 -
 9
9 -
 10
10 -
 11
11 -
 12
12 -
 13
13 -
14
-
15
-
16
-
17
-
18
-
19
-
20
-
21
-
22
-
23
-
24
-
25
-
26
-
27
-
28
-
29
-
30
-
31
-
32
-
33
-
34
-
35
-
36
-
37
-
38
-
39
-
40
-
41
-
42
-
43
-
44
-
45
-
46
-
47
-
48
-
49
-
50
-
51
-
52
-
53
-
54
-
55
-
56
-
57
-
58
-
59
-
60
 |
 |
