Asus AAM6030VI-B1 AAM6030VI-B1 User's Manual - Page 16
Getting Started
 |
View all Asus AAM6030VI-B1 manuals
Add to My Manuals
Save this manual to your list of manuals |
Page 16 highlights
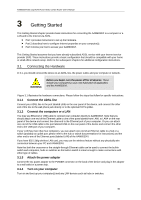
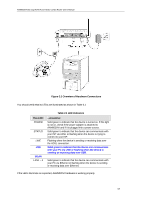
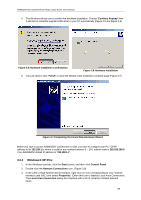
AAM6030VI 802.11g WLAN 4-port ADSL Combo Router User's Manual 3 Getting Started This Getting Started chapter provides basic instructions for connecting the AAM6030VI to a computer or a LAN and to the Internet via ADSL. f Part 1 provides instructions to set up the hardware. f Part 2 describes how to configure Internet properties on your computer(s). f Part 3 shows you how to access your AAM6030VI. This Getting Started assumes that you have already subscribed ADSL service with your Internet service provider (ISP). These instructions provide a basic configuration that should be compatible with your home or small office network setup. Refer to the subsequent chapters for additional configuration instructions. 3.1 Connecting the Hardware In 3.1, you should connect the device to an ADSL line, the power outlet, and your computer or network. WARNING Before you begin, turn the power off for all devices. These include your computer(s), your LAN hub/switch (if applicable), and the AAM6030VI. Figure 3.1 illustrates the hardware connections. Please follow the steps that follow for specific instructions. 3.1.1 Connect the ADSL line Connect your ADSL line to the port labeled LINE on the rear panel of the device, and connect the other end of the line to the wall phone jack directly or to the optional POTS splitter. 3.1.2 Connect the computers or a LAN You may use Ethernet or USB cable to connect your computer directly to AAM6030VI. Note that you should attach one end of the Ethernet cable to one of the ports labeled from LAN1 to LAN4 on the rear panel of the device and connect the other end to the Ethernet port of your computer. Or you can attach one end of the USB cable to the port labeled USB on the rear panel of the device and connect the other end to the USB port of your computer. If your LAN has more than four computers, you can attach one end of an Ethernet cable to a hub or a switch (probably an uplink port; please refer to the hub or switch documentations for instructions) and the other end to one of the Ethernet ports (labeled LAN) of the AAM6030VI. If you have 802.11b/g wireless LAN card, you may use the wireless feature without any physically wire connection between your PC and AAM6030VI. Note that both the crossover or the straight-through Ethernet cable can be used to connect the built-in switch and computers, hubs or switches as the built-in switch is smart enough to make connections with either type of cables. 3.1.3 Attach the power adapter Connect the AC power adapter to the POWER connector on the back of the device and plug in the adapter to a wall outlet or a power strip. 3.1.4 Turn on your computer Turn on and boot up your computer(s) and any LAN devices such as hubs or switches. 16
-
 1
1 -
2
-
3
-
4
-
5
-
6
-
7
-
8
-
9
-
10
-
 11
11 -
 12
12 -
 13
13 -
 14
14 -
 15
15 -
 16
16 -
 17
17 -
 18
18 -
 19
19 -
 20
20 -
 21
21 -
22
-
23
-
24
-
25
-
26
-
27
-
28
-
29
-
30
-
31
-
32
-
33
-
34
-
35
-
36
-
37
-
38
-
39
-
40
-
41
-
42
-
43
-
44
-
45
-
46
-
47
-
48
-
49
-
50
-
51
-
52
-
53
-
54
-
55
-
56
-
57
-
58
-
59
-
60
-
61
-
62
-
63
-
64
 |
 |
