Asus RS100-E5 User Guide - Page 26
Installing the CPU heatsink
 |
UPC - 610839665518
View all Asus RS100-E5 manuals
Add to My Manuals
Save this manual to your list of manuals |
Page 26 highlights
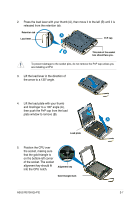
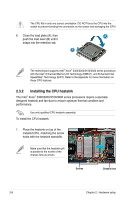
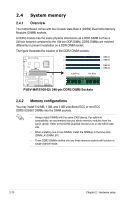
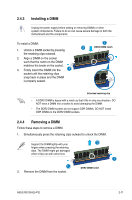
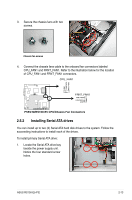
The CPU fits in only one correct orientation. DO NOT force the CPU into the socket to prevent bending the connectors on the socket and damaging the CPU! 6. Close the load plate (A), then A push the load lever (B) until it snaps into the retention tab. B The motherboard supports Intel® Xeon® 3300/3200/3100/3000 series processors with the Intel® Enhanced Memory 64 Technology (EM64T), and Enhanced Intel SpeedStep® Technology (EIST). Refer to the Appendix for more information on these CPU features. 2.3.2 Installing the CPU heatsink The Intel® Xeon® 3300/3200/3100/3000 series processors require a specially designed heatsink and fan-duct to ensure optimum thermal condition and performance. Use only qualified CPU heatsink assembly. To install the CPU heatsink: 1. Place the heatsink on top of the installed CPU, matching the screw holes with the heatsink standoffs. Make sure that the heatsink grill is parallel to the nozzle of the chassis fans as shown. Screws Chassis fans 2-8 Chapter 2: Hardware setup
-
 1
1 -
2
-
3
-
4
-
5
-
6
-
7
-
8
-
9
-
10
-
11
-
12
-
13
-
14
-
15
-
16
-
17
-
18
-
19
-
20
-
 21
21 -
 22
22 -
 23
23 -
 24
24 -
 25
25 -
 26
26 -
 27
27 -
 28
28 -
 29
29 -
 30
30 -
 31
31 -
32
-
33
-
34
-
35
-
36
-
37
-
38
-
39
-
40
-
41
-
42
-
43
-
44
-
45
-
46
-
47
-
48
-
49
-
50
-
51
-
52
-
53
-
54
-
55
-
56
-
57
-
58
-
59
-
60
-
61
-
62
-
63
-
64
-
65
-
66
-
67
-
68
-
69
-
70
-
71
-
72
-
73
-
74
-
75
-
76
-
77
-
78
-
79
-
80
-
81
-
82
-
83
-
84
-
85
-
86
-
87
-
88
-
89
-
90
-
91
-
92
-
93
-
94
-
95
-
96
-
97
-
98
-
99
-
100
-
101
-
102
-
103
-
104
-
105
-
106
-
107
-
108
-
109
-
110
-
111
-
112
-
113
-
114
-
115
-
116
-
117
-
118
-
119
-
120
-
121
-
122
-
123
-
124
-
125
-
126
-
127
-
128
-
129
-
130
-
131
-
132
-
133
-
134
-
135
-
136
-
137
-
138
-
139
-
140
-
141
-
142
-
143
-
144
-
145
-
146
-
147
-
148
 |
 |
