BenQ DV3250 User Manual - Page 44
PC Menu
 |
View all BenQ DV3250 manuals
Add to My Manuals
Save this manual to your list of manuals |
Page 44 highlights
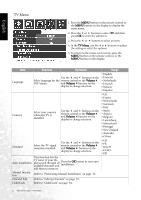
English PC Menu 1. Press the MENU button on the remote control or the MENU button on the display to display the main menu. 2. Press the or buttons to select PC and then press OK to enter the submenu. 3. Press the or buttons to select an item. 4. In the PC Menu, use the or buttons to adjust the setting or select the options. 5. To return to the menu one level up, press the MENU button on the remote control, or the MENU button on the display. Item DPMS Frequency Phase H. Position V. Position Auto Function Operation Range Protect screen and enter power saver mode when no PC signal is detected. Use the and buttons on the remote control or the Volume • Off and Volume buttons on the • On display to change selection. Adjust display clock frequency. Use the and buttons on the remote control or the Volume and Volume buttons on the -15 to 15 display to change selection. Adjust display clock phase. Use the and buttons on the remote control or the Volume and Volume buttons on the 0 to 31 display to change selection. Use the and buttons on the Adjust horizontal position of remote control or the Volume the image. and Volume buttons on the -30 to 30 display to change selection. Use the and buttons on the Adjust vertical position of the remote control or the Volume image. and Volume buttons on the -30 to 30 display to change selection. Automatically adjusts frequency, phase, H. position and V. position to place the image on the screen. Use the OK button on the remote control or the INPUT button on the display to begin auto adjustment. 36 On-Screen Display (OSD) Menu
-
 1
1 -
2
-
3
-
4
-
5
-
6
-
7
-
8
-
9
-
10
-
11
-
12
-
13
-
14
-
15
-
16
-
17
-
18
-
19
-
20
-
21
-
22
-
23
-
24
-
25
-
26
-
27
-
28
-
29
-
30
-
31
-
32
-
33
-
34
-
35
-
36
-
37
-
38
-
 39
39 -
 40
40 -
 41
41 -
 42
42 -
 43
43 -
 44
44 -
 45
45 -
 46
46 -
 47
47 -
 48
48 -
 49
49 -
50
 |
 |
