BenQ PG2401PT PG2401PT User Manual
BenQ PG2401PT Manual
 |
View all BenQ PG2401PT manuals
Add to My Manuals
Save this manual to your list of manuals |
BenQ PG2401PT manual content summary:
- BenQ PG2401PT | PG2401PT User Manual - Page 1
PG2401PT LCD Monitor User Manual - BenQ PG2401PT | PG2401PT User Manual - Page 2
, chemical, manual or otherwise, without the prior written permission of BenQ Corporation. Disclaimer BenQ Corporation makes no BenQ Corporation to notify any person of such revision or changes. Power Safety Please follow these safety instructions for best performance, and long life for your monitor - BenQ PG2401PT | PG2401PT User Manual - Page 3
problems BenQ standard testing condition) for the system to reach to a stable state. For works that involve critical color judgment or image enhancement, please wait for 30 minutes after the monitor contact qualified service personnel for servicing. BenQ ecoFACTS BenQ has been management, BenQ has - BenQ PG2401PT | PG2401PT User Manual - Page 4
stand and the base 16 Installing shading hood ...18 Adjusting the monitor height ...21 Rotating the monitor ...22 Viewing angle adjustment ...23 Using the monitor wall mounting kit 24 Getting the most from your BenQ monitor 25 How to install the monitor on a new computer 26 How to upgrade the - BenQ PG2401PT | PG2401PT User Manual - Page 5
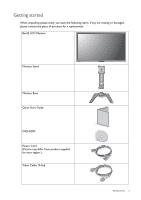
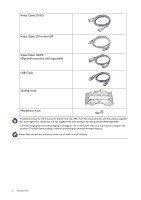
you have the following items. If any are missing or damaged, please contact the place of purchase for a replacement. BenQ LCD Monitor Monitor Stand Monitor Base Quick Start Guide DVD-ROM Power Cord (Picture may differ from product supplied for your region.) Video Cable: D-Sub Getting started 5 - BenQ PG2401PT | PG2401PT User Manual - Page 6
separately. • Consider keeping the box and packaging in storage for use in the future when you may need to transport the monitor. The fitted foam packing is ideal for protecting the monitor during transport. Always keep the product and accessories out of reach of small children. 6 Getting started - BenQ PG2401PT | PG2401PT User Manual - Page 7
Getting to know your monitor Front view 1. Light sensor / Eco sensor 2. Control buttons 3. Power button 1 Back view 23 4. Power switch 5. AC power input jack 6. Headphone jack 7. Cable management hole 8. HDMI socket 9. D-Sub socket 10. USB port (upstream; connecting to the PC) 11. Kensington lock - BenQ PG2401PT | PG2401PT User Manual - Page 8
14 15 16 17 • Above diagram may vary depending on the model. • Picture may differ from product supplied for your region. 8 Getting to know your monitor - BenQ PG2401PT | PG2401PT User Manual - Page 9
, you can purchase them separately. For detailed connection methods, see page 11 - 13. SD card USB peripherals Colorimeter Headphone PC/Notebook Getting to know your monitor 9 - BenQ PG2401PT | PG2401PT User Manual - Page 10
• If the computer is turned on you must turn it off before continuing. Do not plug-in or turn-on the power to the monitor until instructed to do so. • The following illustrations are for your reference only. Available input and output jacks may vary depending on the purchased model. 1. Attach - BenQ PG2401PT | PG2401PT User Manual - Page 11
on its stand on a flat even surface. You should position the monitor and angle the screen to minimize unwanted reflections from other light sources. plug of the D-Sub cable (at the end without the ferrite filter) to the monitor video socket. Connect the other end of the cable (at the end with the - BenQ PG2401PT | PG2401PT User Manual - Page 12
Cable Or Connect the plug of the HDMI cable to the HDMI port on the monitor. Connect the other end of the cable to the HDMI port of a digital mini DP Cable Or Connect the plug of the mini DP cable to the monitor video socket. Connect the other end of the cable to the computer video socket - BenQ PG2401PT | PG2401PT User Manual - Page 13
right. 5. Connect the memory card. Insert a SD, MMC, or MS memory card following the direction indicated on the card to exchange files. Supported memory card formats are as follows: - SD/SDHC/SDXC - MMC - Memory Stick / Memory Stick Pro - MS Duo /MS-Pro Duo How to assemble your monitor hardware 13 - BenQ PG2401PT | PG2401PT User Manual - Page 14
the power cord into the socket labelled on the rear of the monitor. Do not connect the other end to a power outlet just headphone is not in use. 2 Orient and align the headphone hook with the hole on the monitor stand, and attach the hook to the hole ( ). 1 Turn the hook clockwise until you - BenQ PG2401PT | PG2401PT User Manual - Page 15
power button on the monitor. Turn on the computer too, and follow the instructions in Getting the most from your BenQ monitor on page 25 to install the monitor software. To extend the service life of the product, we recommend that you use your computer's power management function. How to assemble - BenQ PG2401PT | PG2401PT User Manual - Page 16
a towel on the desk for padding, before laying the screen face down on a flat clean padded surface. Please be careful to prevent damage to the monitor. Placing the screen surface on an object like a stapler or a mouse will crack the glass or damage the LCD substrate voiding your warranty. Sliding or - BenQ PG2401PT | PG2401PT User Manual - Page 17
Turn the stand counterclockwise until you cannot go further. And then detach the base from the stand. You can remove the headphone hook as illustrated. Keep the headphone hook somewhere safe. How to assemble your monitor hardware 17 - BenQ PG2401PT | PG2401PT User Manual - Page 18
install the provided shading hood. Please be careful to prevent damage to the shading hood and the monitor. Different pieces of shading hood are well-designed and can fit into your monitor properly. Do not use excessive force when installing the shading hood to avoid possible damage. 1. Prepare for - BenQ PG2401PT | PG2401PT User Manual - Page 19
4. Install the right part of shading hood. b d 5. Attach to the right side of the monitor. 2 6. Place the piece e on the top of the monitor. 1 e Installing shading hood 19 - BenQ PG2401PT | PG2401PT User Manual - Page 20
7. Install the piece f . 2 1 f 8. If you intend to calibrate the display's color by a colorimeter, slide the piece f to the left end so the colorimeter can be installed. Follow the instruction manuals of the colorimeter you purchased and the provided software to complete the installation and - BenQ PG2401PT | PG2401PT User Manual - Page 21
part of the height-adjustable stand or at the bottom of the monitor, as ascending or descending monitor might cause personal injuries. Keep children out of reach of the monitor while performing this operation. • If the monitor has been rotated to portrait mode and height adjustment is desired, you - BenQ PG2401PT | PG2401PT User Manual - Page 22
display is rotated, you also need to rotate the OSD menu. Go to System and Auto Pivot. Select On. The OSD menu rotates with the monitor. 3. Fully extend the monitor and tilt it. Gently lift the display up and extend it to the maximum extended position. Then tilt the - BenQ PG2401PT | PG2401PT User Manual - Page 23
Adjust the monitor to the desired viewing angle. Viewing angle adjustment You may position the screen to the desired angle with -5° to + 20° monitor tilt, 90° (left and right total) monitor swivel, and 150 mm monitor height. -5O ~ +20O -45O ~ +45O 150 mm How to assemble your monitor hardware 23 - BenQ PG2401PT | PG2401PT User Manual - Page 24
recommended to avoid of losing the screws. In case you intend to use your monitor on the stand in the future, please keep the monitor base, monitor stand, and screws somewhere safe for future use. 3. Follow the instruction manuals of the wall mount bracket you purchased to complete the installation - BenQ PG2401PT | PG2401PT User Manual - Page 25
point, click the Have Disk button, insert the BenQ LCD Monitor DVD-ROM and select the appropriate monitor model. Further details and step-by-step instructions for either an automatic (new) or upgrade (existing) installation, see: • How to install the monitor on a new computer on page 26. • How to - BenQ PG2401PT | PG2401PT User Manual - Page 26
software installed), you should not be following these instructions. You should instead be following the instructions for How to upgrade the monitor on an existing computer. 1. Follow the instructions in Getting the most from your BenQ monitor on page 25. When Windows starts, it will automatically - BenQ PG2401PT | PG2401PT User Manual - Page 27
on an existing computer This instruction details the procedure for manually updating the existing monitor driver software on your Microsoft Windows computer. It is currently tested as compatible for Mac OS, Windows 8, and Windows 7 Operating System (OS). The BenQ LCD Monitor driver for your model - BenQ PG2401PT | PG2401PT User Manual - Page 28
, Control Panel, Devices and Printers and right-click the name of your monitor from the menu. Alternatively, right-click the desktop and select Personalize, Display, the Driver tab and the Update Driver button. 6. Insert the BenQ LCD Monitor DVD-ROM into a DVD drive on the computer. 7. In the - BenQ PG2401PT | PG2401PT User Manual - Page 29
Hardware and Sound, Devices and Printers and right-click the name of your monitor from the menu. Alternatively, right-click the desktop and select Personalize, Display, the Driver tab and the Update Driver button. 6. Insert the BenQ LCD Monitor DVD-ROM into a DVD drive on the computer. 7. In the - BenQ PG2401PT | PG2401PT User Manual - Page 30
How to adjust your monitor The control panel 1 2 No. Name Description 1. Control keys 2. Power key Accesses the functions or menu items displayed on the screen, by the LED indicators. Touch of an LED indicator represents pressing the corresponding control key. 30 How to adjust your monitor - BenQ PG2401PT | PG2401PT User Manual - Page 31
OSD (On Screen Display) menus can be accessed by the control keys. You can use the OSD menu to adjust all the settings on your monitor. 1 2 123456 4 3 1. Press any of the control keys. 2. The hot key menu is displayed. The left four controls are custom keys and are designated for particular - BenQ PG2401PT | PG2401PT User Manual - Page 32
key menu OSD icon in main menu Function 2 Custom Key 2 • By default, the key is the hot key for Color Mode. To change the default settings, see Customizing the hot keys on page 33. • For Down/Decrease adjustment. 3 controls, press and hold any key for 10 seconds. 32 How to adjust your monitor - BenQ PG2401PT | PG2401PT User Manual - Page 33
graphic card on your computer is set to the native resolution of the monitor when you use the Auto Adjustment function. If you wish, you can always adjust the screen geometric settings manually using geometry menu items. To assist you in this endeavour, BenQ has provided a screen test image - BenQ PG2401PT | PG2401PT User Manual - Page 34
color. The calibration result will be saved under Color Adjustment > Color Mode > Calibration 1 or Calibration 2. See the provided Palette Master How-to-Use Guide monitor to adjust the backlight automatically. See Eye Protect on page 42 for more information • Change the backlight manually from Color - BenQ PG2401PT | PG2401PT User Manual - Page 35
(On Screen Display) menu to adjust all the settings on your monitor. Press any of the control keys to bring up the hot key information on each menu, please refer to the following pages: • Display menu on page 36 • Color Adjustment menu on page 38 • Ergonomics menu on page 42 • Eco menu on page 44 - BenQ PG2401PT | PG2401PT User Manual - Page 36
become grayed out. And keys that are not available will be disabled and the corresponding OSD icons will disappear. Mode: Adobe RGB Display Color Adjustment Ergonomics Eco PIP/PBP System Input Aspect Ratio Auto Adjustment H. Position V. Position Pixel Clock Phase 1. Select Menu from the hot key - BenQ PG2401PT | PG2401PT User Manual - Page 37
Item Function 1:1 Displays the input image in its native resolution without scaling. Auto Optimizes and adjusts the screen settings automatically for Adjustment you. Range H. Position V. Position Pixel Clock Not applicable to a digital input signal. Adjusts the horizontal position of the - BenQ PG2401PT | PG2401PT User Manual - Page 38
, or use 5. To return to the previous menu, select . 6. To exit the menu, select . or to select a menu item. to make selection. Item Function Color Mode Select a color mode that best suits the type of images shown on the screen. Standard For basic PC application. Adobe RGB For better - BenQ PG2401PT | PG2401PT User Manual - Page 39
Palette Calibration 2 Master and your colorimeter (purchased separately). See the provided Palette Master How-to-Use Guide for more information. Custom 1 Applies a combination of color settings defined by users. Custom 2 Brightness Adjusts the balance between light and dark shades. 0 to 100 - BenQ PG2401PT | PG2401PT User Manual - Page 40
gradations may not be displayed well if this the setting has been adjusted. • C • M • Y Saturation Adjusts the purity degree of colors. • R • G • B Some color gradations may not be displayed well if this the setting has been adjusted. • C • M • Y Black Level Adjusts the luminance of - BenQ PG2401PT | PG2401PT User Manual - Page 41
Available menu options for each Color Mode Depending on the Color Mode you just set, the available options for color adjustment may vary. Color modes and the available display options are as follows: Color Mode Setting Standard Adobe RGB sRGB Illumin. A D50 D65 Eco Calibration Custom - BenQ PG2401PT | PG2401PT User Manual - Page 42
. If the light is sufficient, the monitor brightness is increased. If the monitor is in a poor light, the monitor brightness is decreased. • ON • OFF If you prefer to adjust the monitor brightness manually, go to Color Adjustment > Brightness. Color performance may be compromised if light sensor - BenQ PG2401PT | PG2401PT User Manual - Page 43
Item Function Range Eye Protect Meter (available when Color Mode is set to Standard or Custom) Sets to display the light condition around the monitor on the screen. • ON • OFF Smart Reminder Decides to display the pop-up message that reminds you to • ON rest your eyes. • OFF Time interval - BenQ PG2401PT | PG2401PT User Manual - Page 44
is turned off by the Eco sensor, the power button flashes in green. If the Eco sensor detects no presence for over 2 hours, the monitor will be powered off. Press the power button to turn on the monitor. Color performance may be compromised if Eco sensor is enabled. 44 Navigating the main menu - BenQ PG2401PT | PG2401PT User Manual - Page 45
Item Sensor Range Function Decides how far the sensor can detect. Range • Near • Middle • Far Navigating the main menu 45 - BenQ PG2401PT | PG2401PT User Manual - Page 46
will become grayed out. And keys that are not available will be disabled and the corresponding OSD icons will disappear. Mode: AdobeRGB Display Color Adjustment Ergonomics Eco PIP/PBP System Mode PIP/PBP Source PIP Size H. Position V. Position Contrast Sharpness PIP PBP SWAP Off 1. Select Menu - BenQ PG2401PT | PG2401PT User Manual - Page 47
the main source, go to the Color Adjustment menu. See page 39 for more information. Video source selection in PIP/PBP mode Your monitor scans for the available video sources table to find your main source and its supporting second sources. Main source Inputs VGA DVI-D HDMI DP Mini DP Possible second - BenQ PG2401PT | PG2401PT User Manual - Page 48
will become grayed out. And keys that are not available will be disabled and the corresponding OSD icons will disappear. Mode: AdobeRGB Display Color Adjustment Ergonomics Eco PIP/PBP System OSD Settings Language HDMI Auto Switch Display Time HDMI RGB PC Range OSD locked Uniformity AMA Auto - BenQ PG2401PT | PG2401PT User Manual - Page 49
SiCG/BiH/CRO • Română • Nederlands Svenska • Português Display Adjusts the display time of the OSD menu. Time OSD Lock Prevents all the monitor settings from being accidentally changed. When this function is activated, the OSD controls and hotkey operations will be disabled. • 5 sec. • 10 sec - BenQ PG2401PT | PG2401PT User Manual - Page 50
the detected video signal. Range You might need to manually set the Color Format if colors shown on the monitor screen do not display properly. If the input source is HDMI or DP, color format is not selectable. In other words, Color Format is automatically set depending on the input video source - BenQ PG2401PT | PG2401PT User Manual - Page 51
3. 3 Custom Key Sets the function to be accessed by custom key 4. 4 • Brightness • Contrast • Auto Adjustment • Input • Color mode • Color temp. • Gamma • Color gamut • Black level • PIP DDC/CI Allows the monitor settings to be set through the software • ON on the PC. • OFF DDC/CI, short for - BenQ PG2401PT | PG2401PT User Manual - Page 52
instructions. How do you use a VGA extension cable? Remove the extension cable for the test color. monitor does not support, please change the setting to one of the supported mode. Please read the "Preset display modes" section from the link "Adjusting the Screen Resolution". 52 Troubleshooting - BenQ PG2401PT | PG2401PT User Manual - Page 53
management mode is active. Press any button on the computer keyboard or move the mouse. If that does not help, check the signal cable connectors. If any pin is bent or broken off, please contact your dealer to get necessary support instructions. You are running the monitor instructions on instructions - BenQ PG2401PT | PG2401PT User Manual - Page 54
a manufacturing defect nor is the sensor damaged. You should turn off the Eco sensor for now in Eco > Eco Sensor. Need more help? If your problems remain after checking this manual, please contact your place of purchase or e-mail us at: [email protected]. 54 Troubleshooting
-
 1
1 -
 2
2 -
 3
3 -
 4
4 -
 5
5 -
 6
6 -
 7
7 -
8
-
9
-
10
-
11
-
12
-
13
-
14
-
15
-
16
-
17
-
18
-
19
-
20
-
21
-
22
-
23
-
24
-
25
-
26
-
27
-
28
-
29
-
30
-
31
-
32
-
33
-
34
-
35
-
36
-
37
-
38
-
39
-
40
-
41
-
42
-
43
-
44
-
45
-
46
-
47
-
48
-
49
-
50
-
51
-
52
-
53
-
54
 |
 |

PG2401PT
LCD Monitor
User Manual