Biostar IDEQ 200A iDEQ 200A user's manual - Page 36
Connecting, Printer
 |
View all Biostar IDEQ 200A manuals
Add to My Manuals
Save this manual to your list of manuals |
Page 36 highlights
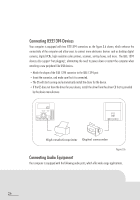
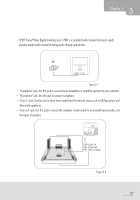
Connecting Printer Your computer provides the expansion port for parallel cable on the rear panel. If users would like to attach the printer through the parallel port, please contact your dealer to purchase the cable kits. However, many printers are now using USB as their input connector. Connecting the printer port: • Match the pins and the shape of the printer connector to the printer port. • Plug it in firmly. • Tighten it up with the locking screw on the connector. • Install the driver from the driver CD or diskette provided by the printer manufacturer. • Restart the computer if asked to by the OS. Connecting the printer via USB port: • Plug the USB connector to one of the USB port on your computer. • Your OS should start running and install the printer driver for you. • However, if your OS does not have the driver, please install it from the driver CD or diskette that is provided by the printer manufacturer. Note: To install the printer driver, please refer to the guide your printer manufacturer provides for you. Connecting LAN You can connect your computer with another computer system or get on broadband Internet connection by using the LAN port. Connect your computer to a network as follows: • The LAN jack is located on the back of your computer. • Plug an R1-45 network cable in the LAN jack. • The other end should be connected to a network hub or switch, or to a peer computer. 28
-
 1
1 -
2
-
3
-
4
-
5
-
6
-
7
-
8
-
9
-
10
-
11
-
12
-
13
-
14
-
15
-
16
-
17
-
18
-
19
-
20
-
21
-
22
-
23
-
24
-
25
-
26
-
27
-
28
-
29
-
30
-
 31
31 -
 32
32 -
 33
33 -
 34
34 -
 35
35 -
 36
36 -
 37
37 -
 38
38 -
 39
39 -
 40
40 -
 41
41 -
42
-
43
-
44
-
45
-
46
-
47
-
48
-
49
-
50
-
51
-
52
-
53
-
54
-
55
-
56
 |
 |