Biostar IDEQ 200A iDEQ 200A user's manual - Page 39
Installing, Utilities
 |
View all Biostar IDEQ 200A manuals
Add to My Manuals
Save this manual to your list of manuals |
Page 39 highlights
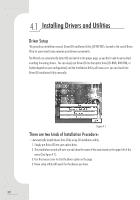
Chapter 4 5. The utility will start a page with the drivers you may need. 6. Click on the driver you want to install. 7. The utility will invoke other applications to complete the rest of installation. 8. Follow the installing instructions to finish the installation. 9. Click on the next driver you want to install. 10. Repeat steps 6 to 8 until you have installed all the drivers the utility has for you. • If the Driver and utility installation CD does not auto run, please follow the next steps after you place the CD into the optical drive. 1. Place the Driver CD into the optical drive. 2. Double click on My Computer. 3. Double click on your optical drive to browse the CD. 4. Double click the Setup.exe file to run the utility manually. 5. Use the mouse cursor to click the Driver option on the page. 6. Driver setup utility will search for the devices you have. 7. The utility will start a page with the drivers you may need. 8. Click on the driver you want to install. 9. The utility will invoke other applications to complete the rest of installation. 10. Follow the installing instructions to finish the installation. 11. Click on the next driver you want to install. 12. Repeat steps 8 to 10 until you have installed all the drivers the utility has for you. Installing Utilities We also provide you some very useful utilities to enhance the experience of your computer. Just like installing drivers for your computer, you can follow the steps for installing driver until the menu of figure 4.1 shows up. Then, please go through the following steps. 31
-
 1
1 -
2
-
3
-
4
-
5
-
6
-
7
-
8
-
9
-
10
-
11
-
12
-
13
-
14
-
15
-
16
-
17
-
18
-
19
-
20
-
21
-
22
-
23
-
24
-
25
-
26
-
27
-
28
-
29
-
30
-
31
-
32
-
33
-
 34
34 -
 35
35 -
 36
36 -
 37
37 -
 38
38 -
 39
39 -
 40
40 -
 41
41 -
 42
42 -
 43
43 -
 44
44 -
45
-
46
-
47
-
48
-
49
-
50
-
51
-
52
-
53
-
54
-
55
-
56
 |
 |