Biostar IDEQ 200A iDEQ 200A user's manual - Page 53
Appendix
 |
View all Biostar IDEQ 200A manuals
Add to My Manuals
Save this manual to your list of manuals |
Page 53 highlights
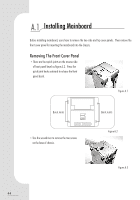
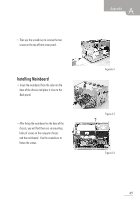
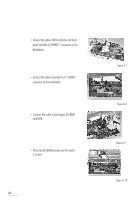
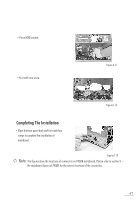
A Appendix • Then use the screwdriver to remove the two screws on the top of front cover panel. Installing Mainboard • Insert the mainboard from the side into the base of the chassis and place it close to the Back panel. • After fixing the mainboard on the base of the chassis, you will find there are six mounting holes of screws on the computer chassis and the mainboard. Use the screwdriver to fasten the screws. Figure A.4 _ ~; .: r ik v Figure A.5 Figure A.6 45
-
 1
1 -
2
-
3
-
4
-
5
-
6
-
7
-
8
-
9
-
10
-
11
-
12
-
13
-
14
-
15
-
16
-
17
-
18
-
19
-
20
-
21
-
22
-
23
-
24
-
25
-
26
-
27
-
28
-
29
-
30
-
31
-
32
-
33
-
34
-
35
-
36
-
37
-
38
-
39
-
40
-
41
-
42
-
43
-
44
-
45
-
46
-
47
-
 48
48 -
 49
49 -
 50
50 -
 51
51 -
 52
52 -
 53
53 -
 54
54 -
 55
55 -
 56
56
 |
 |
Appendix
A
•
Then
use
the
screwdriver
to
remove
the
two
screws
on
the
top
of
front
cover
panel.
Figure
A.4
Installing
Mainboard
•
Insert
the
mainboard
from
the
side
into
the
base
of
the
chassis
and
place
it
close
to
the
Back
panel.
•
After
fixing
the
mainboard
on
the
base
of
the
chassis,
you
will
find
there
are
six
mounting
holes
of
screws
on
the
computer
chassis
and
the
mainboard.
Use
the
screwdriver
to
fasten
the
screws.
_
~;
r
ik
v
.:
Figure
A.5
Figure
A.6
45