Bissell Carpet Cleaners User Guide - Page 5
Assembly
 |
View all Bissell Carpet Cleaners manuals
Add to My Manuals
Save this manual to your list of manuals |
Page 5 highlights
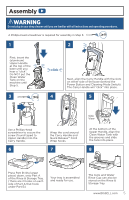
Assembly WARNING Do not plug in your deep cleaner until you are familiar with all instructions and operating procedures. A Phillips-head screwdriver is required for assembly in Step 3. 1 2 First, insert the (aluminum) Upper Handle at the top of the base until you hear a "click". Do NOT put the Clean Water Tank on the machine until Step 5. 3 click 4 Next, align the Carry Handle with the slots on either side of the base (behind the Power Button and Cleaning Mode Switch). The Carry Handle will "click" into place. 5 Use a Phillips-head screwdriver to secure the screw (found taped to Upper Handle) into the Carry Handle. 6 Wrap the cord around the Carry Handle and Quick Release™ Cord Wrap hooks. 7 Side View At the bottom of the Upper Handle, align the Clean Water Tank with the grooves and slide the tank into place. 8 Press Part B (the larger piece) down, onto Part A of the Rinse & Storage Tray. (There are 2 hooks on each side of Part A that hook under Part B.) Your tray is assembled and ready for use. The tools and Water Rinse Cup can also be stored on the Rinse & Storage Tray. www.BISSELL.com 5
-
 1
1 -
 2
2 -
 3
3 -
 4
4 -
 5
5 -
 6
6 -
 7
7 -
 8
8 -
 9
9 -
 10
10 -
 11
11 -
12
-
13
-
14
-
15
-
16
-
17
-
18
-
19
-
20
 |
 |
