Bose Lifestyle 38 Series IV Installation guide - Page 27
PTIONAL, ONNECTIONS, DDITIONS, Using digital audio connections
 |
View all Bose Lifestyle 38 Series IV manuals
Add to My Manuals
Save this manual to your list of manuals |
Page 27 highlights
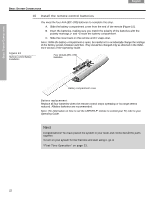
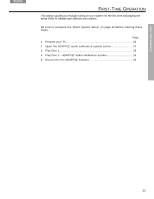
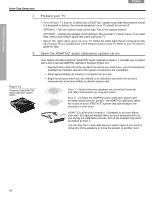
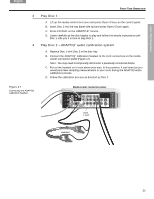
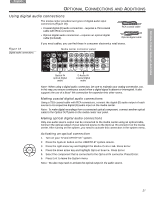
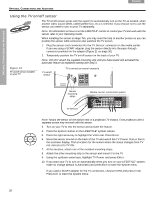
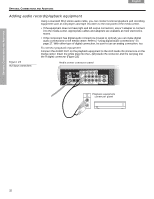
OPTIONAL CONNECTIONS AND ADDITIONS English DEsepuatsñcohl FItralniaçnaois Nederlands Svenska OPTIONAL CONNECTIONS AND ADDITIONS Using digital audio connections The media center provides two types of digital audio input connections (Figure 18): • Coaxial digital (D) audio connection - requires a 75Ω coaxial cable with RCA connectors. • Optical digital audio connection - requires an optical digital cable (included). RCA coaxial cable Optical digital cable If you need cables, you can find these in consumer electronics retail stores. Figure 18 Digital audio connections Media center connector panel Optical IN optical digital audio D Audio IN coaxial digital audio Note: When using a digital audio connection, be sure to maintain your analog connection, too. In this way, you ensure continuous sound when a digital signal is absent or interrupted. It also supports the use of a Bose® link connection for expansion into other rooms. Making coaxial digital audio connections Using a 75Ω coaxial cable with RCA connectors, connect the digital (D) audio output of each source to its respective digital (D) audio input on the media center. Note: To make digital recordings from a connected optical component, connect another optical cable to the Optical OUT jacks on the media center rear panel. Making optical digital audio connections Only one audio source output can be connected to the media center using an optical cable. Connect the optical output of your selected source to the Optical IN connector on the media center. After turning on the system, you need to activate this connection in the system menu. Activating an optical connection 1. Turn on your TV and LIFESTYLE® system. 2. Press the System button on the LIFESTYLE® system remote. 3. Press the right arrow key and highlight the Media Center tab. Press Enter. 4. Press the down arrow key and highlight Optical Source. Press Enter. 5. Select the component that is connected to the Optical IN connector. Press Enter. 6. Press Exit to leave the System menu. Note: You also may need to activate the optical output in the audio source. 27
-
 1
1 -
2
-
3
-
4
-
5
-
6
-
7
-
8
-
9
-
10
-
11
-
12
-
13
-
14
-
15
-
16
-
17
-
18
-
19
-
20
-
21
-
 22
22 -
 23
23 -
 24
24 -
 25
25 -
 26
26 -
 27
27 -
 28
28 -
 29
29 -
 30
30 -
 31
31 -
 32
32 -
33
-
34
-
35
-
36
-
37
-
38
-
39
-
40
-
41
-
42
-
43
-
44
-
45
-
46
-
47
-
48
-
49
-
50
-
51
-
52
-
53
-
54
-
55
-
56
-
57
-
58
-
59
-
60
-
61
-
62
-
63
-
64
-
65
-
66
-
67
-
68
-
69
-
70
-
71
-
72
-
73
-
74
-
75
-
76
-
77
-
78
-
79
-
80
-
81
-
82
-
83
-
84
-
85
-
86
-
87
-
88
-
89
-
90
-
91
-
92
-
93
-
94
-
95
-
96
-
97
-
98
-
99
-
100
-
101
-
102
-
103
-
104
-
105
-
106
-
107
-
108
-
109
-
110
-
111
-
112
-
113
 |
 |