Brother International BAS-342G Basic Instruction Manual - English - Page 27
PREPARATION BEFORE SEWING, 5-1. Installing the needle, 5-2. Operating the 2-pedal foot switch
 |
View all Brother International BAS-342G manuals
Add to My Manuals
Save this manual to your list of manuals |
Page 27 highlights
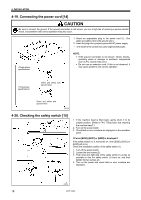
5. PREPARATION BEFORE SEWING 5. PREPARATION BEFORE SEWING 5-1. Installing the needle CAUTION Turn off the power switch before installing the needle. If the foot switch is depressed by mistake, the sewing machine might start operating and injury could result. 1. Loosen the set screw (1). 2. Insert the needle (2) in a straight line as far as it will go, making sure that the long groove on the needle is at the front, and then securely tighten the set screw (1). 3990M 5-2. Operating the 2-pedal foot switch Work clamp switch Start switch 3991M When the work clamp switch (left side) is depressed, the intermittent presser foot (1) and the work clamp (2) are lowered, and when the start switch (right side) is then depressed, the sewing machine starts operating. * The work clamp (2) lowering method can be changed using memory switch No. 002. (Refer to "7-3. List of memory switch settings" in the instruction manual CD.) 3992M BAS-342G 19
-
 1
1 -
2
-
3
-
4
-
5
-
6
-
7
-
8
-
9
-
10
-
11
-
12
-
13
-
14
-
15
-
16
-
17
-
18
-
19
-
20
-
21
-
 22
22 -
 23
23 -
 24
24 -
 25
25 -
 26
26 -
 27
27 -
 28
28 -
 29
29 -
 30
30 -
 31
31 -
 32
32 -
33
-
34
-
35
-
36
-
37
-
38
-
39
-
40
-
41
-
42
-
43
-
44
 |
 |
