Brother International BE-1204B Instruction Manual - English - Page 190
Operating Procedures, 1-1 Power Source, 1-2 Preparation for Embroidering
 |
View all Brother International BE-1204B manuals
Add to My Manuals
Save this manual to your list of manuals |
Page 190 highlights
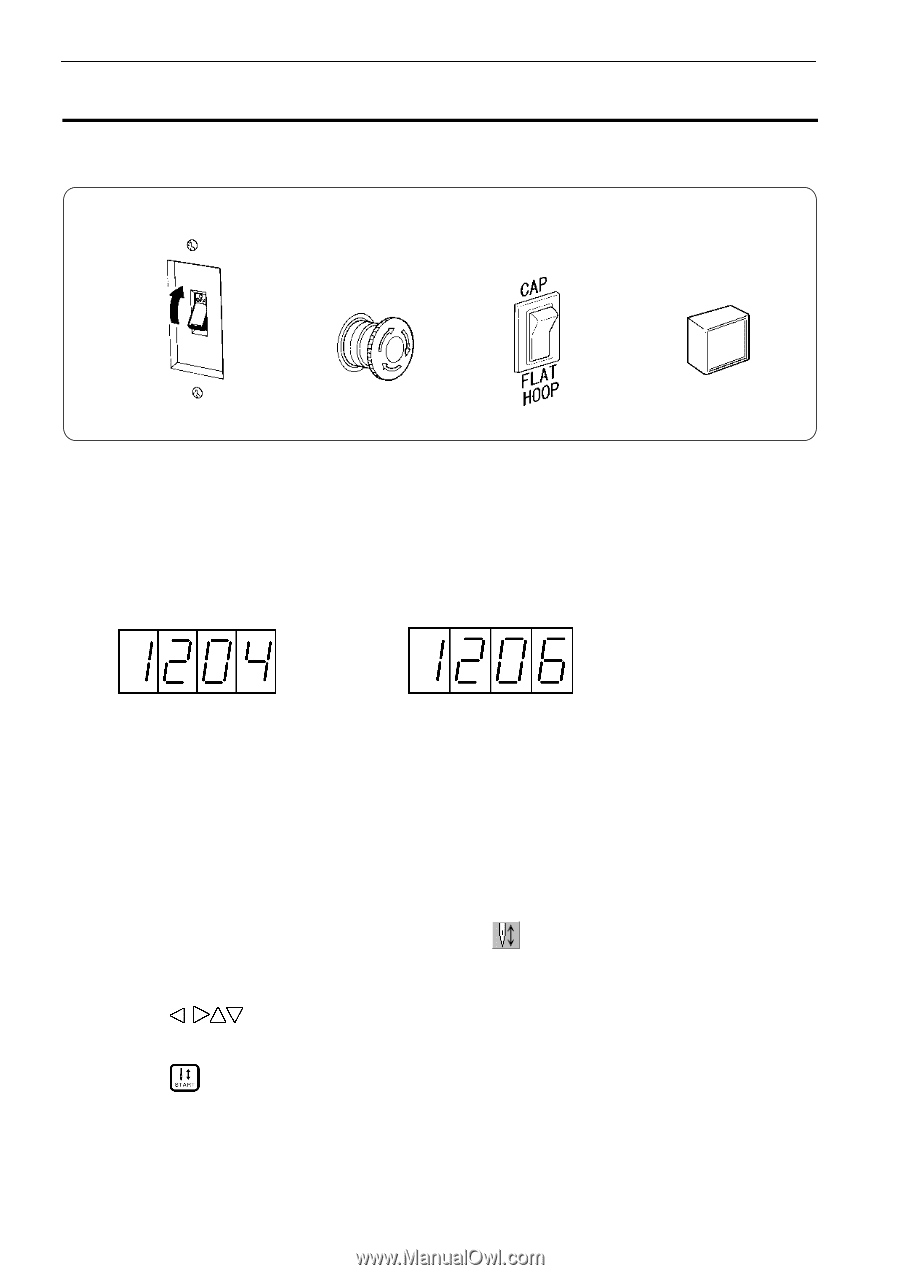
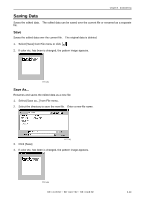
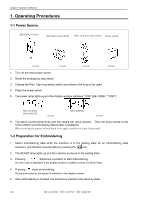
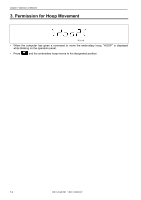
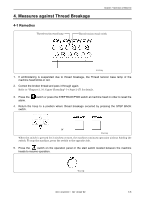
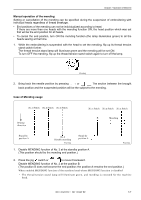
Chapter 7 Operation of Machine 1. Operating Procedures 1-1 Power Source Main power switch Emergency stop switch Flat / Cap hoop select swich Power switch W1262Q W1265Q W1405Q W1266Q 1. Turn on the main power switch. 2. Reset the emergency stop switch. 3. Change the Flat / Cap hoop select switch according to the hoop to be used. 4. Press the power switch. 5. The power lamp lights up and the display window indicates "1204" (BE-1206B : "1206")". BE-1204B-BC BE-1204C-BC W1355Q BE-1206B-BC W1356Q 6. The alarm sounds three times and the needle bar move upward. Then the hoop moves to the home position and the sewing data screen is displayed. When turning the power off and back it on again, wait for at least 10 seconds. 1-2 Preparation for Embroidering 1. Select embroidering data while the machine is in the waiting state for an embroidering data selection, and transmit required data by pressing the icon. 2. The READY lamp lights up and the machine is placed in the waiting state. 3. Pressing , determine a position to start embroidering. An error code is displayed in the display window if a pattern comes out of the hoop. 4. Pressing starts embroidering. During embroidering, the speed is indicated in the display window. 5. After embroidering is finished, the machine is placed in the stand-by state. 7-2 BE-1204B-BC • BE-1204C-BC • BE-1206B-BC
-
 1
1 -
2
-
3
-
4
-
5
-
6
-
7
-
8
-
9
-
10
-
11
-
12
-
13
-
14
-
15
-
16
-
17
-
18
-
19
-
20
-
21
-
22
-
23
-
24
-
25
-
26
-
27
-
28
-
29
-
30
-
31
-
32
-
33
-
34
-
35
-
36
-
37
-
38
-
39
-
40
-
41
-
42
-
43
-
44
-
45
-
46
-
47
-
48
-
49
-
50
-
51
-
52
-
53
-
54
-
55
-
56
-
57
-
58
-
59
-
60
-
61
-
62
-
63
-
64
-
65
-
66
-
67
-
68
-
69
-
70
-
71
-
72
-
73
-
74
-
75
-
76
-
77
-
78
-
79
-
80
-
81
-
82
-
83
-
84
-
85
-
86
-
87
-
88
-
89
-
90
-
91
-
92
-
93
-
94
-
95
-
96
-
97
-
98
-
99
-
100
-
101
-
102
-
103
-
104
-
105
-
106
-
107
-
108
-
109
-
110
-
111
-
112
-
113
-
114
-
115
-
116
-
117
-
118
-
119
-
120
-
121
-
122
-
123
-
124
-
125
-
126
-
127
-
128
-
129
-
130
-
131
-
132
-
133
-
134
-
135
-
136
-
137
-
138
-
139
-
140
-
141
-
142
-
143
-
144
-
145
-
146
-
147
-
148
-
149
-
150
-
151
-
152
-
153
-
154
-
155
-
156
-
157
-
158
-
159
-
160
-
161
-
162
-
163
-
164
-
165
-
166
-
167
-
168
-
169
-
170
-
171
-
172
-
173
-
174
-
175
-
176
-
177
-
178
-
179
-
180
-
181
-
182
-
183
-
184
-
 185
185 -
 186
186 -
 187
187 -
 188
188 -
 189
189 -
 190
190 -
 191
191 -
 192
192 -
 193
193 -
 194
194 -
 195
195 -
196
-
197
-
198
-
199
-
200
-
201
-
202
-
203
-
204
-
205
-
206
-
207
-
208
-
209
-
210
-
211
-
212
-
213
-
214
-
215
-
216
-
217
-
218
-
219
-
220
-
221
-
222
-
223
-
224
-
225
-
226
-
227
-
228
-
229
-
230
-
231
-
232
-
233
-
234
-
235
-
236
-
237
-
238
-
239
-
240
-
241
-
242
-
243
-
244
-
245
-
246
-
247
-
248
-
249
-
250
-
251
-
252
-
253
-
254
-
255
-
256
-
257
-
258
-
259
-
260
-
261
-
262
 |
 |