Brother International BE-1204B Cap Frame Device Instruction Manual - English - Page 24
Removing the wide cap frame / semiwide cap frame, CAUTION
 |
View all Brother International BE-1204B manuals
Add to My Manuals
Save this manual to your list of manuals |
Page 24 highlights
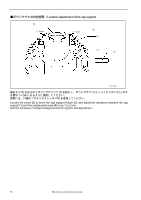
Removing the wide cap frame / semiwide cap frame 注意/CAUTION NOTE) Be sure to turn off the power. Before removing the cap frame, turn off the power switch, otherwise the machine may operate if the start switch is pressed by mistake, which could result in injury. Use only the proper replacement parts as specified by Brother. Any problems in machine operation which result from unauthorized modifications to the machine will not be covered by the warranty. [2] [10] [9] [7] [8] W1424Q 1 10 1. Take out the thumb screw [10]. [6] W1423Q 2 N[8 9 2. Hold up the cap frame sash N [8] and take it out from the positioning pins [9]. 3. 2 6 7 Y 2 3. Open the two fixed levers [6] in the direction of the arrow and shift the fixing pins [7] outside to take them out from the Y-feed sash [2]. 22 Electronic embroidery machine
-
 1
1 -
2
-
3
-
4
-
5
-
6
-
7
-
8
-
9
-
10
-
11
-
12
-
13
-
14
-
15
-
16
-
17
-
18
-
 19
19 -
 20
20 -
 21
21 -
 22
22 -
 23
23 -
 24
24 -
 25
25 -
 26
26 -
 27
27 -
 28
28
 |
 |
