Brother International BE-1204B Cap Frame Device Instruction Manual - English - Page 9
Setting the cap frame and the cap, Adjusting cap frame size]
 |
View all Brother International BE-1204B manuals
Add to My Manuals
Save this manual to your list of manuals |
Page 9 highlights
Setting the cap frame and the cap Adjusting cap frame size] [6] [5] 深さ depth [5] W1413Q [3] [7] clamp member W1442Q W1443Q 1 1. The frame size must be adjusted according to the depth of the cap. 2. 皿ねじ[5]4 3 6]4 6 2. The frame can be adjusted to three sizes by removing the four set screws [5]. Adjust the size according to the size of the cap. Also loosen the four wing nuts [6] to adjust the cap frame to the cap size. * The clamp members can be adjusted to suit the material thickness by loosening the four wing nuts [6] and moving the snap lock sideways as shown in the illustration. 3. 帽子枠[7 3 3. Set the cap frame [7] in the set frame base set [3] . Electronic embroidery machine 7
-
 1
1 -
2
-
3
-
 4
4 -
 5
5 -
 6
6 -
 7
7 -
 8
8 -
 9
9 -
 10
10 -
 11
11 -
 12
12 -
 13
13 -
 14
14 -
15
-
16
-
17
-
18
-
19
-
20
-
21
-
22
-
23
-
24
-
25
-
26
-
27
-
28
 |
 |

Electronic embroidery machine
7
■
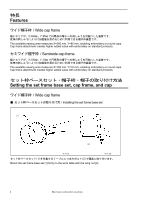
帽子枠・帽子のセット方法
/ Setting the cap frame and the cap
[
帽子枠サイズの調整
] / [Adjusting cap frame size]
W1413Q
W1442Q
W1443Q
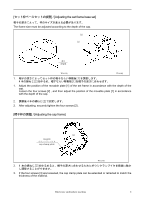
1.
帽子の深さによって、枠のサイズを変える必要があります。
1.
The frame size must be adjusted according to the depth of the cap.
2.
皿
ねじ
[5]4
本を外すとサイズが
3
段階
に変
更
できますので、帽子に合わせてサイズを
決
めます。
また、帽子枠も
蝶ナ
ット
[6]4
本をゆるめてサイズを合わせます。
*4
本の
蝶ナ
ット
[6]
をゆるめてパチン錠を
図
のように
左右
方
向
へずらすとクランプ部を
生地厚
に合わせ
ることができます。
2.
The frame can be adjusted to three sizes by removing the four set screws [5]. Adjust the size
according to the size of the cap. Also loosen the four wing nuts [6] to adjust the cap frame to the
cap size.
*
The clamp members can be adjusted to suit the material thickness by loosening the four wing
nuts [6] and moving the snap lock sideways as shown in the illustration.
3.
帽子枠
[7]
を、セット枠ベースセット
[3]
にセットします。
3.
Set the cap frame [7] in the set frame base set [3] .
深さ
depth
[5]
[6]
[5]
クランプ部
clamp member
[7]
[3]