Brother International BE-1204B Cap Frame Device Instruction Manual - English - Page 7
り、クリップ
 |
View all Brother International BE-1204B manuals
Add to My Manuals
Save this manual to your list of manuals |
Page 7 highlights
ツバ visor [6] holder guide pins [5] W1419Q cap clamp plate clip W1420Q [7] [4] W1421Q 6. フタ枠 W[6 W[6 W[6 6. Hold the holder of cover frame W[6] in your fingers and close cover frame W[6]. Check that the guide pins are inside the groove and the notch of cover frame W[6] at this time. 7 5 7. While pushing the holder with your finger, close the snap lock [5]. 8 4 8. Pull the cap downward to secure it to the cap clamp plate with the four clips, while making sure that there are no wrinkles in the cap. 9 1 4 7 9. Remove the cap frame [4] from the set frame base set [1], and set it on the cap frame driving assembly [7] mounted on the machine. Electronic embroidery machine 5
-
 1
1 -
 2
2 -
 3
3 -
 4
4 -
 5
5 -
 6
6 -
 7
7 -
 8
8 -
 9
9 -
 10
10 -
 11
11 -
 12
12 -
13
-
14
-
15
-
16
-
17
-
18
-
19
-
20
-
21
-
22
-
23
-
24
-
25
-
26
-
27
-
28
 |
 |

Electronic embroidery machine
5
W1419Q
W1420Q
W1421Q
6.
フタ枠
W[6]
の指押え部をつまみ、フタ枠
W[6]
を閉じます。
この時、ガイドピンがフタ枠
W[6]
の溝及び切欠き部に
収
まっている
事
を確認してください。
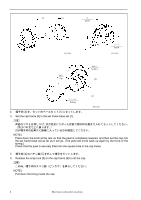
6.
Hold the holder of cover frame W[6] in your fingers and close cover frame W[6].
Check that the guide pins are inside the groove and the notch of cover frame W[6] at this time.
7.
指押え部を指で押し付けながらパチン錠
[5]
をはめます。
7.
While pushing the holder with your finger, close the snap lock [5].
8.
帽子の外
周
を下へ
ひ
っ
ぱ
り、クリップ
4
個
で帽子に
“
シワ
”
が
寄
らないようにボウシクランプイ
タに固定します。
8.
Pull the cap downward to secure it to the cap clamp plate with the four clips, while making sure
that there are no wrinkles in the cap.
9.
セット枠ベースセット
[1]
より帽子枠
[4]
を取り外し、ミシン本
体
に取り付けてある帽子枠
駆
動(
組
)
[7]
にセットします。
9.
Remove the cap frame [4] from the set frame base set [1], and set it on the cap frame driving
assembly [7] mounted on the machine.
ツバ
visor
クリップ
clip
[7]
[4]
ボウシクランプイタ
cap clamp plate
[5]
指押え部
holder
ガイドピン
guide pins
[6]