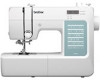
Brother International CP60X Sewing Guide
Brother International CP60X Manual
 |
View all Brother International CP60X manuals
Add to My Manuals
Save this manual to your list of manuals |
Brother International CP60X manual content summary:
- Brother International CP60X | Sewing Guide - Page 1
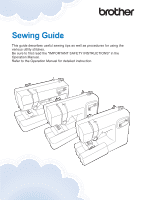
Sewing Guide This guide describes useful sewing tips as well as procedures for using the various utility stitches. Be sure to first read the "IMPORTANT SAFETY INSTRUCTIONS" in the Operation Manual. Refer to the Operation Manual for detailed instruction. - Brother International CP60X | Sewing Guide - Page 2
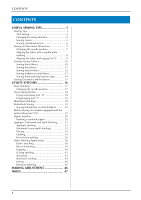
CONTENTS CONTENTS USEFUL SEWING TIPS 3 Sewing Tips 3 Trial sewing 3 Changing the sewing direction 4 Sewing curves 5 Sewing cylindrical pieces 6 Sewing an Even Seam Allowance 7 Changing the needle position 7 Aligning the fabric with a needle plate marking 8 Aligning the fabric with zigzag - Brother International CP60X | Sewing Guide - Page 3
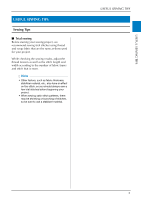
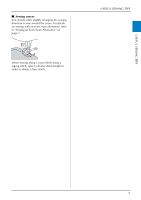
USEFUL SEWING TIPS USEFUL SEWING TIPS Sewing Tips ■ Trial sewing Before starting your sewing project, we recommend sewing trial stitches using thread and scrap fabric that are the same as those used for your project. While checking the sewing results, adjust the thread tension as well as the stitch - Brother International CP60X | Sewing Guide - Page 4
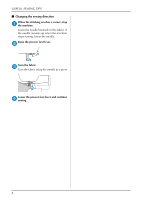
USEFUL SEWING TIPS ■ Changing the sewing direction When the stitching reaches a corner, stop a the machine. Leave the needle lowered (in the fabric). If the needle remains up when the machine stops sewing, lower the needle. Raise the presser foot lever. b Turn the fabric. c Turn the fabric using the - Brother International CP60X | Sewing Guide - Page 5
USEFUL SEWING TIPS ■ Sewing curves Sew slowly while slightly changing the sewing direction to sew around the curve. For details on sewing with an even seam allowance, refer to "Sewing an Even Seam Allowance" on page 7. When sewing along a curve while using a zigzag stitch, select a shorter stitch - Brother International CP60X | Sewing Guide - Page 6
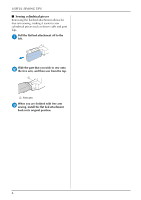
USEFUL SEWING TIPS ■ Sewing cylindrical pieces Removing the flat bed attachment allows for free-arm sewing, making it easier to sew cylindrical pieces such as sleeve cuffs and pant legs. Pull the flat bed attachment off to the a left. Slide the part that you wish to sew onto b the free arm, and then - Brother International CP60X | Sewing Guide - Page 7
USEFUL SEWING TIPS Sewing an Even Seam Allowance To sew an even seam, start sewing so that the seam allowance is to the right of the presser foot, and the edge of the fabric is aligned with either the right edge of the presser foot or a marking on the needle plate. ■ Changing the needle position - Brother International CP60X | Sewing Guide - Page 8
USEFUL SEWING TIPS ■ Aligning the fabric with a needle plate marking The markings on the needle plate show the distance from the needle position of a seam sewn with the straight stitch (left needle position). Sew while keeping the edge of the fabric aligned with a marking on the needle plate. The - Brother International CP60X | Sewing Guide - Page 9
USEFUL SEWING TIPS ■ Aligning the fabric with zigzag foot "J" The marking on zigzag foot "J" can be used to sew about 5 mm (3/16 inch) from the edge of the fabric. When using this feature, select a straight stitch, and set the stitch width to 2.0 mm. a b c 1 Stitch width 2.0 mm 2 Marking 3 5 mm - Brother International CP60X | Sewing Guide - Page 10
USEFUL SEWING TIPS Sewing Various Fabrics ■ Sewing thick fabrics If the fabric does not fit under the presser foot The presser foot lever can be raised to two different positions. If the fabric does not fit under the presser foot, for example, when sewing together thick fabrics, raise the presser - Brother International CP60X | Sewing Guide - Page 11
USEFUL SEWING TIPS ■ Sewing thin fabrics When sewing thin fabrics, the stitching may become misaligned or the fabric may not feed correctly. If this occurs, place thin paper or stabilizer material under the fabric and sew it together with the fabric. When you have finished sewing, tear off any - Brother International CP60X | Sewing Guide - Page 12
may differ depending on the model. Check stitch selections on the machine's body, and then select the stitch number. Note • Be sure to follow manufacturer's instructions when using water soluble stabilizer. It may not be compatible with some fabrics. 12 - Brother International CP60X | Sewing Guide - Page 13
USEFUL SEWING TIPS ■ Sewing leathers or vinyl fabrics When sewing fabrics that may stick to the presser foot, such as leather or vinyl fabrics, replace the presser foot with the walking foot* or non stick foot*. * Items sold separately, please contact your authorized Brother dealer. 1 1 Leather If - Brother International CP60X | Sewing Guide - Page 14
hookand-loop fastener tape, replace the needle with the needle size for thicker fabrics. For details, refer to "Fabric/Thread/Needle Combinations" on the Operation Manual. 1 1 Edge of the hook-and-loop fastener tape 14 - Brother International CP60X | Sewing Guide - Page 15
USEFUL SEWING TIPS Sewing Decorative Stitch Patterns Fabric When sewing on stretch fabrics, lightweight fabrics, or fabrics with coarse weaves, attach stabilizer on the wrong side of the fabric. An alternative would be to place the fabric on thin paper such as tracing paper. Thread Needle 1 - Brother International CP60X | Sewing Guide - Page 16
the foot controller or any button is accidentally pressed and the machine starts sewing. For details on changing the presser foot, refer to the Operation Manual. 16 - Brother International CP60X | Sewing Guide - Page 17
number. Lower the needle into the fabric at the d beginning of the stitching. Start sewing. e • For details, refer to "Starting to sew" on the Operation Manual. • For details on sewing reverse/ reinforcement stitches, refer to "Sewing reverse/reinforcement stitches" on the Operation - Brother International CP60X | Sewing Guide - Page 18
touch the presser foot. 1 The needle should not touch the presser foot center bar. Sew with the edge of the fabric against e the presser foot guide. 1 1 Needle drop point CAUTION • Be sure to pull the fabric backward after finished sewing. If you pull the fabric toward side or forward, the presser - Brother International CP60X | Sewing Guide - Page 19
UTILITY STITCHES ■ Using zigzag foot "J" Attach zigzag foot "J". a Select a stitch. b * Stitches may differ depending on the model. Check stitch selections on the machine's body, and then select the stitch number. Sew along the edge of the fabric with the c needle dropping off the edge at the right - Brother International CP60X | Sewing Guide - Page 20
UTILITY STITCHES Blind Hem Stitching Secure the lower edge of skirts and pants with a blind hem. Memo • When the size of cylindrical pieces is too small to slide onto the arm or the length is too short, the fabric will not feed and desired results may not be achieved. Turn the skirt or pants - Brother International CP60X | Sewing Guide - Page 21
the presser foot lever. 1 Wrong side of fabric 2 Fold of hem 3 Presser foot guide Adjust the stitch width until the needle k slightly catches the fold of the hem. For details of stitch width, refer to the Operation Manual. 1 Needle drop point When you change the needle drop point, raise the needle - Brother International CP60X | Sewing Guide - Page 22
the right side of the fabric will be very large, leaving an unattractive finish. Sew with the fold of the hem against the l presser foot guide. Stop sewing when you are finished, and m raise the presser foot and needle to pull the fabric under the presser foot towards the back of - Brother International CP60X | Sewing Guide - Page 23
mark on the fabric the a position and length of the buttonhole. b a UTILITY STITCHES 1 Marks on fabric 2 Buttonhole sewing Pull out the button guide plate of b buttonhole foot "A", and then insert the button that will be put through the buttonhole. 1 Reinforcement stitching * Stitches may differ - Brother International CP60X | Sewing Guide - Page 24
UTILITY STITCHES Example: For a button with a diameter of 15 mm (9/16 inch) and a thickness of 10 mm (3/8 inch), the button guide plate should be set to 25 mm (1 inch) on the scale. 1 10 mm (3/8 inch) 1 2 15 mm (9/16 inch) 2 The size of the buttonhole is set. - Brother International CP60X | Sewing Guide - Page 25
UTILITY STITCHES Use the seam ripper to cut towards the k pin and open the buttonhole. 1 1 Seam ripper For keyhole buttonholes, use the eyelet punch to make a hole in the rounded end of the buttonhole, and then use the seam ripper to cut open the buttonhole. 1 1 Eyelet punch • When using the eyelet - Brother International CP60X | Sewing Guide - Page 26
UTILITY STITCHES ■ Sewing buttonholes on stretch fabrics Available on models with the following stitches. Use a handsewing needle to pull the gimp h thread to the wrong side of the fabric, and then tie it. When sewing buttonholes on stretch fabrics, use a gimp thread. Hook the gimp thread onto the - Brother International CP60X | Sewing Guide - Page 27
UTILITY STITCHES UTILITY STITCHES Button Sewing (for models equipped with the button fitting foot "M") Buttons can be sewn on with the machine. Buttons with two or with four holes can be attached. Measure the distance between the holes a in the button to be attached. Place the button in the - Brother International CP60X | Sewing Guide - Page 28
UTILITY STITCHES Sew about 10 stitches at a slow speed. h (For models equipped with the sewing speed controller on the machine) Set the sewing speed controller to the left so that the speed will be slow. Use scissors to cut the upper thread and i the bobbin thread at the beginning of the stitching. - Brother International CP60X | Sewing Guide - Page 29
UTILITY STITCHES UTILITY STITCHES Zipper Insertion ■ Inserting a centered zipper Stitching is sewn on both pieces of fabric butted against each other. 2 1 3 1 Right side of fabric 2 Stitching 3 End of zipper opening Attach zigzag foot "J". a Sew straight stitches up to the zipper b opening. With - Brother International CP60X | Sewing Guide - Page 30
UTILITY STITCHES Attach the presser foot holder to the right g pin of zipper foot "I". I 1 2 1 Pin on the right side 2 Needle drop point Select the straight stitch (middle (center) h needle position). Topstitch around the zipper. i 1 3 2 4 * Check the stitch number on the machine's body, - Brother International CP60X | Sewing Guide - Page 31
UTILITY STITCHES UTILITY STITCHES Appliqué, Patchwork and Quilt Stitching ■ Appliqué stitching Baste or glue the appliqué piece to the a base fabric to secure it. Note • If glue is used to hold the appliqué in place on the fabric, do not apply glue to areas that will be sewn with the machine. If - Brother International CP60X | Sewing Guide - Page 32
UTILITY STITCHES ■ Patchwork (crazy quilt) stitching Fold the edge of the top piece of fabric a and place it over the lower piece. Attach zigzag foot "J". b Select a stitch. c • The stitches shown below are examples. Select the desired stitch. * Stitches may differ depending on the model. Check - Brother International CP60X | Sewing Guide - Page 33
width of the seam allowance (needle position), adjust the stitch width. For details, refer to "Setting the stitch length and stitch width" on the Operation Manual and "Sewing an Even Seam Allowance" on page 7. 1 6.5 mm (1/4 inch) 33 - Brother International CP60X | Sewing Guide - Page 34
is called "quilting". Quilts can easily be sewn using the walking foot* and the quilting guide*. * Items sold separately, please contact your authorized Brother dealer. Note • Thread the needle manually when using the walking foot, or attach the walking foot only after threading the needle using - Brother International CP60X | Sewing Guide - Page 35
stitches that are equally spaced. Insert the stem of the quilting guide into a the hole at the rear of the walking foot or presser foot holder. Walking foot Presser foot holder Adjust the stem of the quilting guide so b that the guide aligns with the seam that has already been sewn. UTILITY - Brother International CP60X | Sewing Guide - Page 36
the presser foot and the presser c foot holder. • When removing the presser foot holder, turn off the machine. For details, refer to the Operation Manual. Attach the quilting foot by positioning d the pin of the quilting foot above the needle clamp screw and aligning the lower-left of the quilting - Brother International CP60X | Sewing Guide - Page 37
UTILITY STITCHES Hold the quilting foot in place with your e right hand, and tighten the presser foot holder screw using the screwdriver with your left hand. 1 1 Presser foot holder screw CAUTION • Be sure to securely tighten the screws with the included screwdriver. Otherwise, the needle may touch - Brother International CP60X | Sewing Guide - Page 38
UTILITY STITCHES Other Stitching Applications ■ Elastic attaching When elastic tape is attached to the cuff or waist of a piece of clothing, the finished dimensions will be that of the stretched elastic tape. Therefore, it is necessary that a suitable length of the elastic tape be used. Pin the - Brother International CP60X | Sewing Guide - Page 39
. As an example, the procedure for sewing bar tacks at pocket corners is described below. Determine the length of the bar tack. a Set the button guide plate on buttonhole foot "A" to the length of the bar tack. (The distance between the markings on the presser foot scale is 5 mm (3/16 inch - Brother International CP60X | Sewing Guide - Page 40
UTILITY STITCHES ■ Fagoting Available on models with the following stitches. Sew with the center of the presser foot f aligned along the center of the two pieces of fabric. Stitching across an open seam is called "fagoting". It is used on blouses and children's clothing. This stitch is more - Brother International CP60X | Sewing Guide - Page 41
UTILITY STITCHES ■ Scallop stitching Available on models with the following stitch. The wave-shaped repeated stitch pattern that looks like shells is called "scalloping". It is used on the collars of blouses and to decorate the edges of projects. Attach monogramming foot "N". a Select a stitch. b * - Brother International CP60X | Sewing Guide - Page 42
UTILITY STITCHES ■ Smocking Available on models with the following stitches. Stitch between the straight stitches and e pull out the threads for the straight stitches. The decorative stitch created by stitching or embroidering over gathers is called "smocking". It is used to decorate the front of - Brother International CP60X | Sewing Guide - Page 43
■ Shell tuck stitching Available on models with the following stitch. The gathers that look like shells are called "shell tucks". They are used to decorate trims, the front of blouses or cuffs made of thin fabrics. Draw equally spaced lines along the bias, a and then fold the fabric along the lines. - Brother International CP60X | Sewing Guide - Page 44
UTILITY STITCHES ■ Joining Available on models with the following stitches. Decorative bridging stitches can be sewn over the seam allowance of joined fabrics. This is used when making a crazy quilt. Attach zigzag foot "J". a Sew together the right sides of the two b pieces of fabric, and then open - Brother International CP60X | Sewing Guide - Page 45
• Use a 130/705H 100/16 wing needle. • For details on replacing a needle, refer to the Operation Manual. • The needle threader cannot be used with the wing needle, otherwise the machine may be damaged. Manually pass the thread through the eye of the needle from the front to the back. Attach - Brother International CP60X | Sewing Guide - Page 46
MAKING ADJUSTMENT MAKING ADJUSTMENT (Available on models with 25 or more stitches.) Your stitch pattern may sometimes turn out poorly, depending on the type or thickness of fabric, the stabilizer material used, sewing speed, etc. If your sewing does not turn out well, sew trial stitches using the - Brother International CP60X | Sewing Guide - Page 47
-loop fastener tape 14 J Joining 44 L Leather 13 N Needle position 7, 17 O Overcasting stitches 18 P Patchwork 32 Piecing 33 Q Quilting 34 Quilting guide 35 S Scallop stitching 41 Shell tuck stitch 43 Smocking 42 Stretch fabrics 12 T Thick fabrics 10 Thin fabrics 11 V Vinyl fabrics - Brother International CP60X | Sewing Guide - Page 48
/ where you can get the support information (Sewing Guide, Stitch Chart, Instruction Videos, FAQs, etc.) for your support information (Instruction Videos, FAQs, etc.) for your Brother product. Visit the Google Play™ or App Store to download. Google Play™ App Store Trademarks App Store is a service
-
 1
1 -
 2
2 -
 3
3 -
 4
4 -
 5
5 -
 6
6 -
 7
7 -
8
-
9
-
10
-
11
-
12
-
13
-
14
-
15
-
16
-
17
-
18
-
19
-
20
-
21
-
22
-
23
-
24
-
25
-
26
-
27
-
28
-
29
-
30
-
31
-
32
-
33
-
34
-
35
-
36
-
37
-
38
-
39
-
40
-
41
-
42
-
43
-
44
-
45
-
46
-
47
-
48
 |
 |
Sewing Guide
This guide describes useful sewing tips as well as procedures for using the
various utility stitches.
Be sure to first read the "IMPORTANT SAFETY INSTRUCTIONS" in the
Operation Manual.
Refer to the Operation Manual for detailed instruction.