Brother International CP60X Sewing Guide - Page 17
Basic Stitching, Changing the needle position
 |
View all Brother International CP60X manuals
Add to My Manuals
Save this manual to your list of manuals |
Page 17 highlights
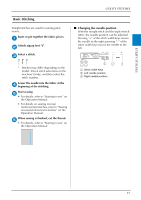
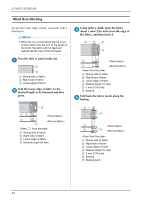
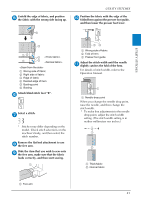
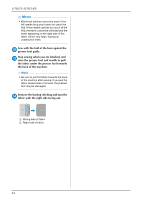
UTILITY STITCHES Basic Stitching Straight stitches are used for sewing plain seams. Baste or pin together the fabric pieces. a Attach zigzag foot "J". b Select a stitch. c UTILITY STITCHES ■ Changing the needle position With the straight stitch and the triple stretch stitch, the needle position can be adjusted. Pressing "+" of the stitch width keys moves the needle to the right; pressing "-" of the stitch width keys moves the needle to the left. * Stitches may differ depending on the model. Check stitch selections on the machine's body, and then select the stitch number. Lower the needle into the fabric at the d beginning of the stitching. Start sewing. e • For details, refer to "Starting to sew" on the Operation Manual. • For details on sewing reverse/ reinforcement stitches, refer to "Sewing reverse/reinforcement stitches" on the Operation Manual. When sewing is finished, cut the thread. f • For details, refer to "Starting to sew" on the Operation Manual. 1 Stitch width keys 2 Left needle position 3 Right needle position 17
-
 1
1 -
2
-
3
-
4
-
5
-
6
-
7
-
8
-
9
-
10
-
11
-
 12
12 -
 13
13 -
 14
14 -
 15
15 -
 16
16 -
 17
17 -
 18
18 -
 19
19 -
 20
20 -
 21
21 -
 22
22 -
23
-
24
-
25
-
26
-
27
-
28
-
29
-
30
-
31
-
32
-
33
-
34
-
35
-
36
-
37
-
38
-
39
-
40
-
41
-
42
-
43
-
44
-
45
-
46
-
47
-
48
 |
 |
