Brother International CP60X Sewing Guide - Page 24
Select a stitch., Attach buttonhole foot A.
 |
View all Brother International CP60X manuals
Add to My Manuals
Save this manual to your list of manuals |
Page 24 highlights
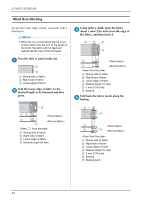
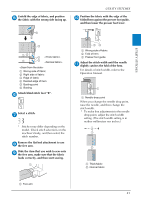
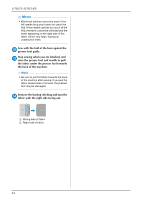
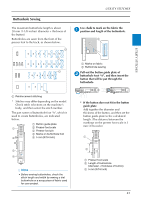
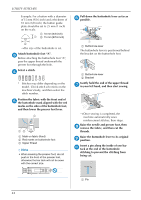
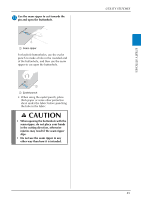
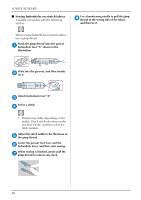
UTILITY STITCHES Example: For a button with a diameter of 15 mm (9/16 inch) and a thickness of 10 mm (3/8 inch), the button guide plate should be set to 25 mm (1 inch) on the scale. 1 10 mm (3/8 inch) 1 2 15 mm (9/16 inch) 2 The size of the buttonhole is set. Attach buttonhole foot "A". c Before attaching the buttonhole foot "A", pass the upper thread underneath the presser foot through the hole. Select a stitch. d * Stitches may differ depending on the model. Check stitch selections on the machine's body, and then select the stitch number. Position the fabric with the front end of e the buttonhole mark aligned with the red marks on the sides of the buttonhole foot, and then lower the presser foot lever. a A cb 1 Mark on fabric (front) 2 Red marks on buttonhole foot 3 Upper thread Note • When lowering the presser foot, do not push in the front of the presser foot, otherwise the bar tack will not be sewn with the correct size. Pull down the buttonhole lever as far as f possible. 1 1 Buttonhole lever The buttonhole lever is positioned behind the bracket on the buttonhole foot. 1 2 1 Buttonhole lever 2 Bracket Gently hold the end of the upper thread g in your left hand, and then start sewing. Once sewing is completed, the machine automatically sews reinforcement stitches, then stops. Raise the needle and presser foot, then h remove the fabric, and then cut the threads. Raise the buttonhole lever to its original i position. Insert a pin along the inside of one bar j tack at the end of the buttonhole stitching to prevent the stitching from being cut. 1 1 Pin 24
-
 1
1 -
2
-
3
-
4
-
5
-
6
-
7
-
8
-
9
-
10
-
11
-
12
-
13
-
14
-
15
-
16
-
17
-
18
-
 19
19 -
 20
20 -
 21
21 -
 22
22 -
 23
23 -
 24
24 -
 25
25 -
 26
26 -
 27
27 -
 28
28 -
 29
29 -
30
-
31
-
32
-
33
-
34
-
35
-
36
-
37
-
38
-
39
-
40
-
41
-
42
-
43
-
44
-
45
-
46
-
47
-
48
 |
 |
