Brother International CP60X Sewing Guide - Page 33
Piecing, the fabric that you wish to piece
 |
View all Brother International CP60X manuals
Add to My Manuals
Save this manual to your list of manuals |
Page 33 highlights
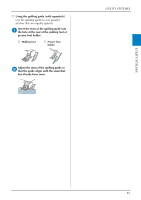
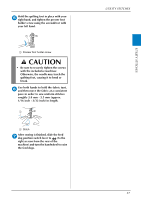
UTILITY STITCHES ■ Piecing Sewing together two pieces of fabric is called "piecing". The fabric pieces should be cut with a 6.5 mm (1/4 inch) seam allowance. Sew a piecing straight stitch 6.5 mm (1/4 inch) from either the right side or the left side of the presser foot. Baste or pin along the seam allowance of a the fabric that you wish to piece together. Attach zigzag foot "J". b Select a stitch. c * Check the stitch number on the machine's body, and set the machine for that stitch. Sew with the side of the presser foot d aligned with the edge of the fabric. For a seam allowance on the right side Align the edge of the fabric with the right side of the presser foot, and set the stitch width 5.5 mm (7/32 inch) and sew using stitch . 1 UTILITY STITCHES For a seam allowance on the left side Align the left side of the presser foot with the edge of the fabric, and set the stitch width 1.5 mm (1/16 inch) and sew using stitch . 1 1 6.5 mm (1/4 inch) Memo • To change the width of the seam allowance (needle position), adjust the stitch width. For details, refer to "Setting the stitch length and stitch width" on the Operation Manual and "Sewing an Even Seam Allowance" on page 7. 1 6.5 mm (1/4 inch) 33
-
 1
1 -
2
-
3
-
4
-
5
-
6
-
7
-
8
-
9
-
10
-
11
-
12
-
13
-
14
-
15
-
16
-
17
-
18
-
19
-
20
-
21
-
22
-
23
-
24
-
25
-
26
-
27
-
 28
28 -
 29
29 -
 30
30 -
 31
31 -
 32
32 -
 33
33 -
 34
34 -
 35
35 -
 36
36 -
 37
37 -
 38
38 -
39
-
40
-
41
-
42
-
43
-
44
-
45
-
46
-
47
-
48
 |
 |
